Developing a successful placer mine is hard. Really hard. The failure rate for rookie miners is well over 60%. At face value it seems simple, dig gravel with an excavator and wash it through a plant. The challenges compound quickly though and if you’re not ready for them you’ll be part of the 60%.
Due to the daunting task in front of them many miners look for shortcuts. The allure of an easier way has been the downfall of many would be miners. This article lists some of the common shortcuts that are guaranteed to bankrupt your placer mining operation. If you can steer clear of them you might just make it in this business.
1. Nobody has to mine
If you are in a situation where you feel that you are forced to mine in the coming season you’ve already made a big mistake. Mining should never start from a place of pressure, and when it does, the ground usually ends up teaching an expensive lesson.
If you take on debt or make commitments that push you to produce gold before you are ready, you put yourself in a weak position. Proper exploration and planning must come first. There are no exceptions. Without that foundation, you might as well be sitting at a roulette table.
Investors tend to put a lot of pressure to mine as soon as possible. If you are borrowing money to get your mine going make sure that the investors or lenders are prepared for a multi-year exploration timeline. There is no need to rush things, the gold has been there for thousands of years, you want to have solid information before you drop big money on mining equipment and large cuts.
Plenty of projects have gone sideways because the early stages were rushed or skipped. Take the time to gather good data and think things through before you turn a single bucket of dirt.
2. Seeking shallow ground
Sure, shallow ground is easier to mine, but that’s not necessarily where the gold is. This is another shortcut that comes up often. Many miners walk right past great deposits because they only focus on shallow gravels. Most people know that gold usually collects at deeper points in valleys but don’t want to take on the challenge of exploring deep deposits.
Here is a news flash for you, nature does not care about your equipment, your schedule, or your comfort. Nine times out of ten the gold will be sitting on the bedrock. If the bedrock is deep, then the gold is deep. This is why proper exploration is so important. Good testing allows you to build a mining plan that matches the deposit. Not every deposit is minable. Sometimes it is too deep or too challenging. That is the nature of the business.
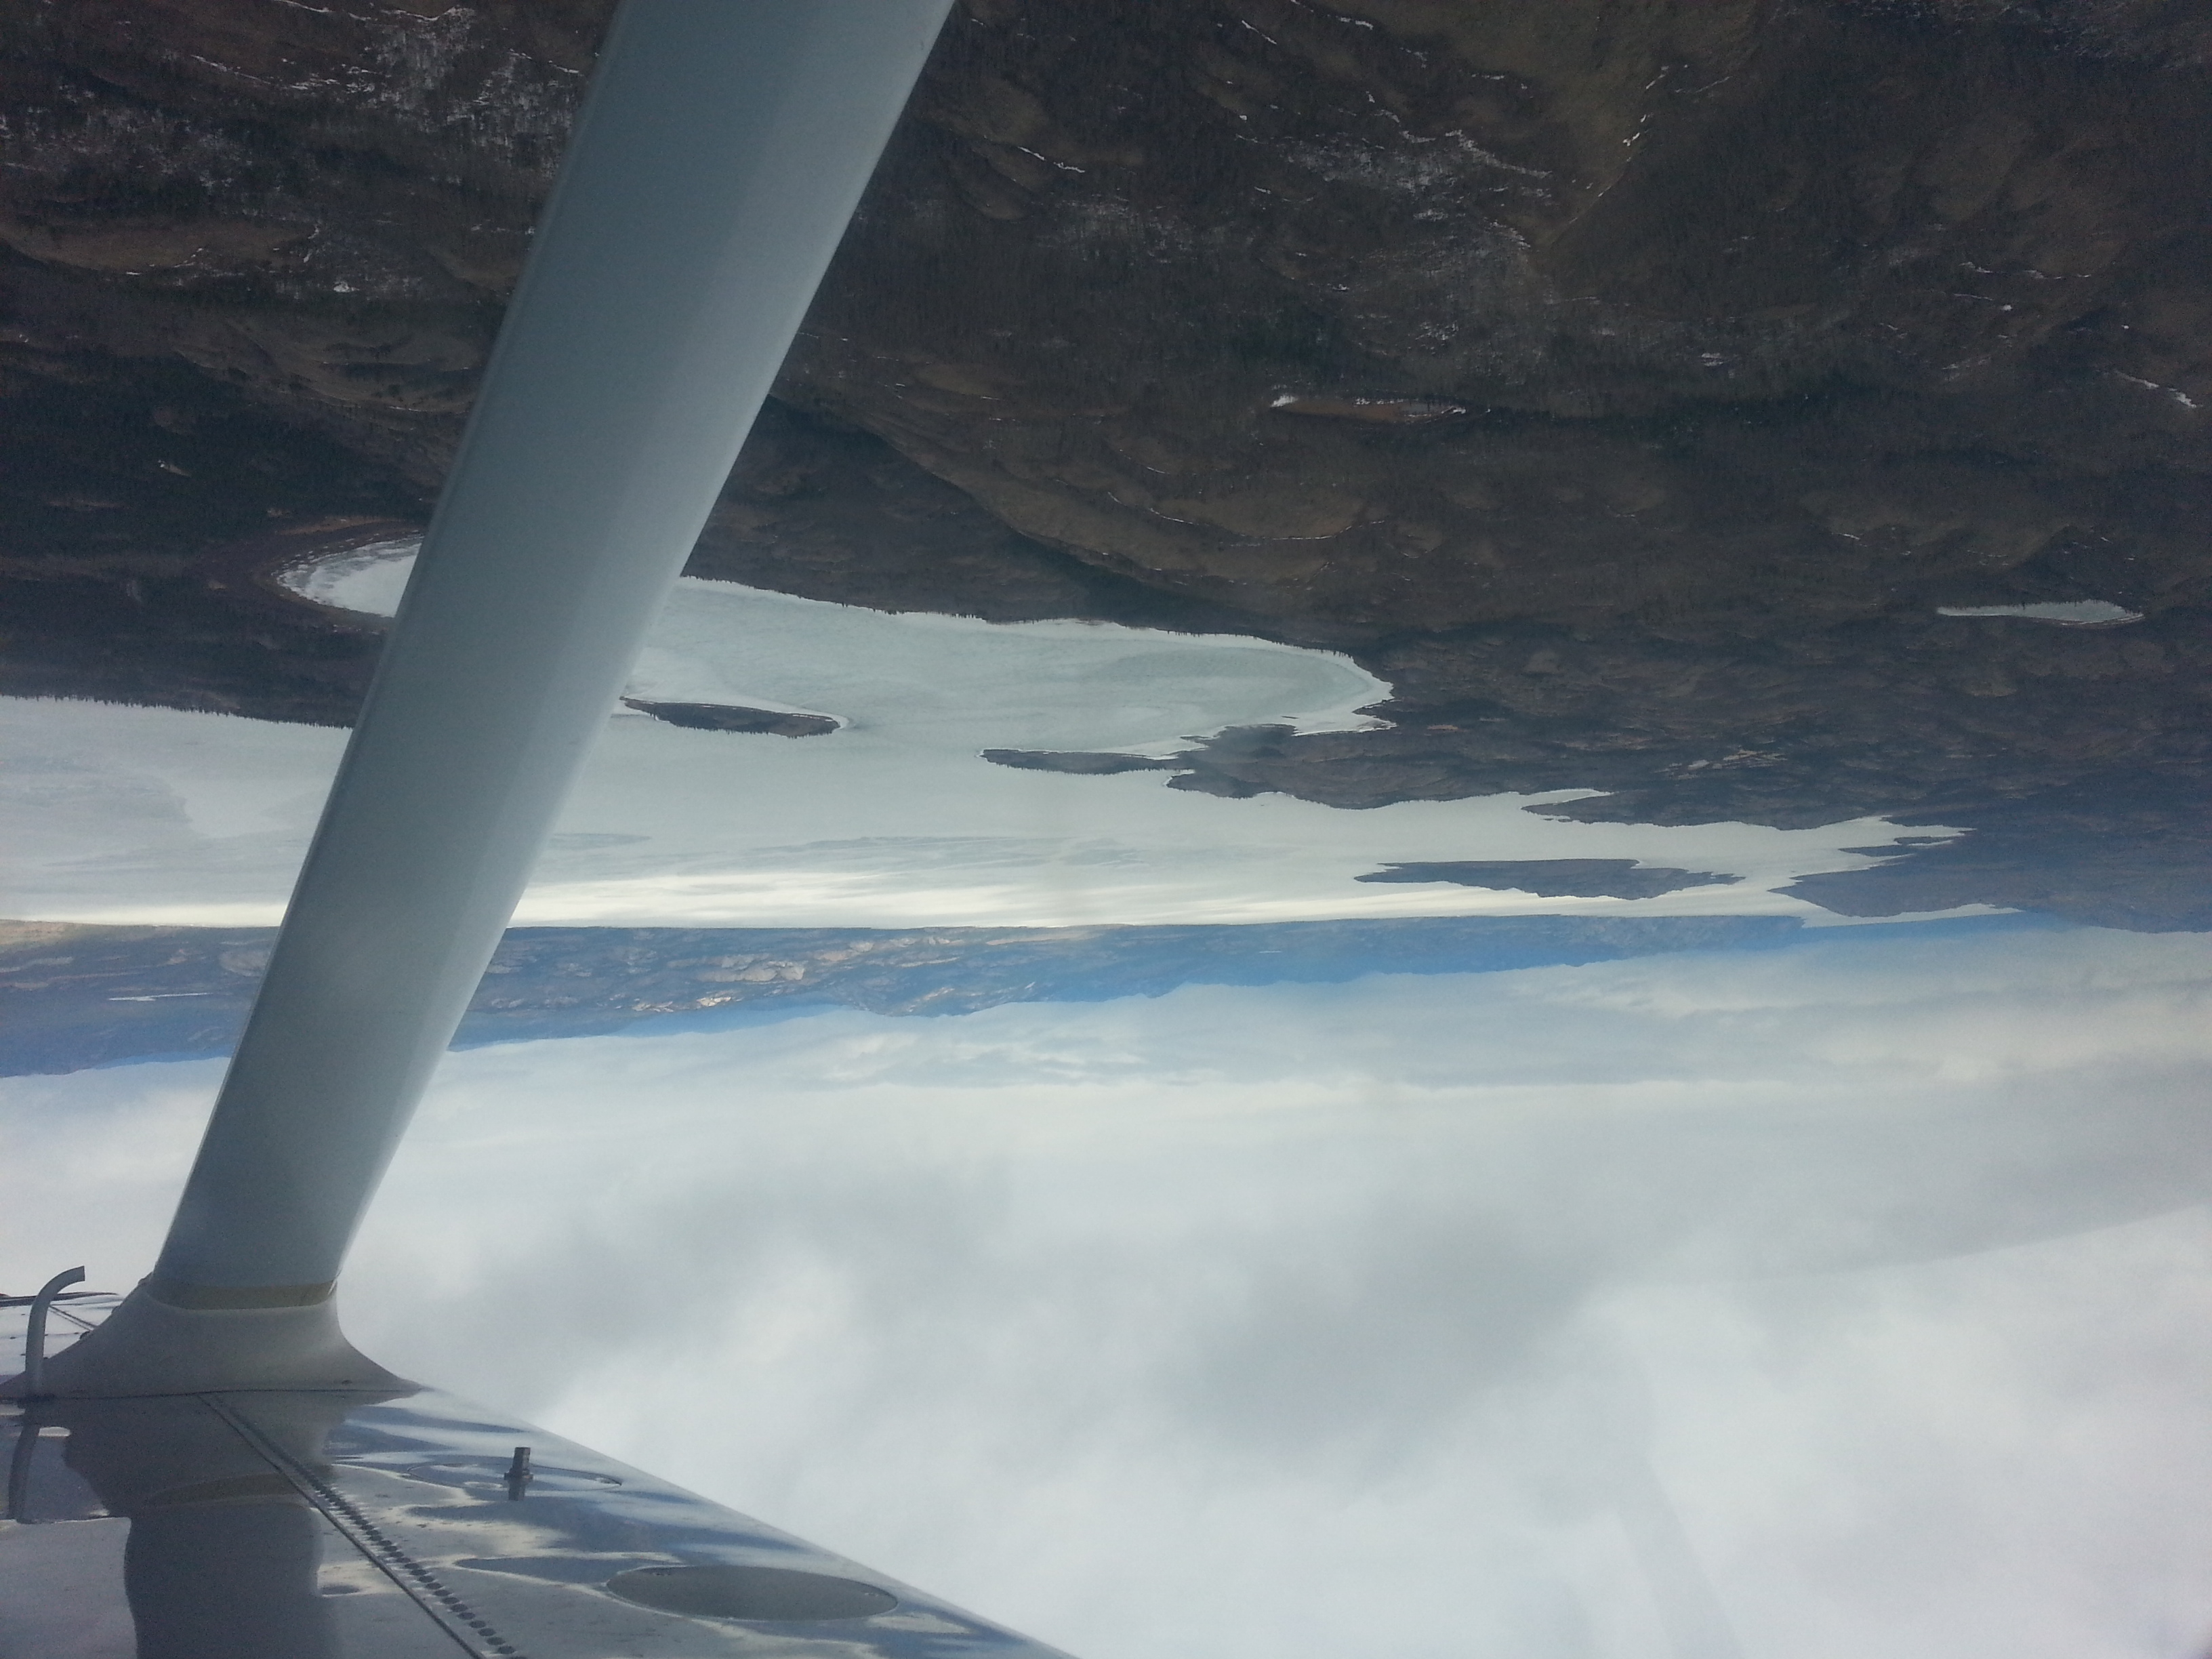
To further compound things many areas have already been partially or completely mined. Areas like the Klondike and BC’s Cariboo have seen extensive mining since the gold rushes of the 1800s. In many of those locations the easy gold is gone but there are excellent paleochannels that are yet to be discovered.
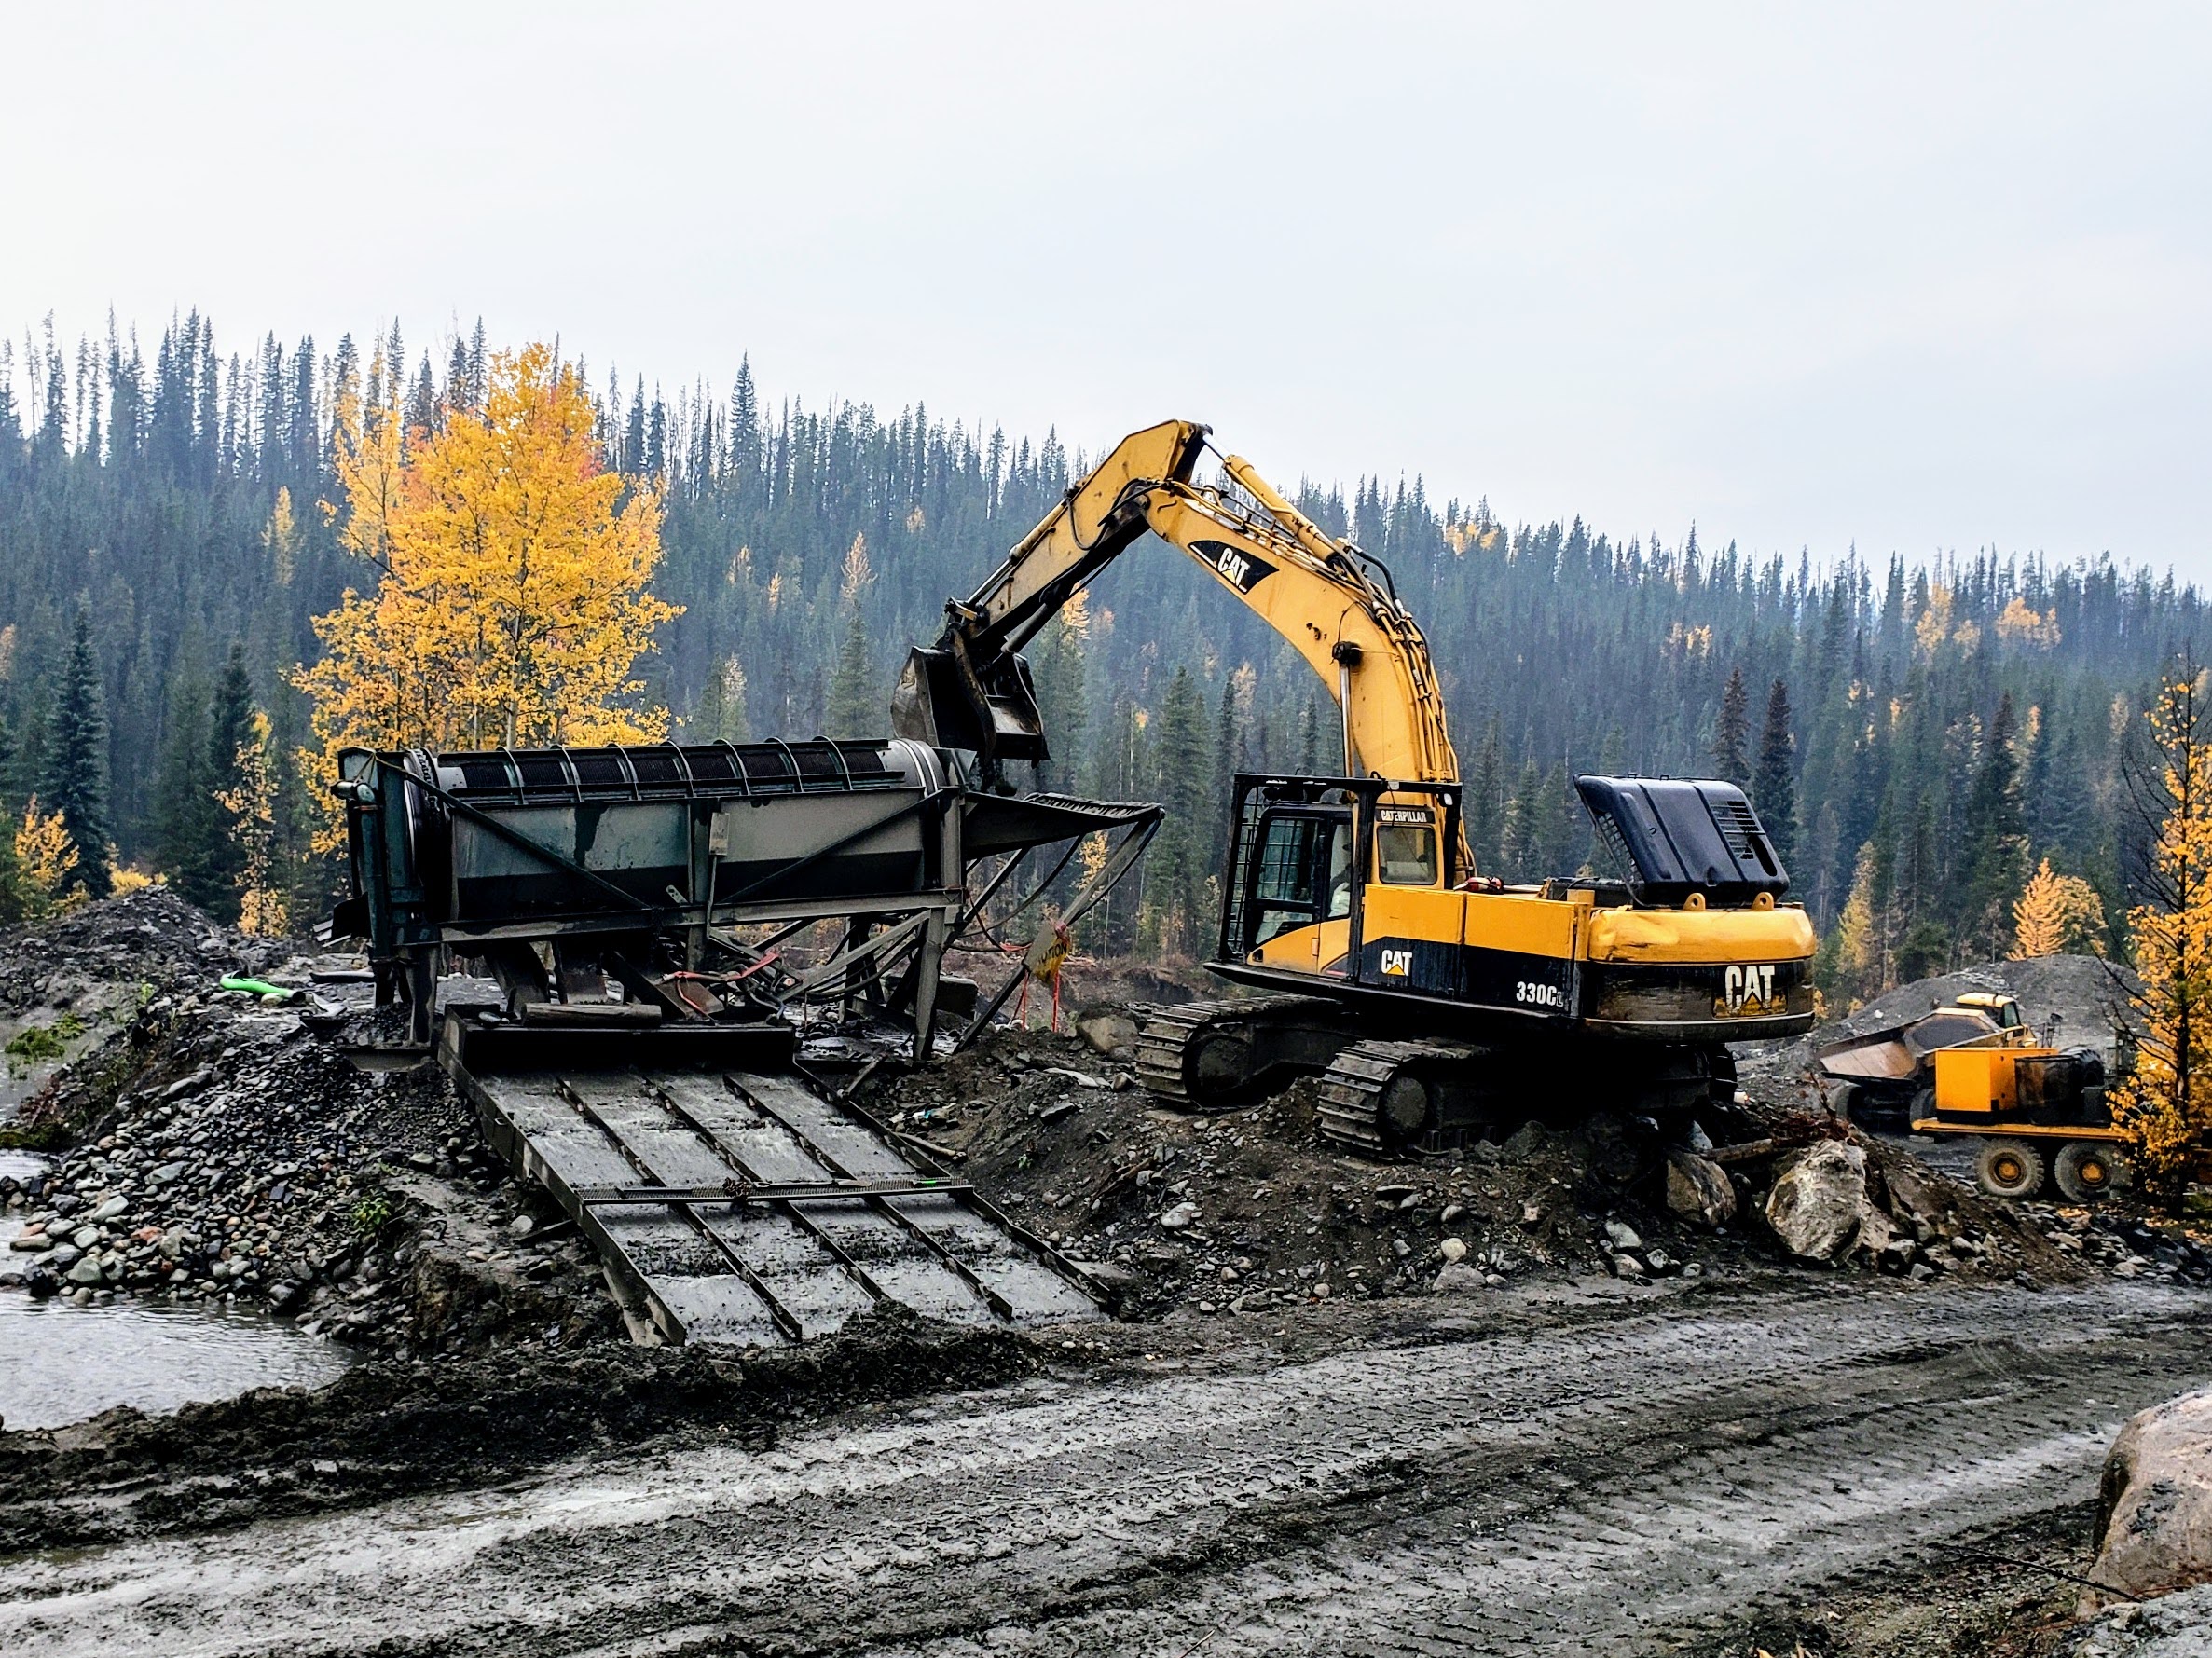
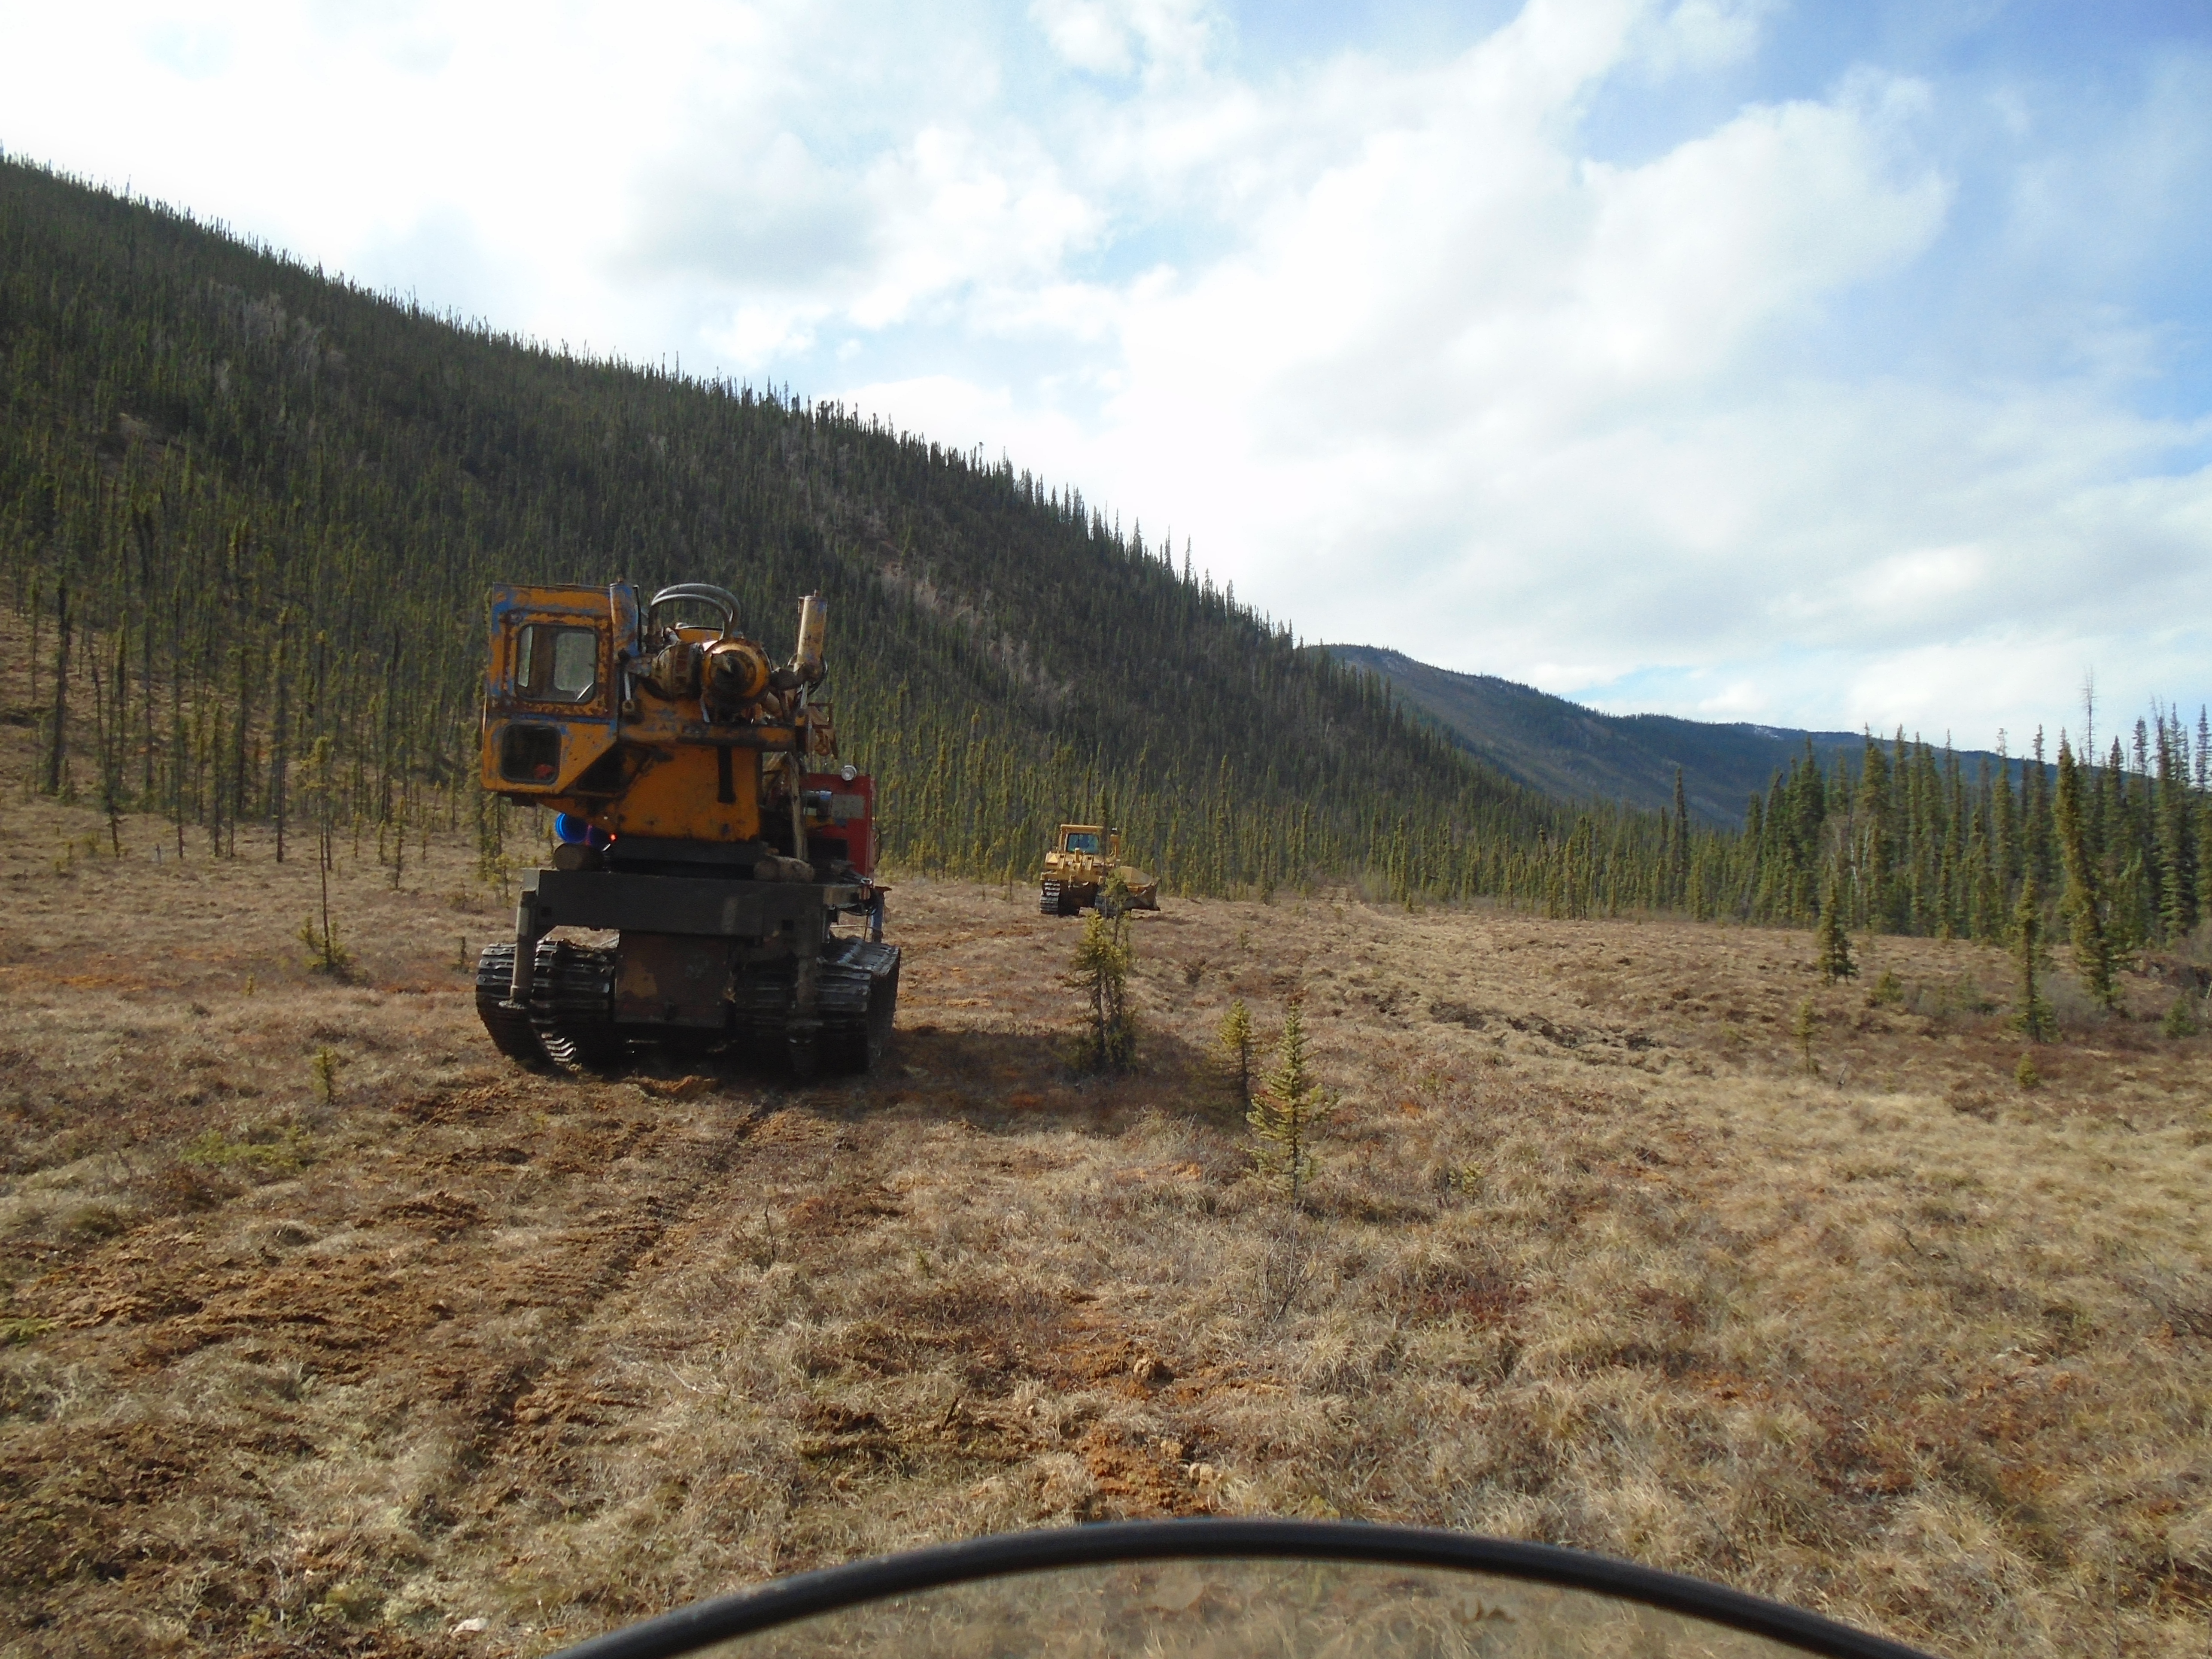
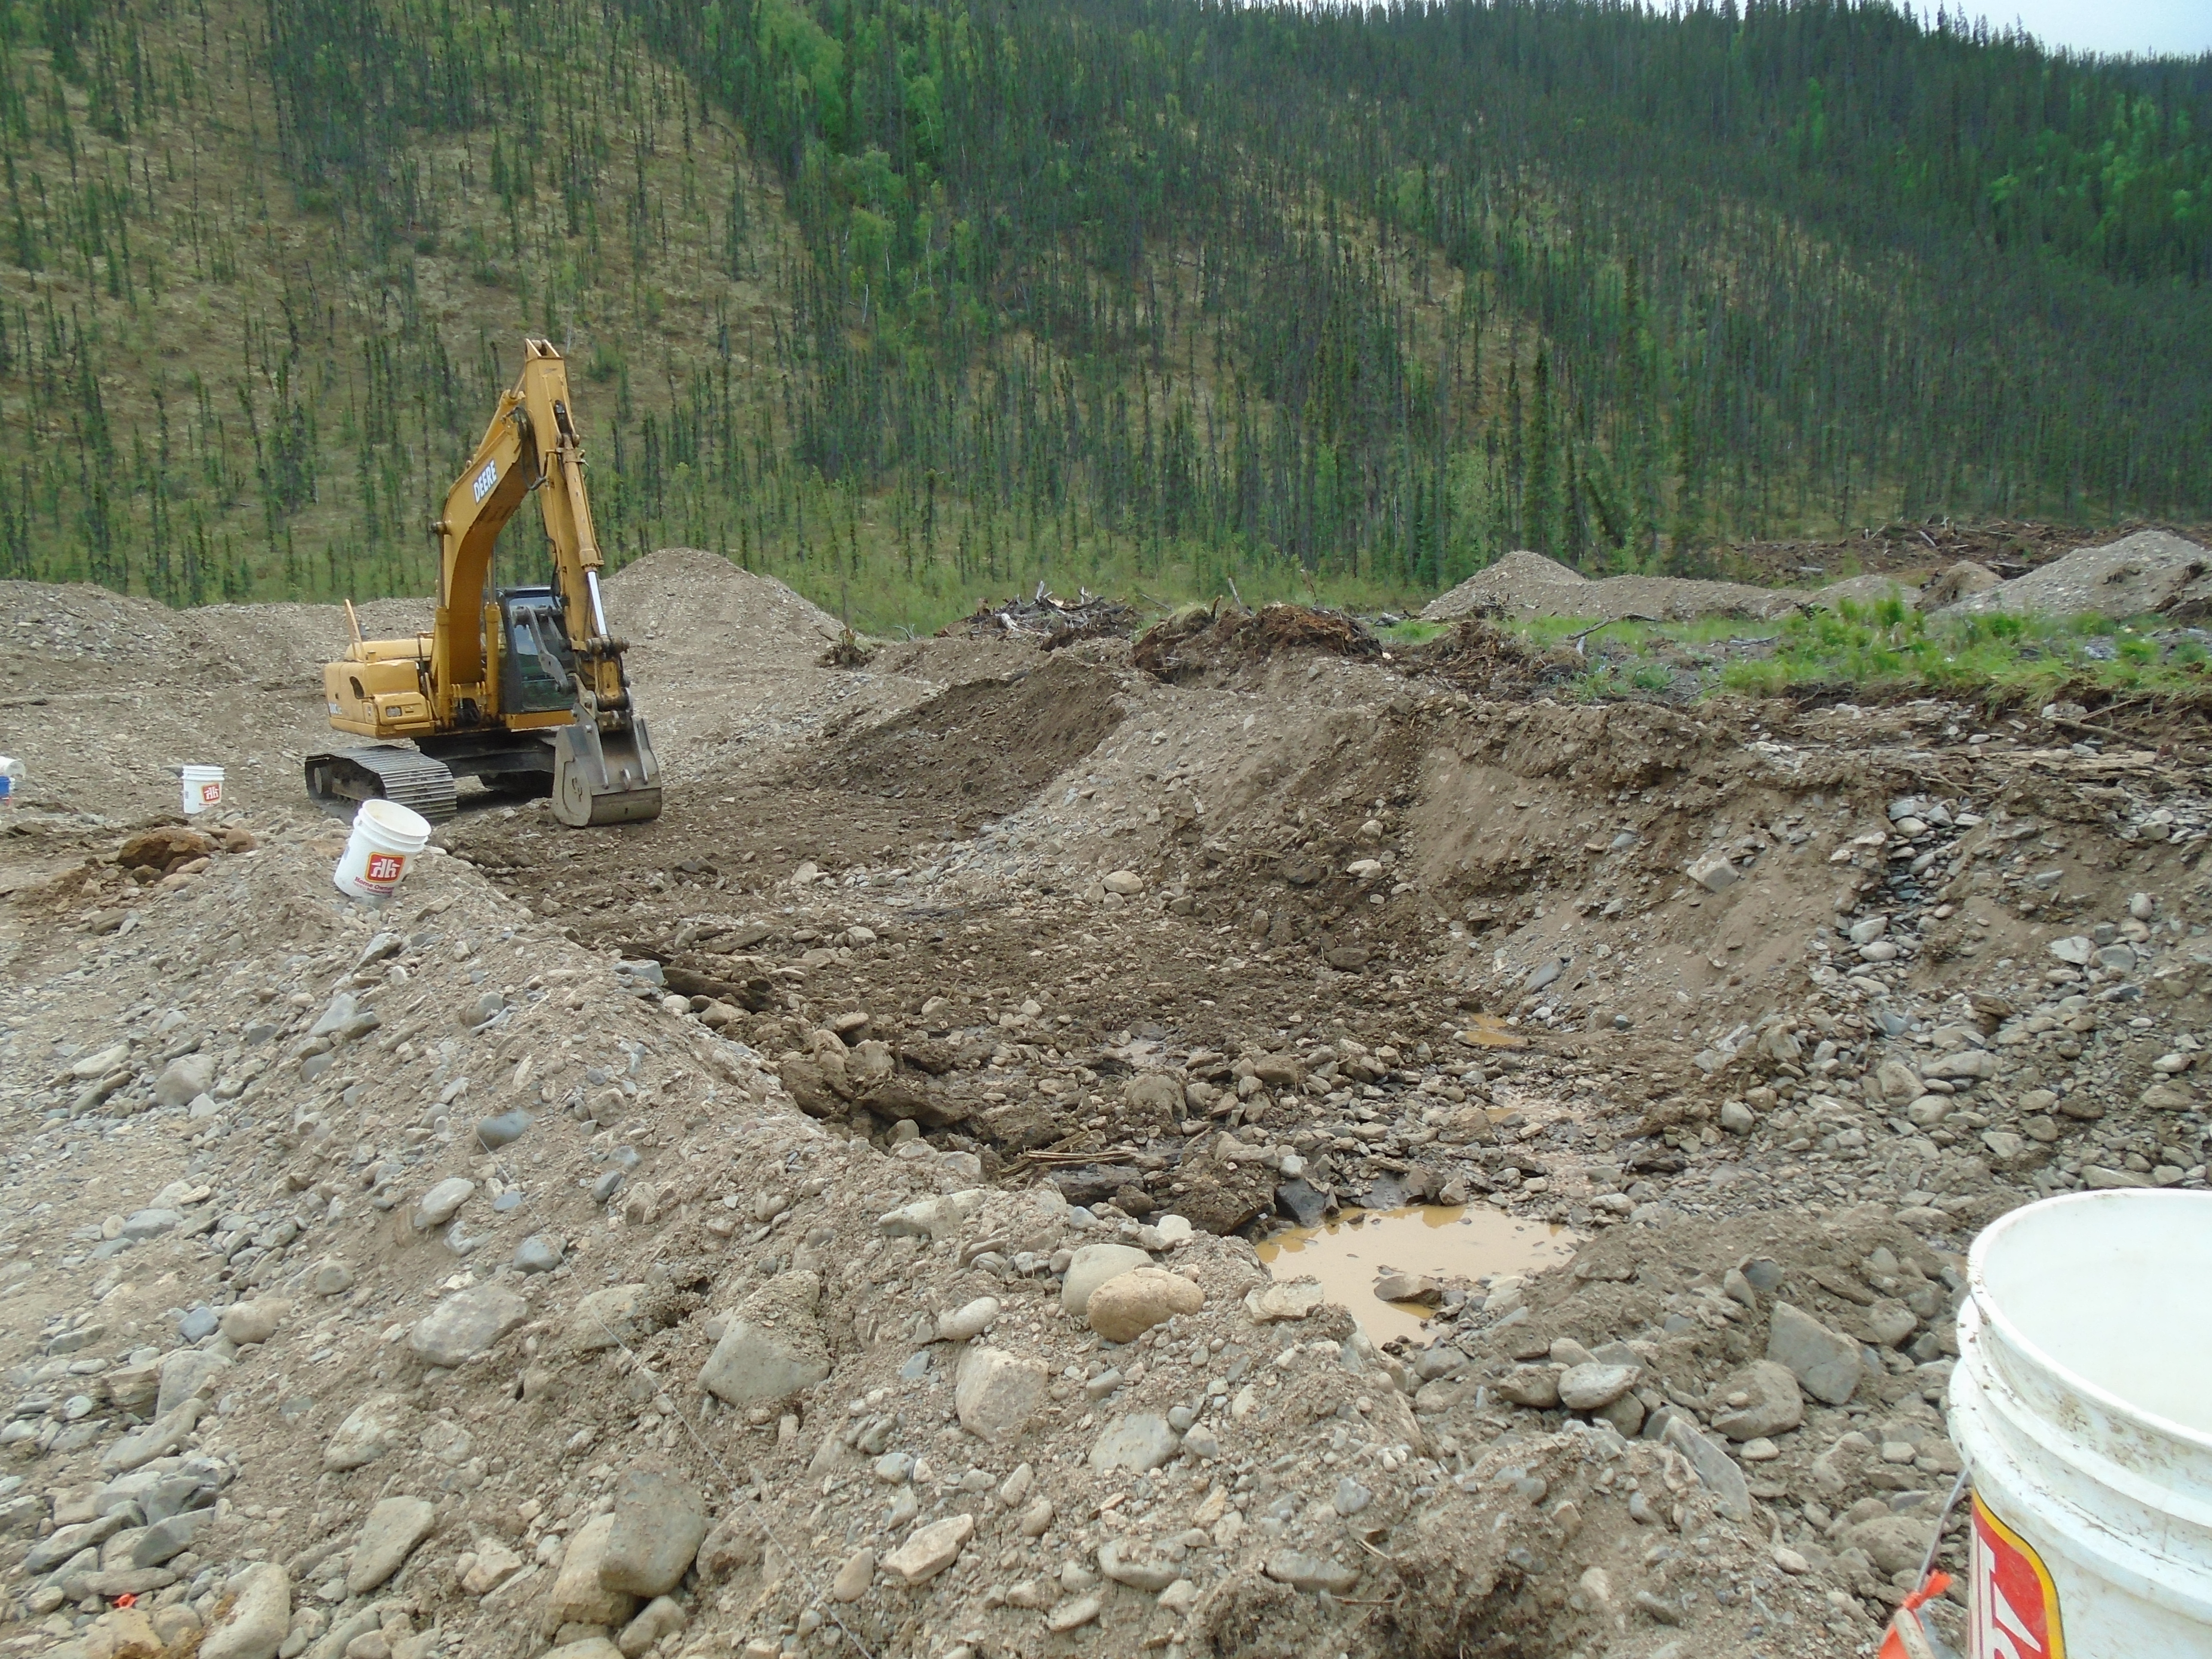
3. Buying too small of an excavator
Many miners, when scaling up from hobby mining to permitted machine mining, try to use a small excavator. This is often due to costs or unfamiliarity with equipment. There is no good reason to come in half cocked. If you are going to go through the effort of getting a permit and developing a mine, then get the right equipment.
We have seen guys work the same ground for multiple years with a Princess Auto excavator. They cannot even move the mid sized boulders. So they spend months figuring out ways to move boulders and base their whole operation around their tiny machine. Needless to say, these operations do not have much gold to show at the end of the season.
You do not always need giant equipment either. It might not be appropriate to run a 470 Hitachi. You need to choose the right tools for the job. If you are new to the game, then save up some money and get something that can actually move some dirt. Proper exploration will guide you on what size of excavators, wash plants, dozers, loaders, and other equipment you will need in your mine plan.
4. Seeking ground that fits your equipment
Many miners end up falling into a rhythm that they are comfortable with. Some guys like screen decks and belt feeders, other guys like floater barges. Some guys are comfortable with trommels and rock trucks. That is great as long as the ground allows for it.
There are many experienced placer miners who have one particular style of mining and will not stray from it. They look for ground that fits that style and ignore anything that falls outside their comfort zone. This severely limits your options, or worse, traps you in an endless uphill battle as you try to force the wrong gear to work in the wrong environment. Conditions change from valley to valley, and your equipment needs to match those conditions.
There is no single mining technique that works everywhere. For example a trommel is not always the right tool. Maybe your dad used a derocker in the Yukon, that doesn’t mean it will work in the Cariboo. Different regions have different gravel sizes, clay content, water flow, and bedrock conditions. What works well in one area can perform terribly in another.
You have to tune your system to the environment that you are working in. A good miner is able to adapt. You must build the plan around the deposit. Seeking ground that fits your existing equipment or your favored technique will severely limit your options.
5. Untested theories and fantasies
It is amazing how prevalent urban legends and rumours are in modern placer mining. Exploration is hard, and everyone is looking for an edge. Rookies and experienced miners alike fall into this trap. There are plenty of legends, hearsay, rumours, and advice to go around. Do not latch onto a story and build your whole operation around it.
For example, suppose a miner with a strong reputation tells you that they know there are 4,000 ounces sitting just over that hill. Are you going to drop everything and try to mine it? Many people do.
Tips can get you started, but they are no substitute for legitimate, rigorous exploration. I am sure you are nodding your head right now, but these types of shortcuts still manage to seduce some of the best of us. Testing, sampling, and exploration are hard and time consuming, but there are no shortcuts. If you want to make it in this business, you need to stick to your plan and be methodical. As enticing as a story might be, take it with a grain of salt. That includes your own theories. Some miners hold on to a theory for 30 years and never want to admit that they are wrong. It is OK to be wrong. Test your ideas and throw them away when they are not working.
6. Insufficient sampling
.
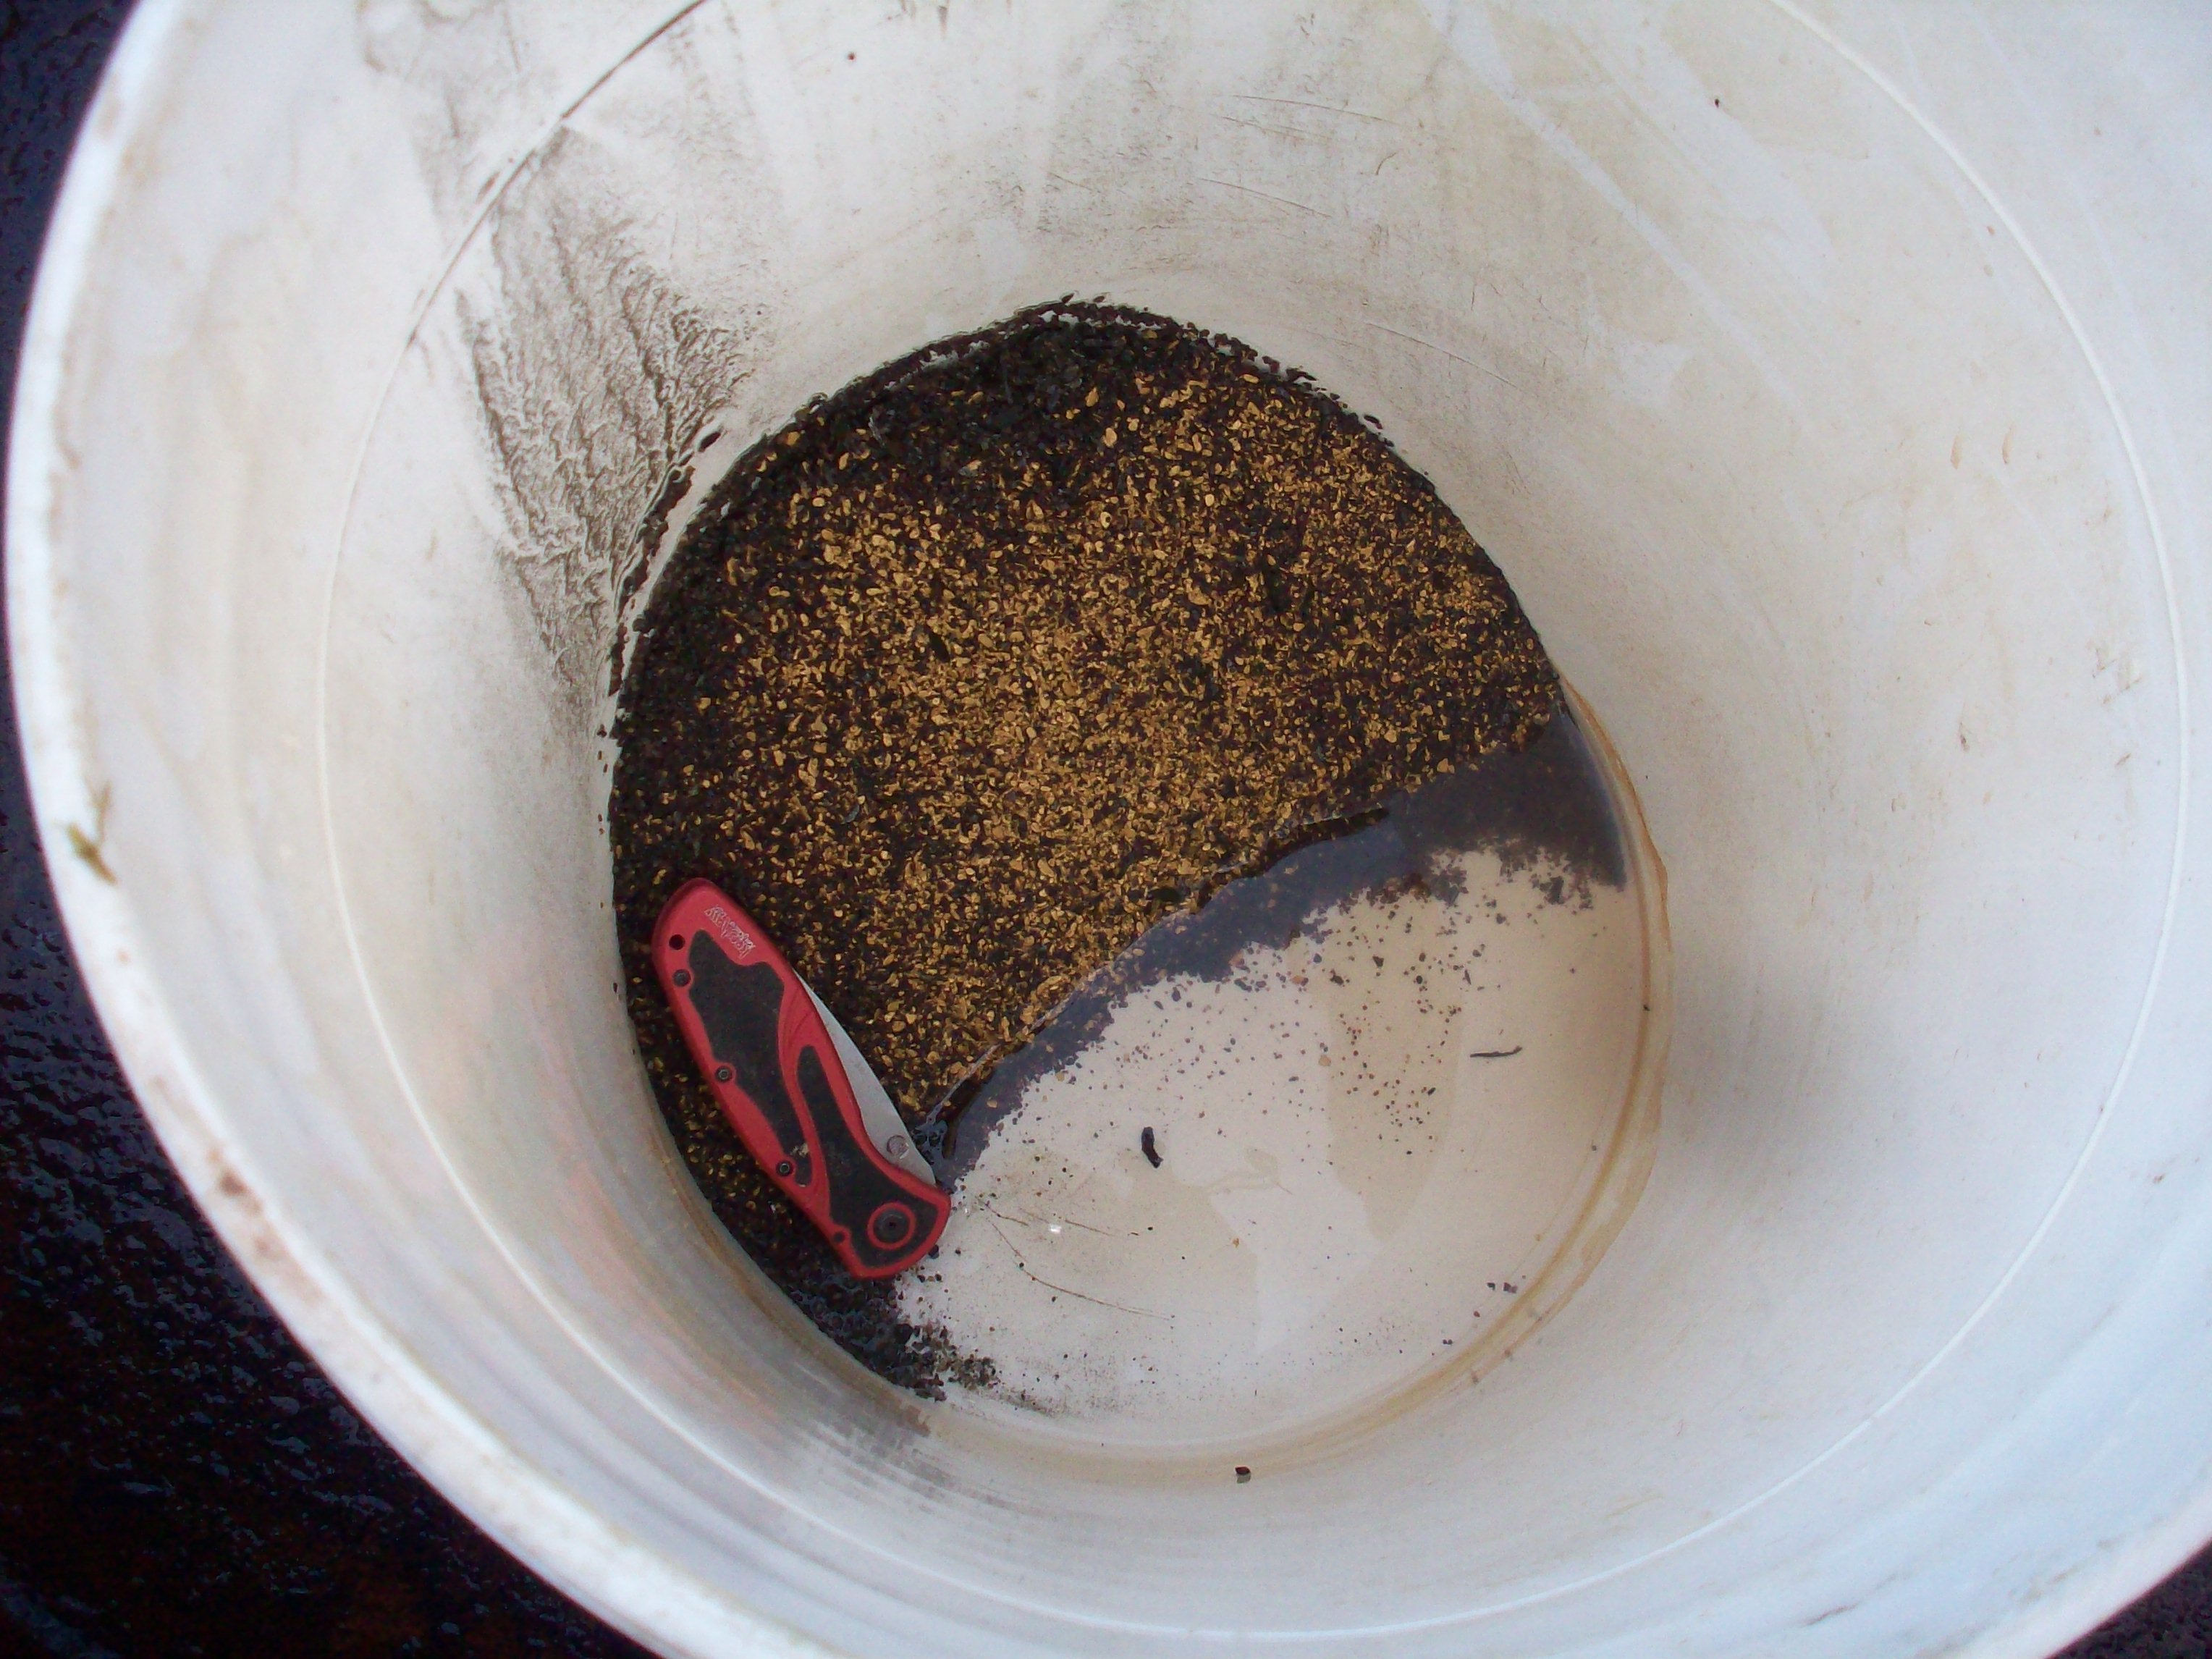
This is the big one. Sampling is hard, and you do not make money doing it. Everyone wants to see that juicy gold in their sluice box, but it takes time to get there. Gold is not easy to find, and you need enough confidence in your results before you start spending serious money.
There are plenty of stories about guys who got lucky. You are not going to be one of them. The only way to nudge the odds in your favour is to test rigorously. That includes systematic sampling, drilling, test pitting, geophysics, and bulk sampling. Two test pits are not enough, 10 test pits are not enough. Proper sampling leaves nothing to chance.
A lot of miners skip this step due to a mix of the factors above, financial pressure from investors or partners, over confidence, legends from old timers, and so on. Sampling is an investment in your future. The real skill is finding ways to manage risk while keeping some of your powder dry. It is very hard to over sample, so do not worry about that. The more information you can gather about your deposit, the better.
7. Magic Devices and sketchy data
We have worked with placer prospectors who have bet the farm on sketchy information. This often comes from a misunderstanding or misinterpretation of free government data. There are many datasets available, including regional geophysics, generalized glacial maps, airborne surveys, and broad geological summaries. These tools have value, but they do not tell you where placer gold is sitting. Some prospectors look at an aerial magnetometer anomaly or a colorful regional map and convince themselves they have found a guaranteed pay streak. That is not how this works.
Regional geophysics shows trends in bedrock, not placer gold in the gravels above it. Glacial movement maps are broad summaries and cannot tell you where pay has actually settled. None of these datasets replace sampling, drilling, or real ground truth. They can sometimes guide your thinking, but they cannot confirm a deposit.
Do not fool yourself into believing you have a slam dunk based on a pretty map or a bright anomaly. There is nothing that exists with today’s technology that can detect placer gold at scale. Anyone who claims otherwise is selling something. The only way to know what is in the ground is to dig, sample, and test. That is where the real answers come from.
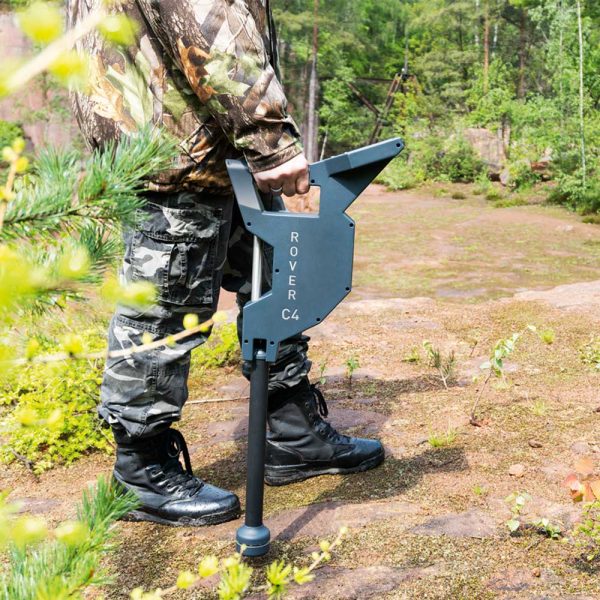
Some miners resort to magic devices that claim to detect economical gold. There are plenty of scam products on the market. One example is the OKM Rover C4. This is a fake device. It is a complete scam with several fake sensors inside an elaborate housing. There are other devices that claim to detect gold at a distance, and some claim to be enhanced dowsing tools, often called Long Range Locators or LRLs. Every single one of these is fake. Here’s a website that goes into detail about some of these devices: geotech1.com.
OKM Rover C4 Fake Device
Anything that looks like this is fake
It can get confusing because some equipment actually does work. Legitimate metal detectors are real tools. They can find nuggets under the right conditions. There are physical limits though. Even the best detectors can only reach a depth of about 8 inches on gold, and none of them can detect fine gold in gravels. If a device claims to locate gold from long distances, through the air, or without real physics behind it, it is not legitimate.
There are companies that claim they can locate placer deposits via satellite. Unfortunately there seem to be more scams today than ever. There are plenty of charlatans out there, don’t fall for it.
It is certainly possible that new technologies will be developed that will enhance our abilities of locating economical placer deposits. Once they are developed and vetted they could be game changing but you probably won’t find them on Alibaba.
Each of the shortcuts in this article comes from real situations we have seen firsthand. Every one of them has cost miners millions of dollars, and in some cases far more. The lesson that ties all of this together is simple. Take a systematic approach, follow the data, and stick to your plan.
People understand this in most areas of life, yet for some reason placer mining seems to make that discipline disappear. For example you do not see parents reaching for a scalpel the moment their child has a stomach ache. They run tests, gather information, and make informed decisions. Placer mining is no different. Keep the scalpel in the drawer and do the proper testing. With patience, a plan, and real data, you will set yourself up for success.
Prospecting for gold is an activity that has captured the imagination of man for thousands of years. There’s something about gold that grabs at our sense of adventure like nothing else in the natural world. The men and women who participated in the gold rushes of the 1800s left us with rich stories that are just as entertaining to read today as the day that they happened.
If you are the kind of person who loves the outdoors, craves adventure, and enjoys the sense of accomplishment that comes along with achieving difficult goals then gold prospecting is an activity that you should consider.
There are a lot of things to think about when starting to become a prospector. The first thing is to determine what your personal goals are. There are several different paths that you can take and each one will require different skills and knowledge.
Choose your path
Do you want to be a recreational prospector? That would mean prospecting as a hobby or pastime while still having another source of income. Recreational prospecting is a great hobby and very rewarding. As a recreational prospector you may or may not need to own a claim and the investments in equipment and training are minimal.
If you aspire to become a small-scale miner you’re going to have to invest a lot more time and money into your endeavors. You’ll need to hold your own claim and will require substantially more equipment than a recreational prospector.
Full-scale commercial miners are a whole different story. You’ll require advanced knowledge of gold deposits, exploration, sampling, and mining techniques as well as heavy investments in mining property and equipment.
In addition to the scale of mining activities that you plan to engage in you’ll have to think about what type of prospecting you want to do. There are two general types of gold prospecting Hard Rock and Placer.
Placer gold is the type that is deposited in river gravels and ancient stream beds. Hard rock gold is located in its original source, in actual rock. The prospecting techniques and methods used for placer and hard rock are totally different with very little overlap. There’s nothing wrong with wanting to explore for both types of gold.
Once you’ve set your goals you’ll be better positioned to set yourself up to reach them. It’s pretty difficult to start from scratch and become a full-scale commercial miner in your first year but that hasn’t stopped people from trying. If you are considering that path make sure that you have some people supporting you with legitimate mining and exploration experience.
Learn prospecting techniques
Different types of gold deposits require different techniques to find them. As a fledgling prospector, you won’t become skilled at all aspects of gold exploration right away. You’ll have to determine what type of prospecting you want to focus on.
To get started you’ll need to learn some basic geology and an understanding of where gold is likely to be found. You don’t have to become a geologist but it will be helpful to understand a few of the different rock types and environments where gold is commonly found in your area. Placer gold is found in creeks and ancient river channels while hard rock gold sources can occur pretty much anywhere in the right kinds of rock.
You’ll want to learn the difference between igneous, sedimentary, and metamorphic rocks. You’ll want to be familiar with minerals that occur in the same environment as gold such as quartz, pyrite, chalcopyrite, and mica. It’s important to be able to tell the difference between fool’s gold and real gold.
For hard rock prospecting, you’ll want to be able to recognize the types of environments where gold deposits form. Some common types are epithermal, porphyry, and volcanic massive sulfide. That all might sound new to you now but through research and experience, you’ll learn to recognize the signs of these different environments.
Placer gold and hard rock gold start out the same but end up being collected in different locations. Placer gold is just in-situ gold that has been eroded and concentrated in a creek or river environment. That being said, placer deposits don’t always point towards hard rock deposits and the opposite is also true.
In placer exploration one of the most important things to understand is how to read a river. That means being able to understand which parts of a creek are likely to contain concentrations of gold. Placer gold is not distributed evenly, instead, it collects in certain parts of a stream while other parts have little to no gold.
The density difference between gold, water, and other minerals is a key component of placer prospecting. Since gold is very dense it takes a lot of energy to move it, when the water loses energy the gold will stay put. Basically, gold will accumulate in sections of the creek where the water velocity slows down. For example on the inside bends where a point bar is forming, on the downstream side of obstructions in the creek, or on riffles or old channels.
You’ll need to recognize the different types of placer deposits. Not all placer gold is found in streams.
Flood Gold is found in the upper gravels of a creek or river that actively move during floods. This gold tends to be small in size and can change from year to year. Flood gold can be found right on the surface of gravel bars in many cases.
Streambed Placer deposits are located within a stream or river channel but in stationary gravels that don’t move with seasonal floods. Streambed deposits tend to have larger gold but require more work to produce. When prospecting these deposits get as close to bedrock as you can as gold will sink to the bottom over time.
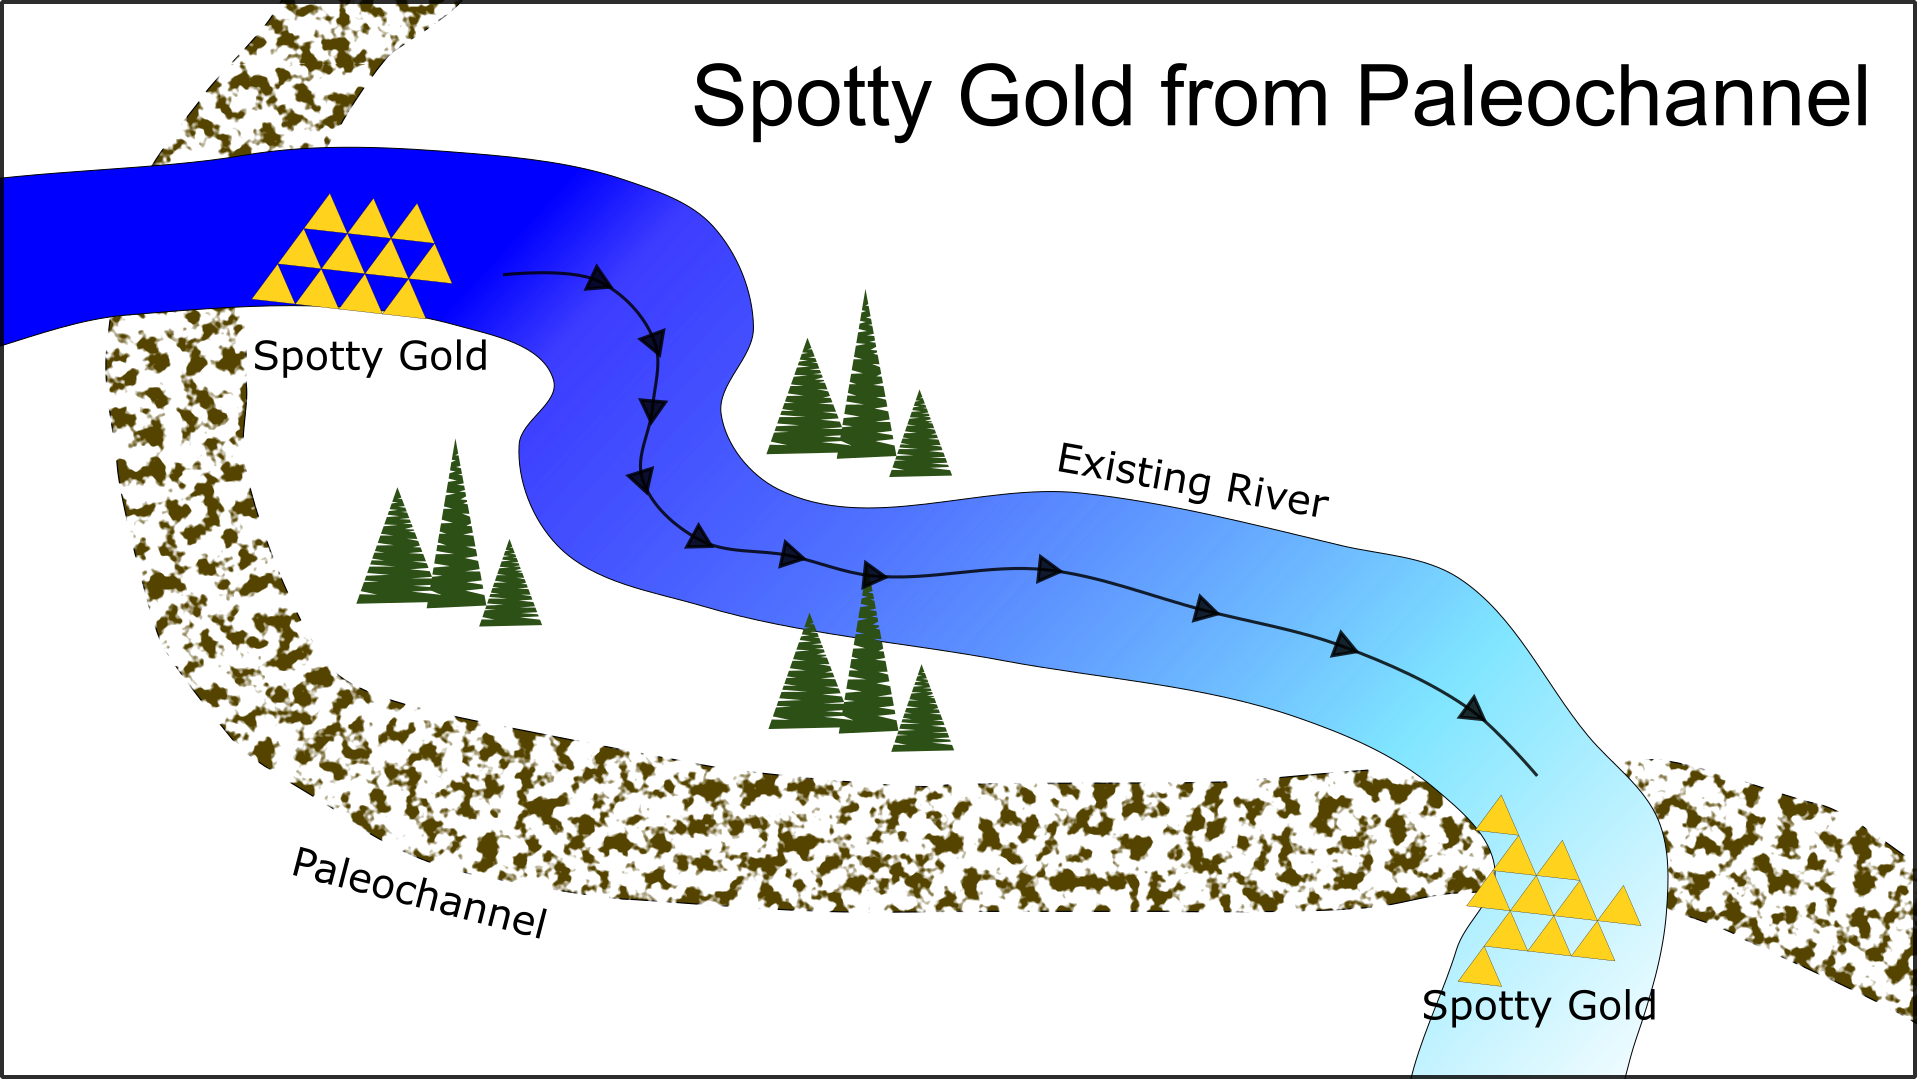
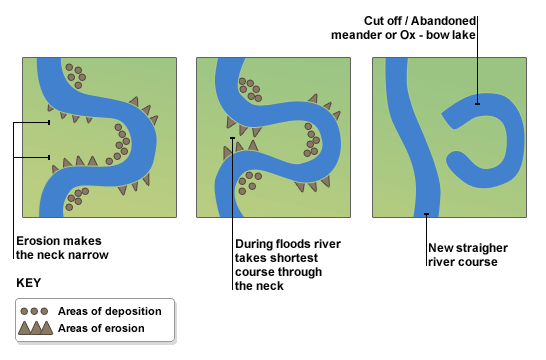
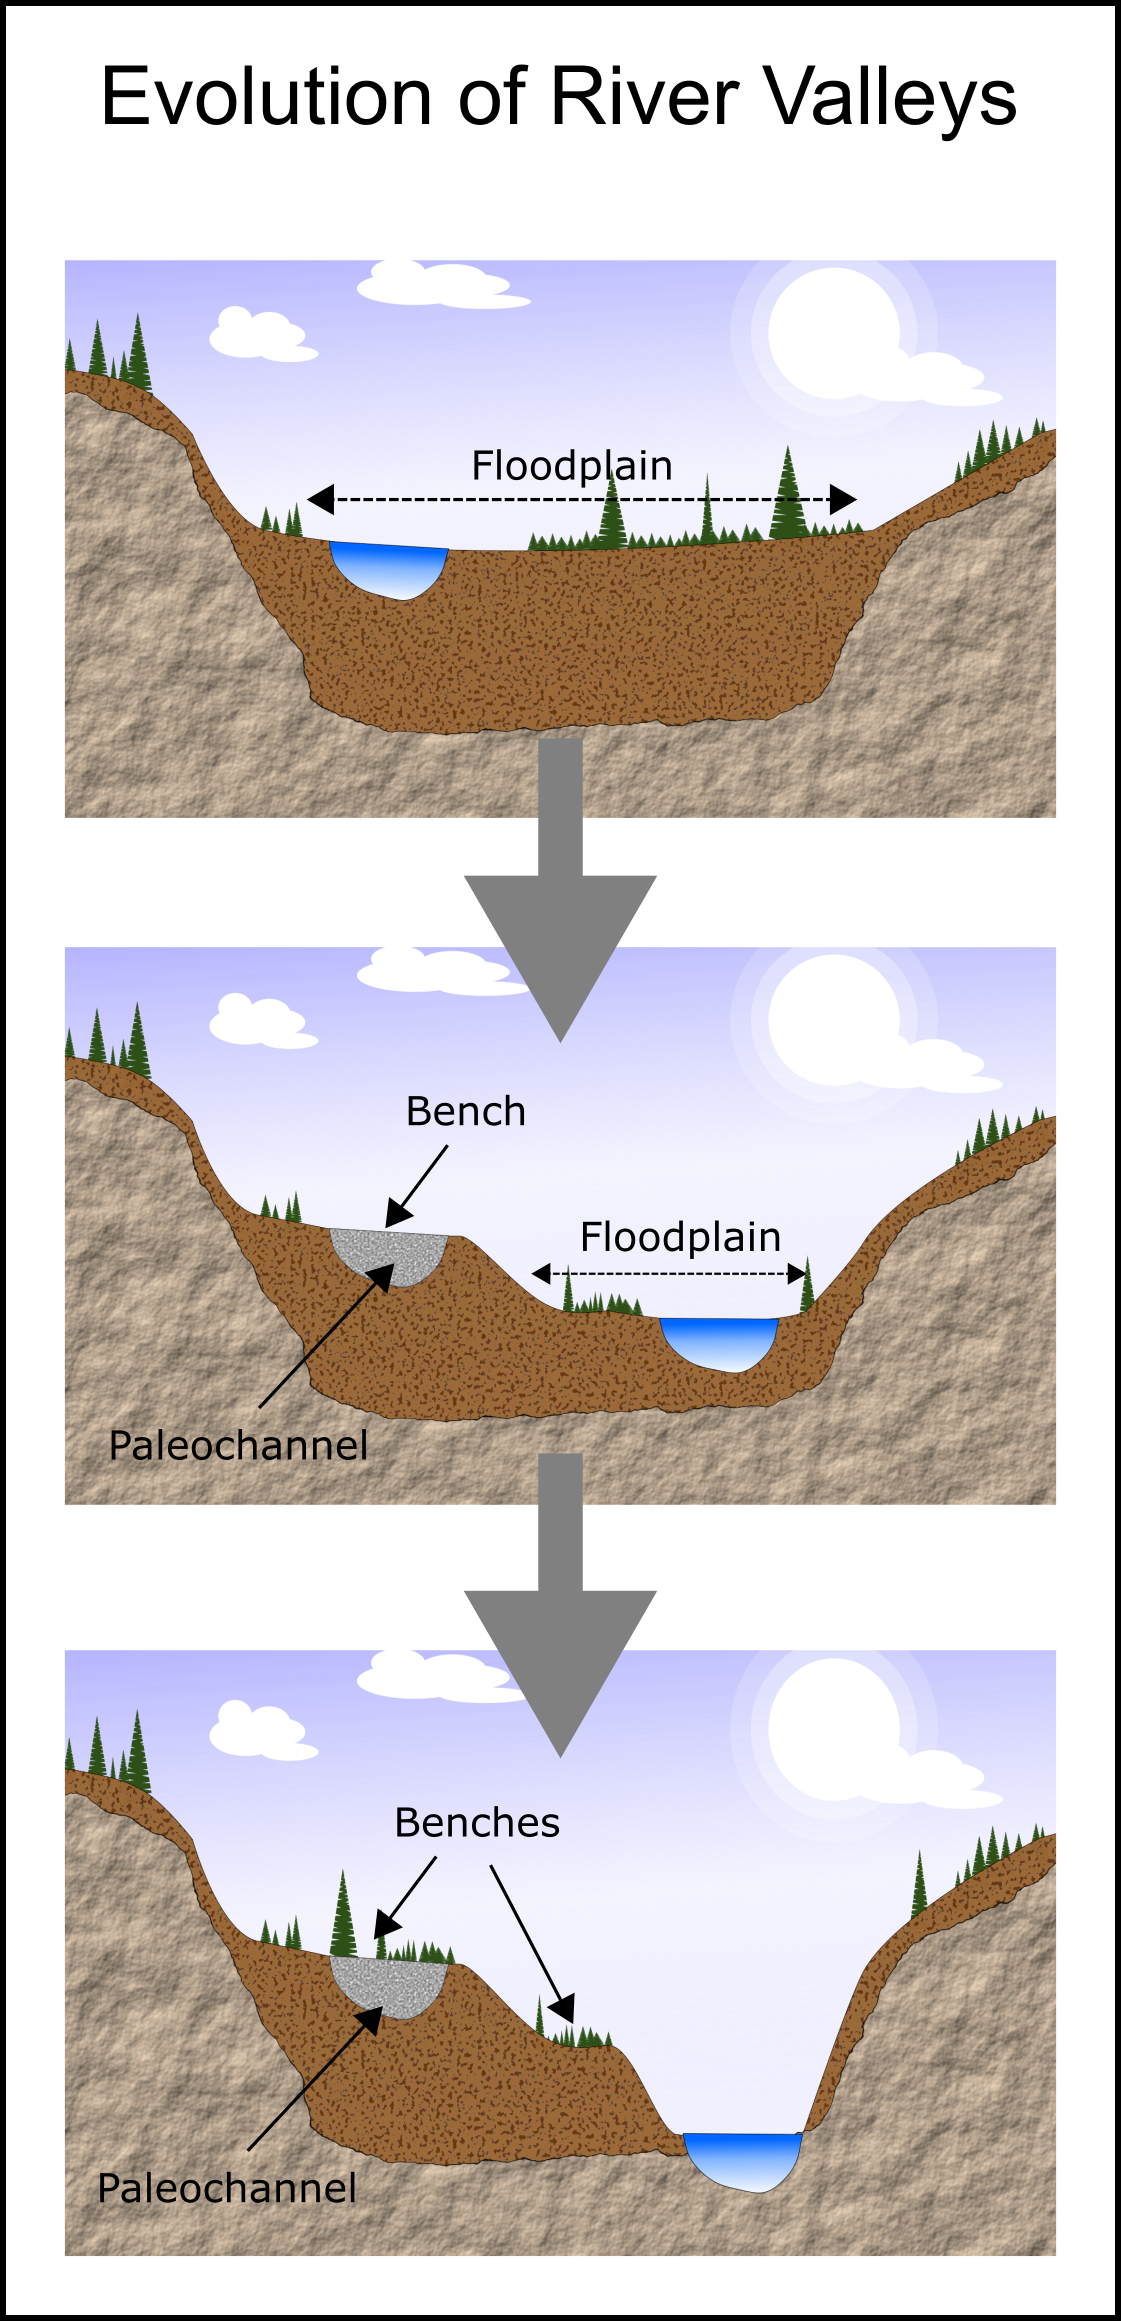
Bench Placers and Ancient Channels are remnants of old rivers that have changed course. They are basically streambed placers but the river is no longer running with water. Benches can be high above the current river and ancient channels can be in a totally different course than the river today. These are difficult to prospect but locating one of these deposits could bring you lots and lots of gold. More info on that here: Paleochannel Hunting Guide
Residual and Eluvial Placers are placer deposits that form near a hard rock source. They are formed by erosion as gold-bearing rock breaks free from its source. Gold can accumulate in the hillside in pockets. These deposits can be very rich but tend to be small in size. Pocket hunting can be lucrative for a small miner though.
Beach Placers form by concentrating placer gold due to the wave action of a beach instead of the flow of a river. A famous example of this is the deposit in Nome, Alaska which is featured in the TV reality show “Bering Sea Gold”.
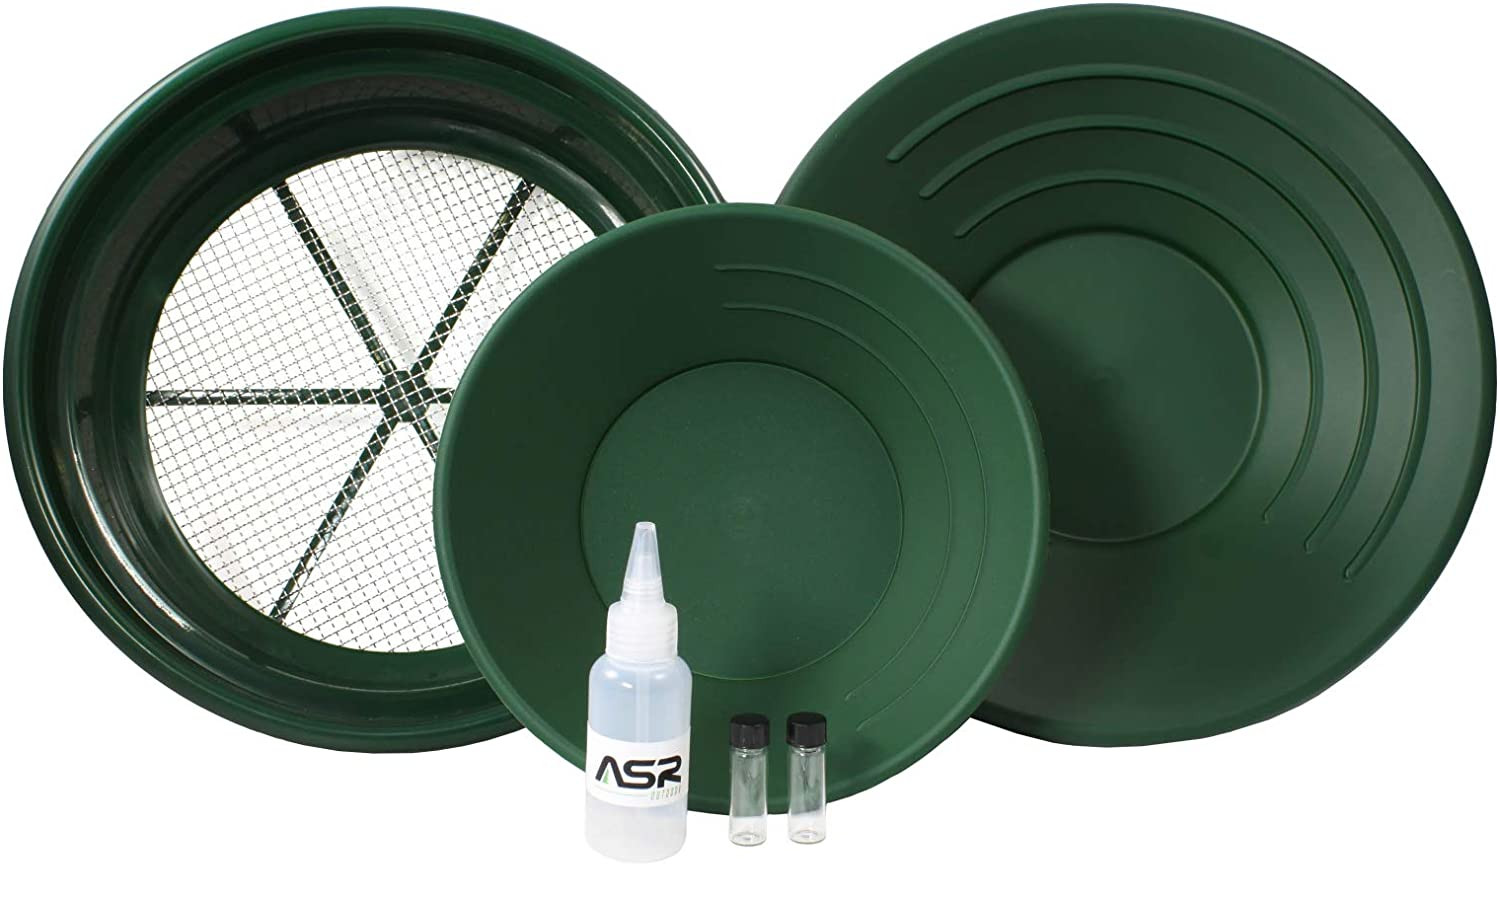
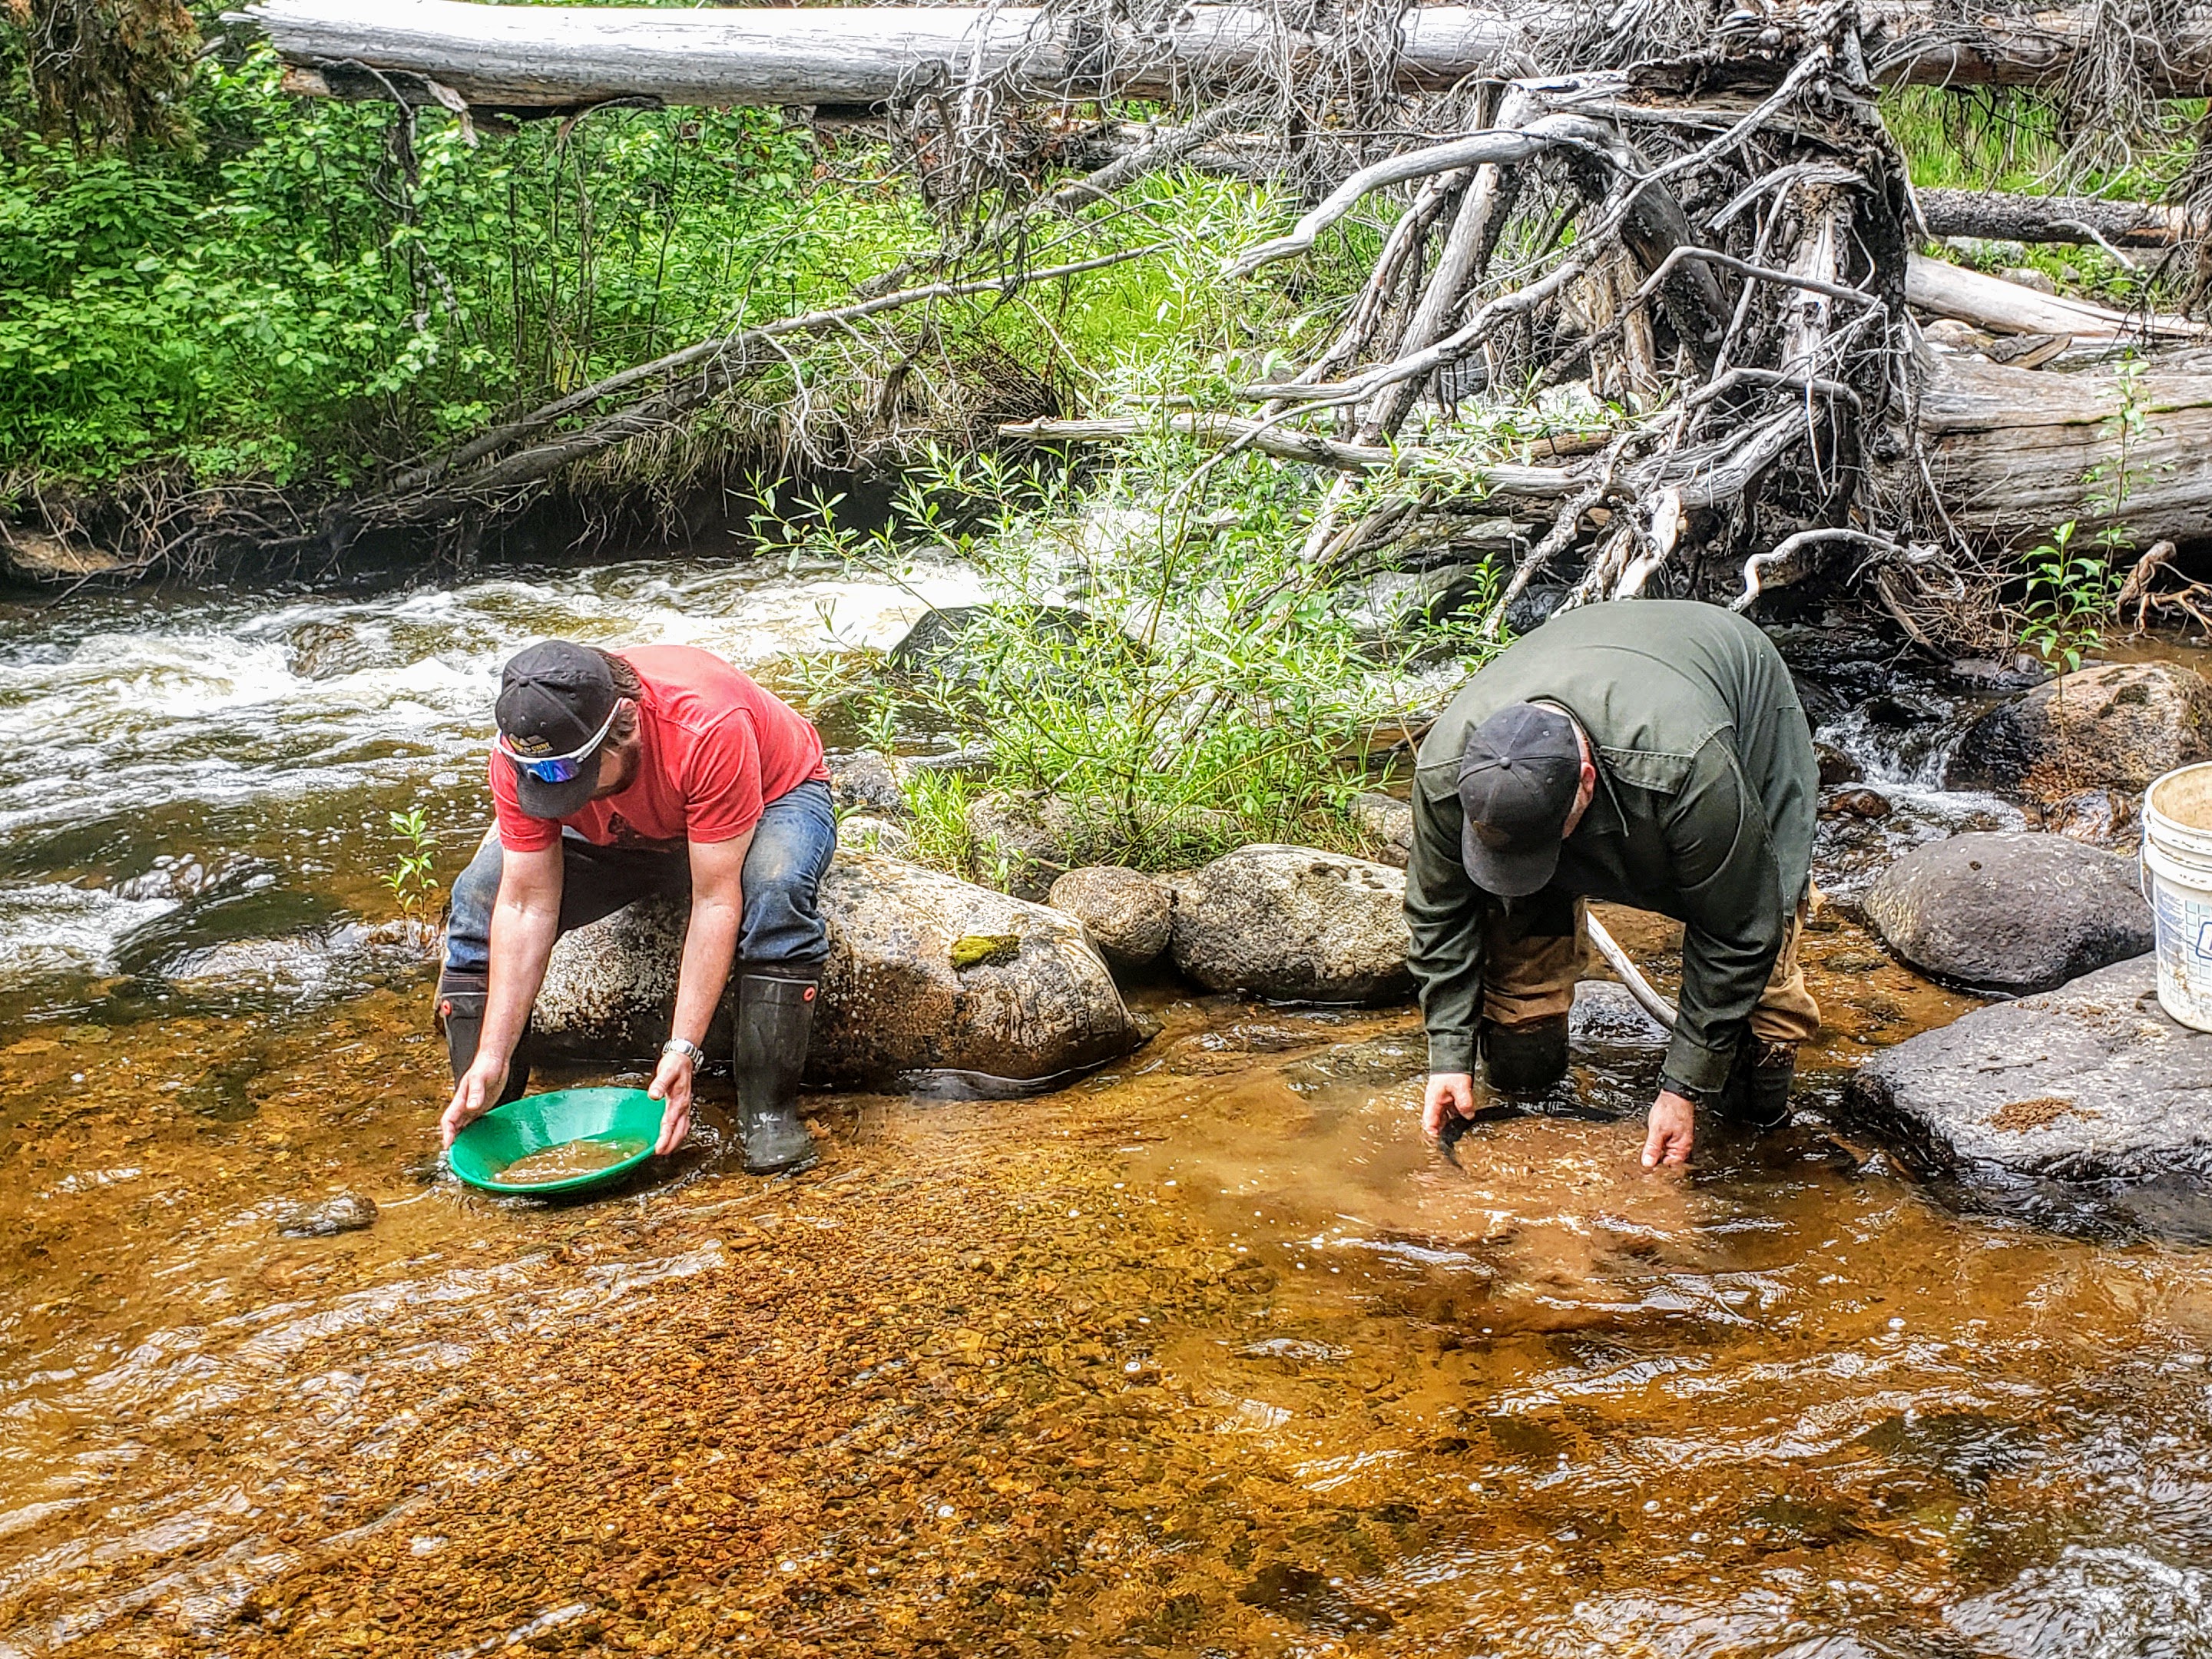
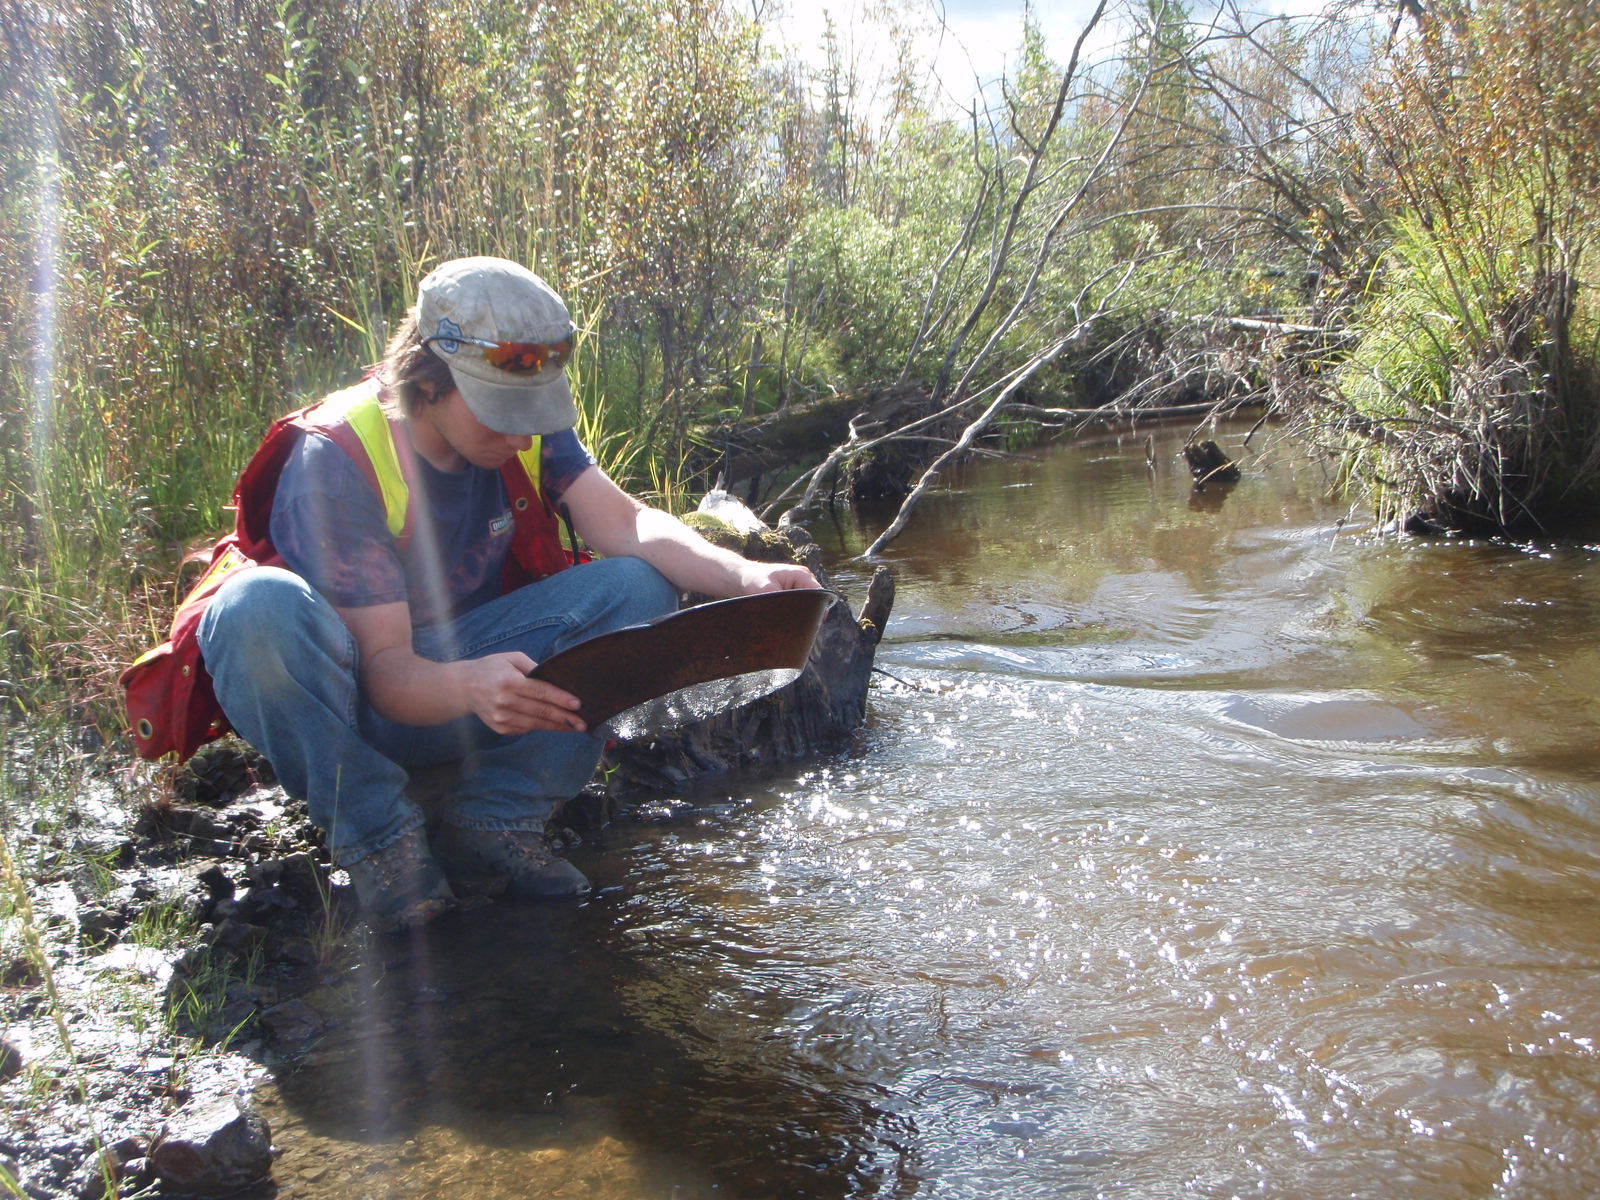
Once you’re able to recognize places where gold is likely to accumulate you’ll need to test the gravels. There is one fundamental skill that is used at every stage of placer prospecting and that is gold panning. You’ll have to spend the time to become good at gold panning. There are numerous devices available that are marketed to make up for lack of gold panning skill. No tool is more important to a gold prospector than his trusty gold pan!
Gold panning, like all placer methods, is based on the density difference of gold vs water, gravel, and black sands. When suspended in water gold will sink to the bottom of the pan. There are two steps to gold panning, agitating the material and washing away the less dense sands. As you’re panning you’ll alternate between these two steps, agitate and wash. As you’re agitating the material you’re allowing the gold to sink to the bottom of the pan, then you want to keep the gold in the bottom while you wash away the lighter material. Eventually, you’ll be left with only gold and nothing else.
Just like any skill it takes time to master. The best way to learn is to start out with lead shot. Try different sizes of shotgun pellets or BBs and mix them with gravel to practice. Once you’re able to separate the shot from the gravel you’ll be ready to try it for real.
You don’t need a lot of tools to start out. Lots of people go on a buying spree when they get started in prospecting. Don’t do that. All those extra gimmicks aren’t going to help you find more gold. Especially things like metal detectors and panning aids.
In addition to a gold pan, you’ll want a ½” or ¼” screen and a snuffer bottle. That’s all you need. The screen helps remove the larger pebbles which makes panning easier and faster. A snuffer bottle is a small plastic bottle that helps you keep your gold. It functions like a turkey baster, you squeeze it and use the bottle to suck up gold out of your pan for safekeeping.
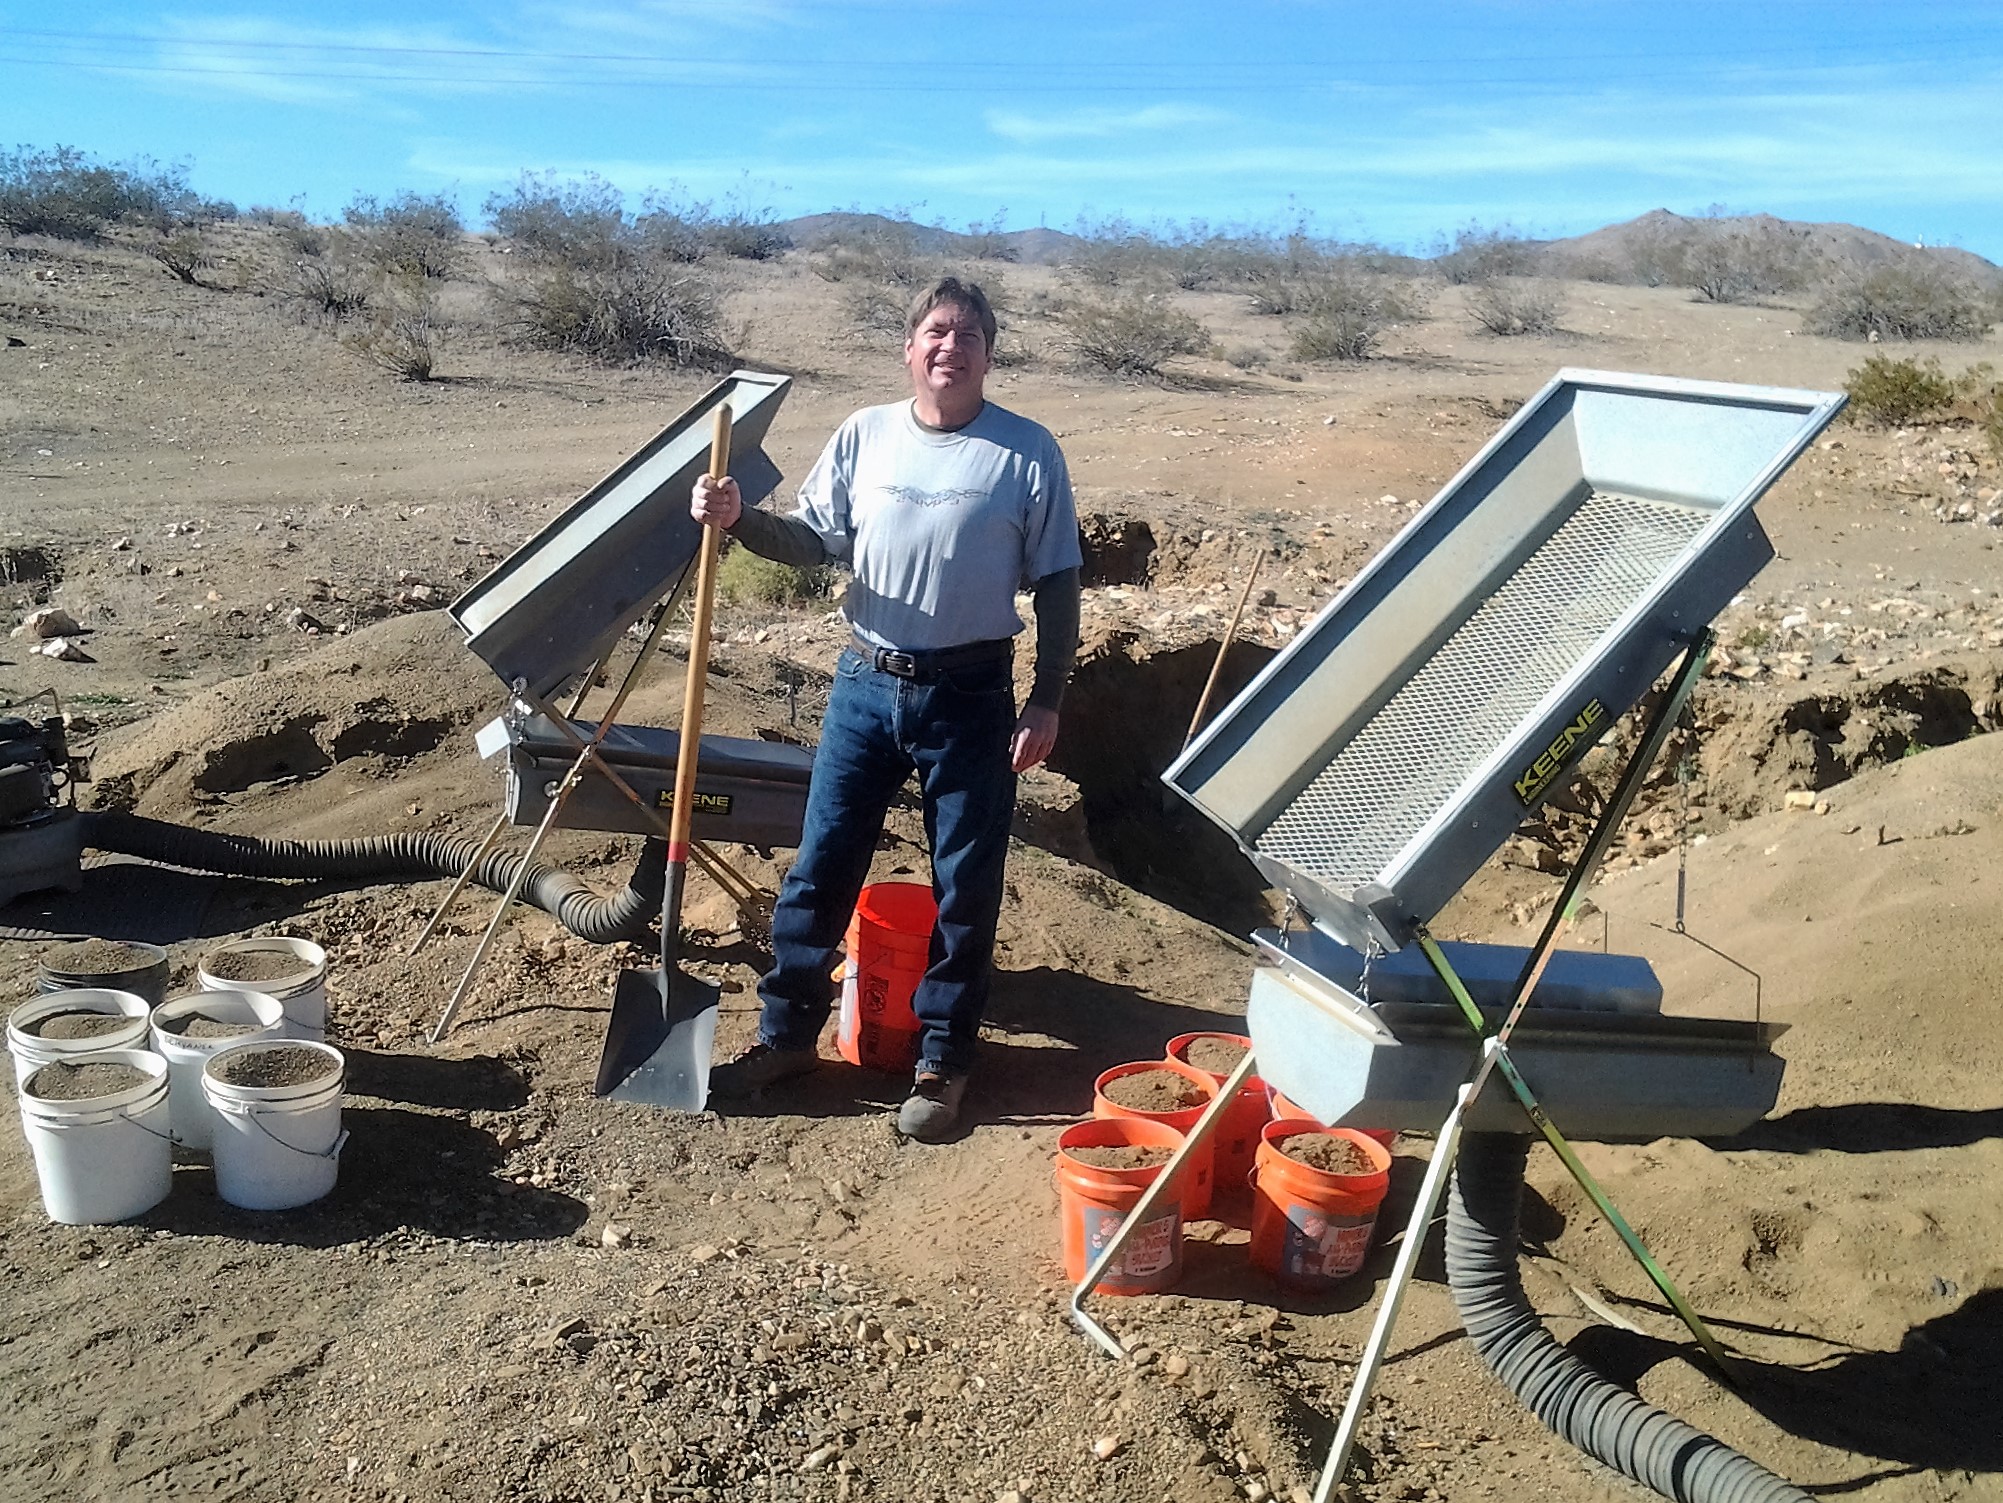
As you advance in your prospecting career you’ll find the need for additional tools. Gold pans are excellent for testing gravels and separating concentrates but sooner or later you’ll want to run larger samples and produce a bit of gold. To run larger samples you’ll need a device that can concentrate gold at a higher rate.
A sluice or highbanker is the next logical step. A sluice is a tray set at an angle with riffles that collect dense material (ie. gold). A highbanker is a portable machine with a sluice and a hopper that allows for concentrating larger amounts of material, usually between ¼ to 2 yards per hour. A high banker is the largest machine that you can run in BC without a permit, more on that below.
When it comes to larger-scale mining you’ll need to learn about exploration, sampling, and mining on a larger scale. Each of those steps requires a lot of detailed knowledge, give us a call when you get to that stage and we’ll help you out.
Stake a Claim
Once you’ve made a discovery it’s time to stake a claim. There are a lot of things to consider when deciding which claim to stake. You’ll want to consider things like location, accessibility, price, type of deposit, and several other factors before you commit to a piece of ground. You’ll also need to consider the licensing and regulations.
In British Columbia, it is necessary to hold a Free Miner’s Certificate in order to hold a claim. This certificate provides certain rights such as access to mineral lands and to tenure ownership. The history of the FMC actually dates back to medieval Europe.
In order to obtain an FMC in BC it is necessary to visit a Front Counter office in person to verify your ID. The government website can guide you through the process.
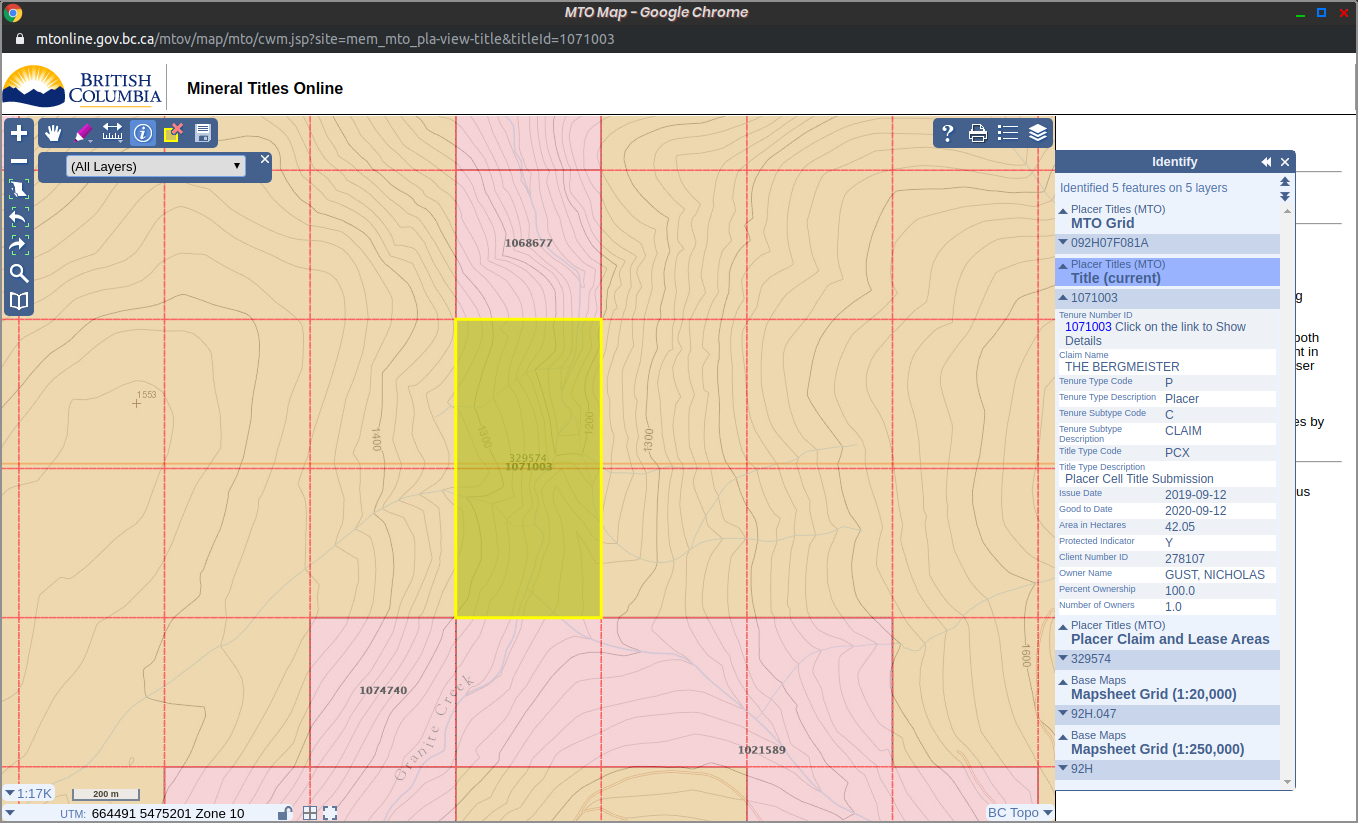
You’ll have to decide if it’s beneficial for you to stake a claim yourself or to buy one from somebody else. The cost to stake a claim is quite low, in BC it costs about $100 for each 500m x 500m cell in staking fees. This is done with BC’s online staking system. In other jurisdictions such as the Yukon, physical claim posts are still used. There is a lot of debate about which system is better but that is beyond the scope of this article.
Buying a claim from someone else is much more expensive but if that person has already done some of the exploration work it could be worthwhile. Be extremely cautious of people advertising claims with good gold on them. Since the early days of the gold rushes in the 1800s speculation and deception have been part of this business. Mark Twain famously defined a gold mine as “A hole in the ground with a liar at the top”. Today is no exception.
If you are considering buying a claim from someone else do your due diligence first. That means doing your own testing on site. Test enough so that you’re confident in the gold grades being advertised. If you aren’t confident in your ability to do that then you’re not ready to buy a claim.
Location: The location of a claim is fundamental to whether it will be successful or not. First and most importantly it must have gold on it. After all, you can’t mine gold if it isn’t there. As mentioned above you should do significant research and test an area prior to staking it. Secondly, you need the claim to be in a location that you can get to on a regular basis. If it’s located far away from your home and you can only get there once a year how will you be able to work it?
Access: Aside from the gold grades you’ll need access to the property. You’ll have to decide what kind of access is necessary. If you want to be bringing in equipment you’ll need some kind of road access. Some newly discovered areas don’t have roads but you’ll need to decide how adventurous you want to get and how much development work you’re willing to do on your own. You’ll also want to determine the access to water and if you can get down to the creek or not. Is the claim in a canyon, or on top of a mountain?
Type of Deposit: as we discussed above there are different types of placer deposits. An area that you are considering claiming could have a creek, or it could be on a high bench with no water. It could be a beach placer or even high up on a mountain. All of these areas could host a viable gold deposit but you’ll have to decide if your skills and ambition are a match for the task at hand.
History: the mining history in the area is also important. You don’t want to buy a claim that’s already been mined out. It’s important to make sure that there’s still some gold left for you. There are scenarios where historical miners make mistakes or had poor prospecting techniques and left lots of gold behind. Sometimes that can be due to superstitions or insufficient funds. It’s also important to not get caught up in urban legends or miner’s tales about the area.
Other Land Owners: a mineral or placer claim gives you the rights to the hard rock or placer minerals within the boundaries of your claim. It does not give you ownership of the land. Someone else could own private property in the same location, other parties could have the forestry rights, traplines, or there could be things like a power line or pipeline right of ways, gravel pits or indigenous land. There are also provincial parks and other types of land ownership such as legacy claims and crown-granted claims to look out for. As a claim owner you have certain rights to access and develop your claim (even if it’s on private property in many cases) but the less conflict you have the better.
Ownership of a claim gives you certain privileges but it also comes with responsibilities. A claim will require upkeep in the form of assessment work or payments in lieu. You’ll also need permits for advanced work and mining which require a lengthy application process and first nations consultation in most cases. Spend the time to properly research and test a claim before you take the plunge, especially if you’re considering spending a lot of money on it.
Learn the Regulations
No matter what scale of gold prospecting you are going to engage in you’ll have to learn the rules and regulations. Now that’s easier said than done. In most jurisdictions, the rules are not readily available, especially in British Columbia. The major rules are usually somewhat easy to find but they are always ripe with exceptions and open to interpretation. Unfortunately, the mining regulations in BC are based on a patchwork of laws and there is no manual or anything that clearly summarizes the rules. Just like any law though ignorance of the law is no excuse for breaking it.
In BC, the rules regarding mining claims and land access are covered by the Mineral Tenure Act. You can access the regulations here: Mineral Tenure Act
The BC Ministry of Mines (or The Ministry of Energy, Mines, and Low Carbon Innovation if you want to use their full name) has put out a good summary of the rules for small-scale mining without a Mines Act Permit called Bulletin #38. You can access that document here: Permissible Activities without a Mines Act Permit
Other acts that regulate mining activities are the Mines Act, the Mining Right of Way Act and the Water Sustainability Act. The MTO website has links to the actual legislation behind those acts: BC Mining Legistlation
Small scale mining without heavy equipment is permitted in BC under the conditions in Bulletin #38. Larger work programs require permits from the Ministry of Mines and are subject to additional regulations.
There is no guidebook to the BC mining laws. It would be nice if the government could put together a book as they have for studying for your driver’s license. Unfortunately no such document exists. The Atlin Placer Miner’s Association put together a document called the Atlin Placer Mining Best Management Practices Guidebook, which was an attempt to create a guidebook.
This article is a brief overview of how to get started in placer mining. This is by no means a comprehensive guide. Each of the points mentioned in the article should be followed up on. Hopefully we answered some of your questions though.
There’s always more to learn and a good prospector will always be learning. Even experts in the field welcome the opportunity to learn a little bit more. The best advice we can give is to be patient, pay attention and hopefully you can find an experienced prospector to work with. The best way to learn is to work with someone who already has the knowledge.
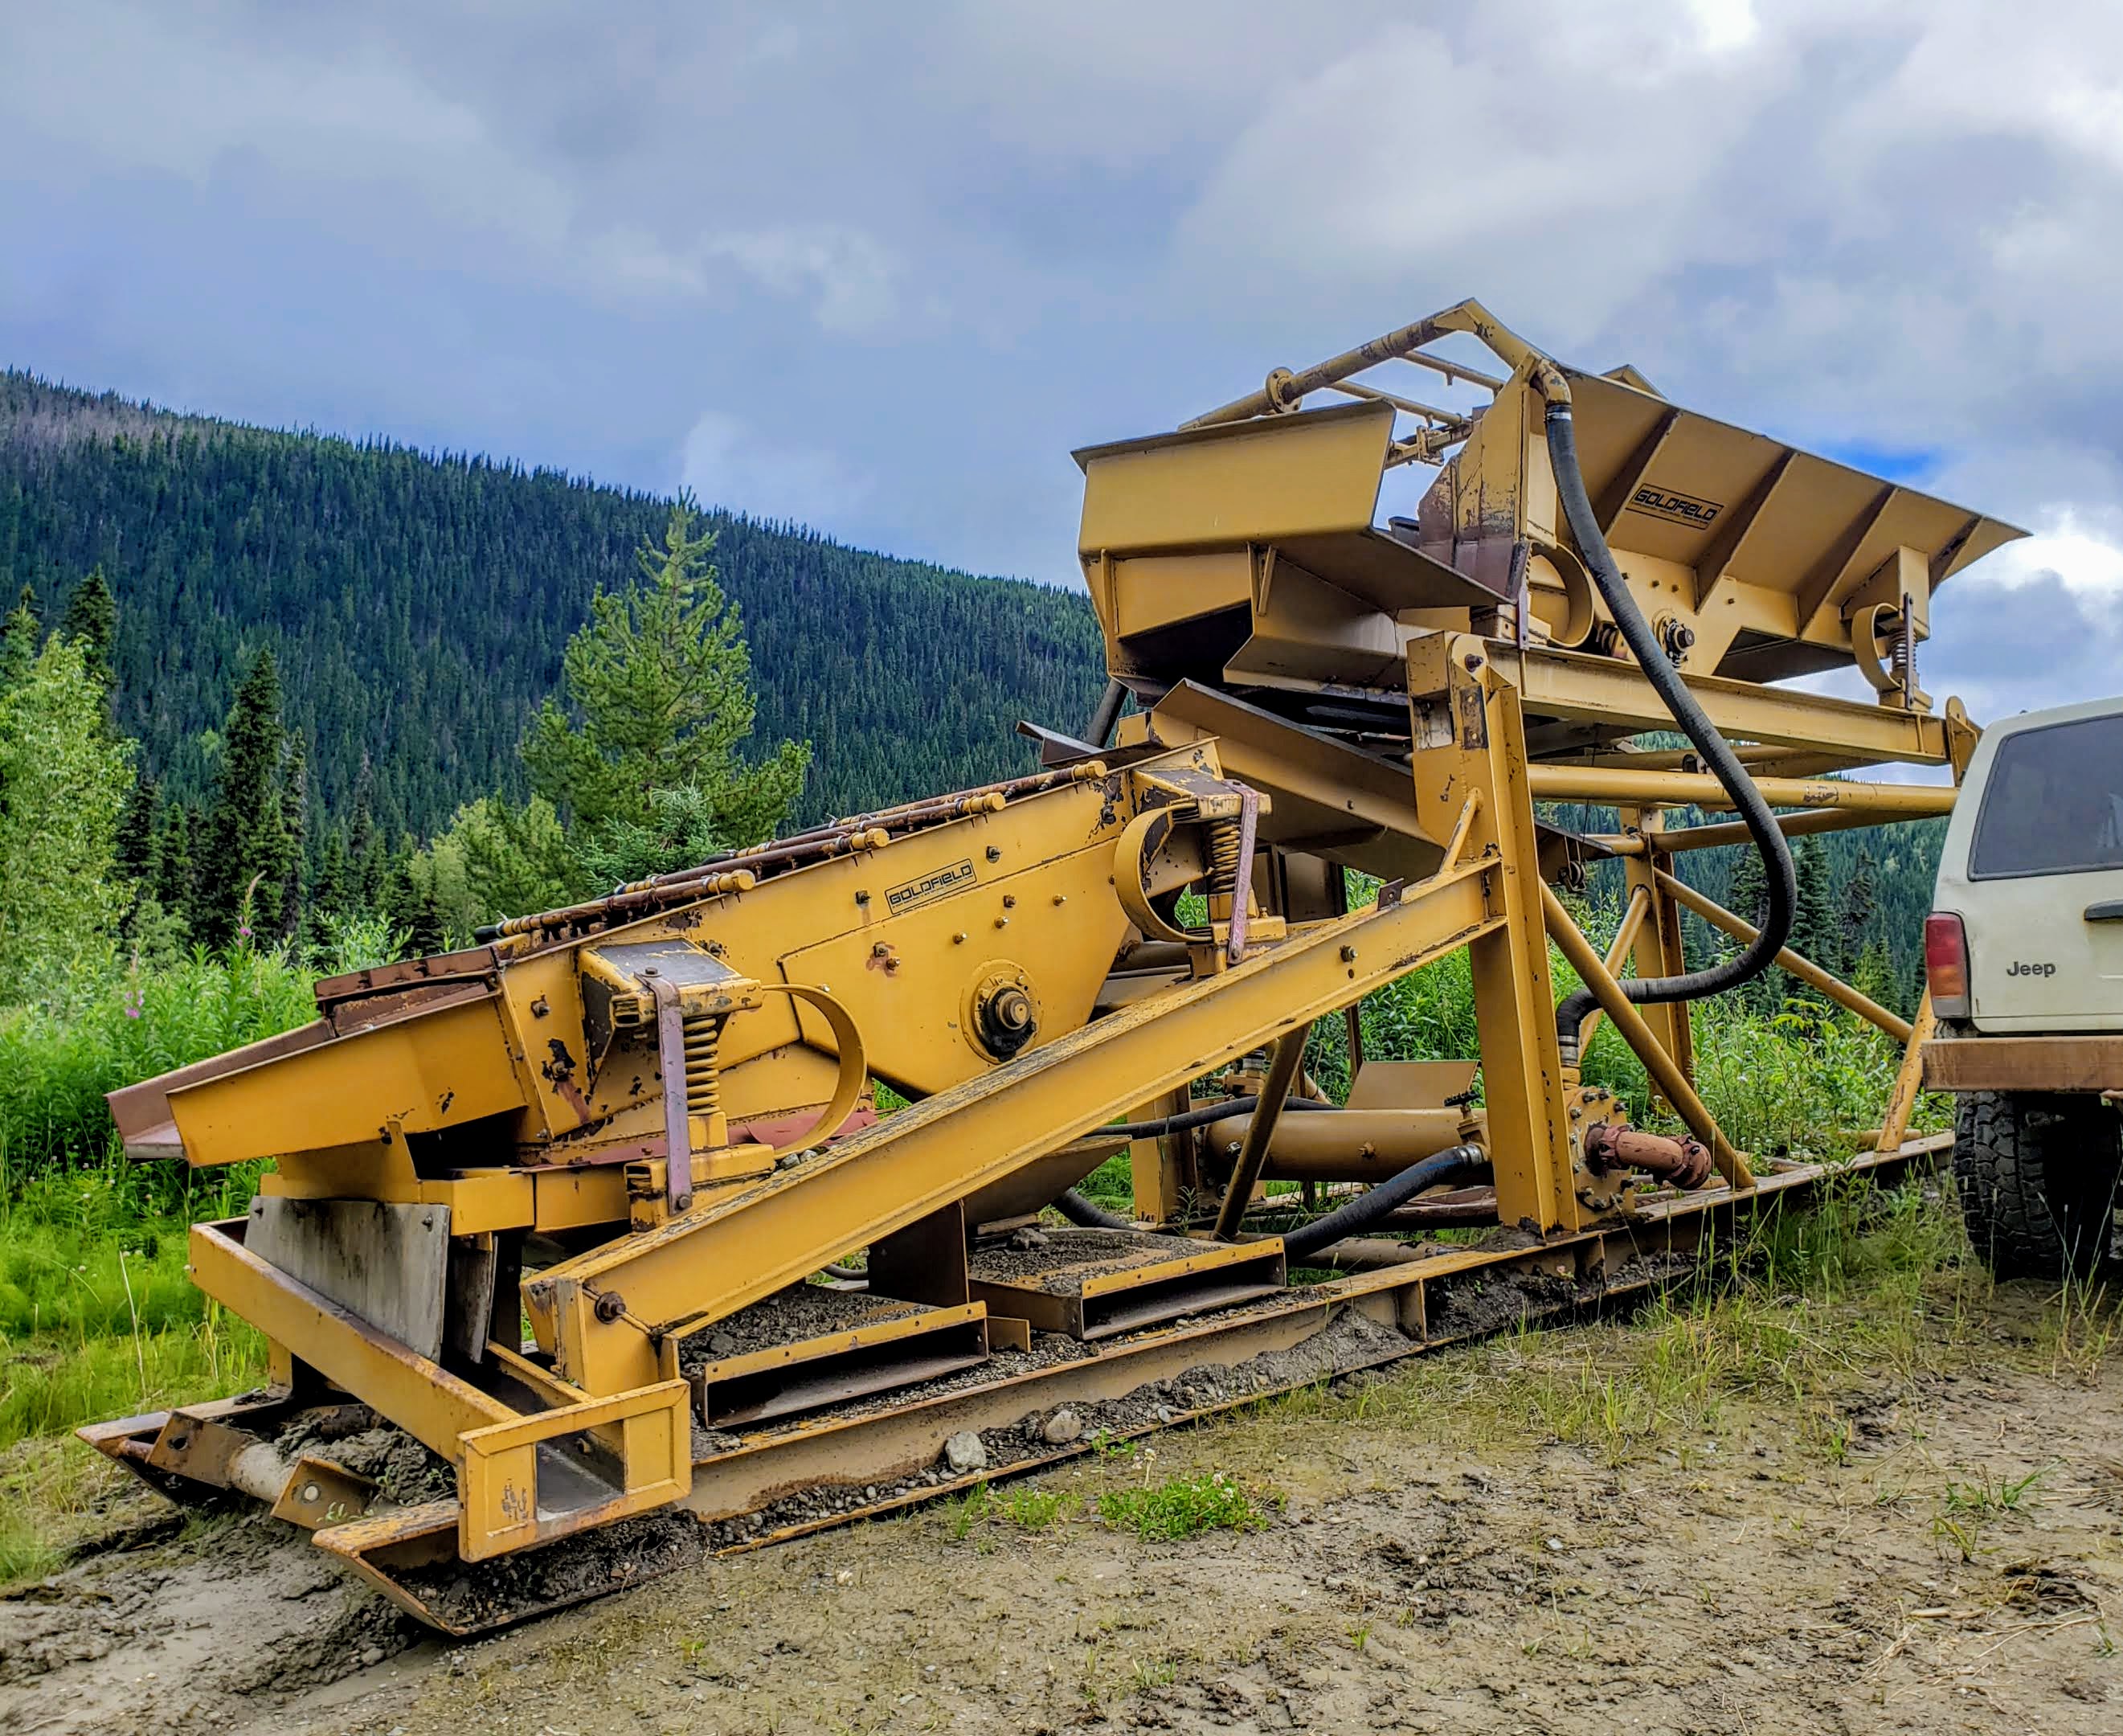
There are many different types of washplants on the market today. The one thing that they all have in common is that everyone says theirs is the best! We’re not setting out to prove which plant is the best, this article will explore different types of plants and their strengths and weaknesses. Different plants are suitable for different conditions. There is no one size fits all solution.
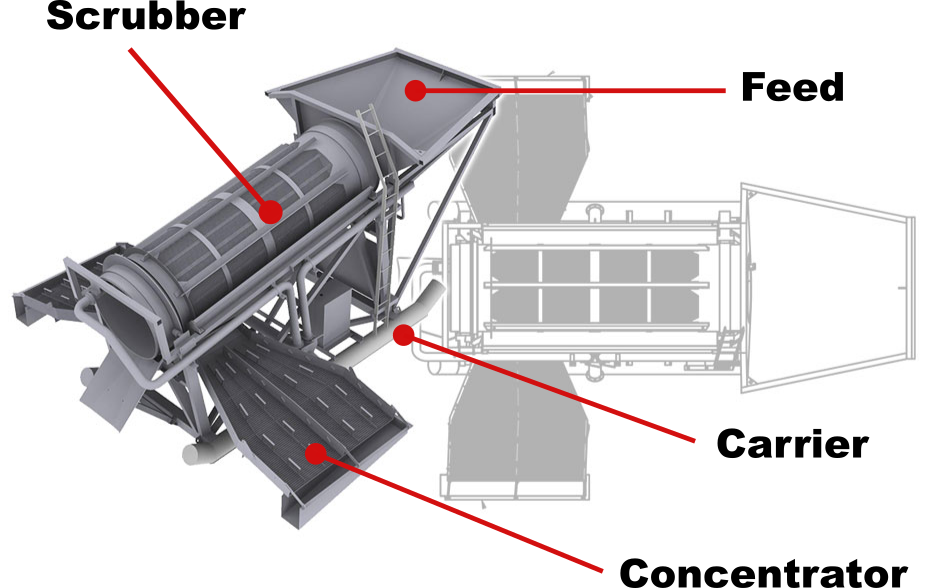
There are 4 main components to a wash plant: Scrubber, Concentrator, Feed System, and Carrier. While no two wash plants are identical they all involve a combination of these 4 components.
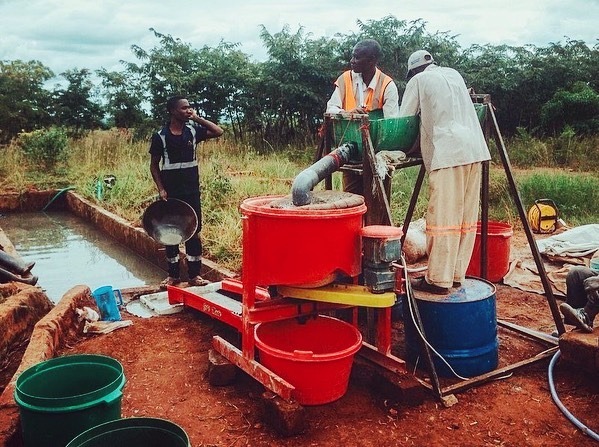
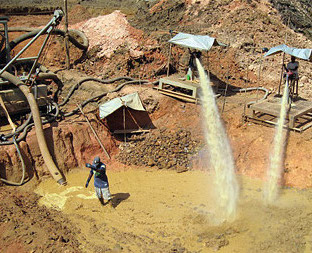
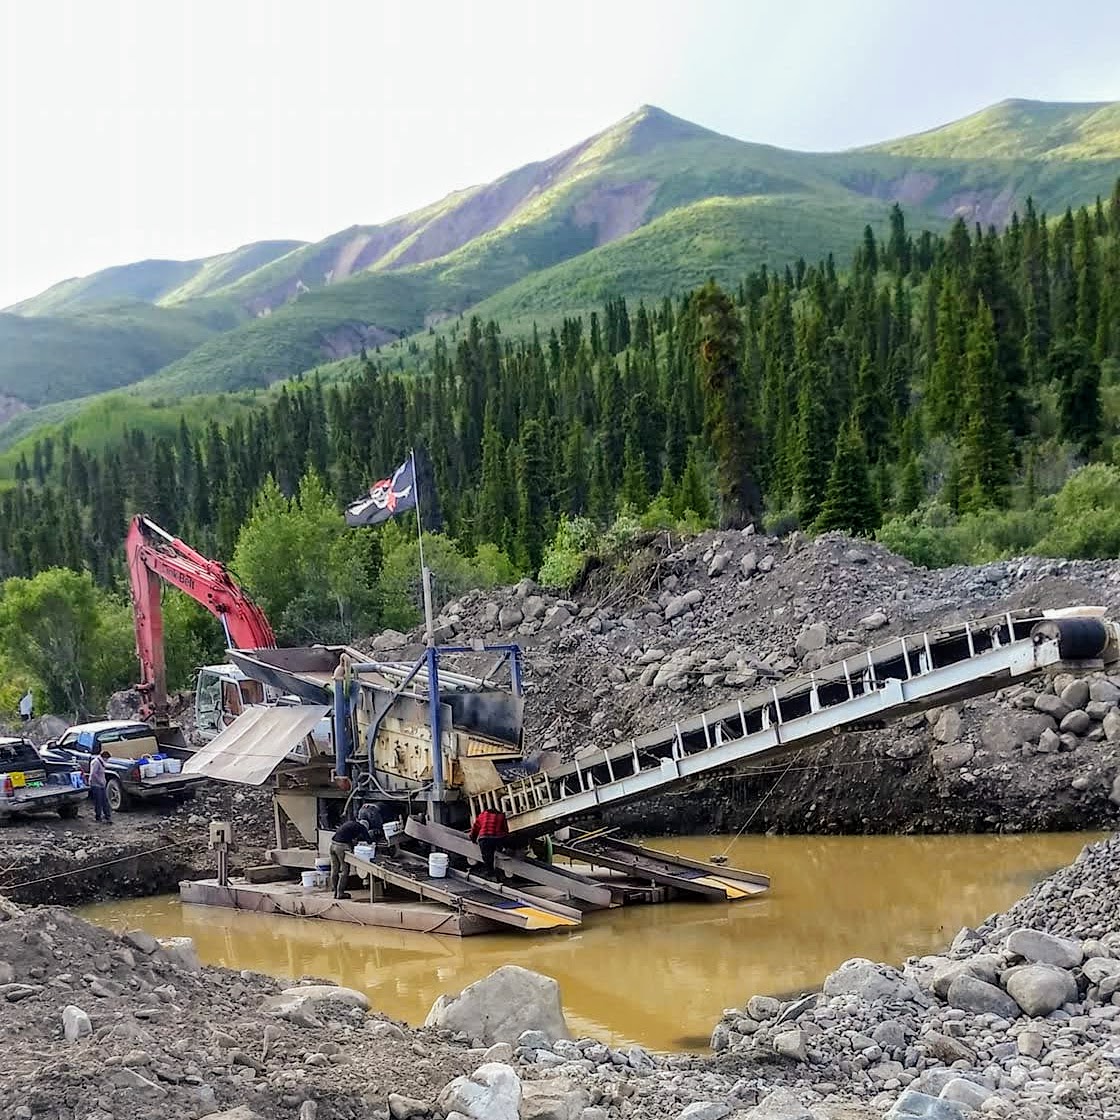
Take a typical trommel plant that you would find in BC or the Yukon for example. You’ll have a hopper that is fed by an excavator, a trommel that feeds a sluice box and it’s mounted on skids.
Scrubbers
The scrubber is the component of a wash plant that separates raw material and prepares it for concentration. The scrubber will remove large rocks and break down chunks of clay and packed sand. Most scrubber systems use water jets to wash the gravel to remove the fine gold that is attached to the cobbles.
The sand and clay that adheres to pebbles and rocks has been shown to have much higher gold content than the gravel as a whole. For that reason, it is important to wash your material well so that gold can be captured in the concentrator.
The scrubber has three main functions:
Separate large cobbles and boulders from the feed gravel
Wash the cobbles and gravel
Break up clods of agglomerated material
The five categories of scrubbers in use today are the Screen Deck, Trommel, Reverse Trommel, Derocker, and Grizzly.
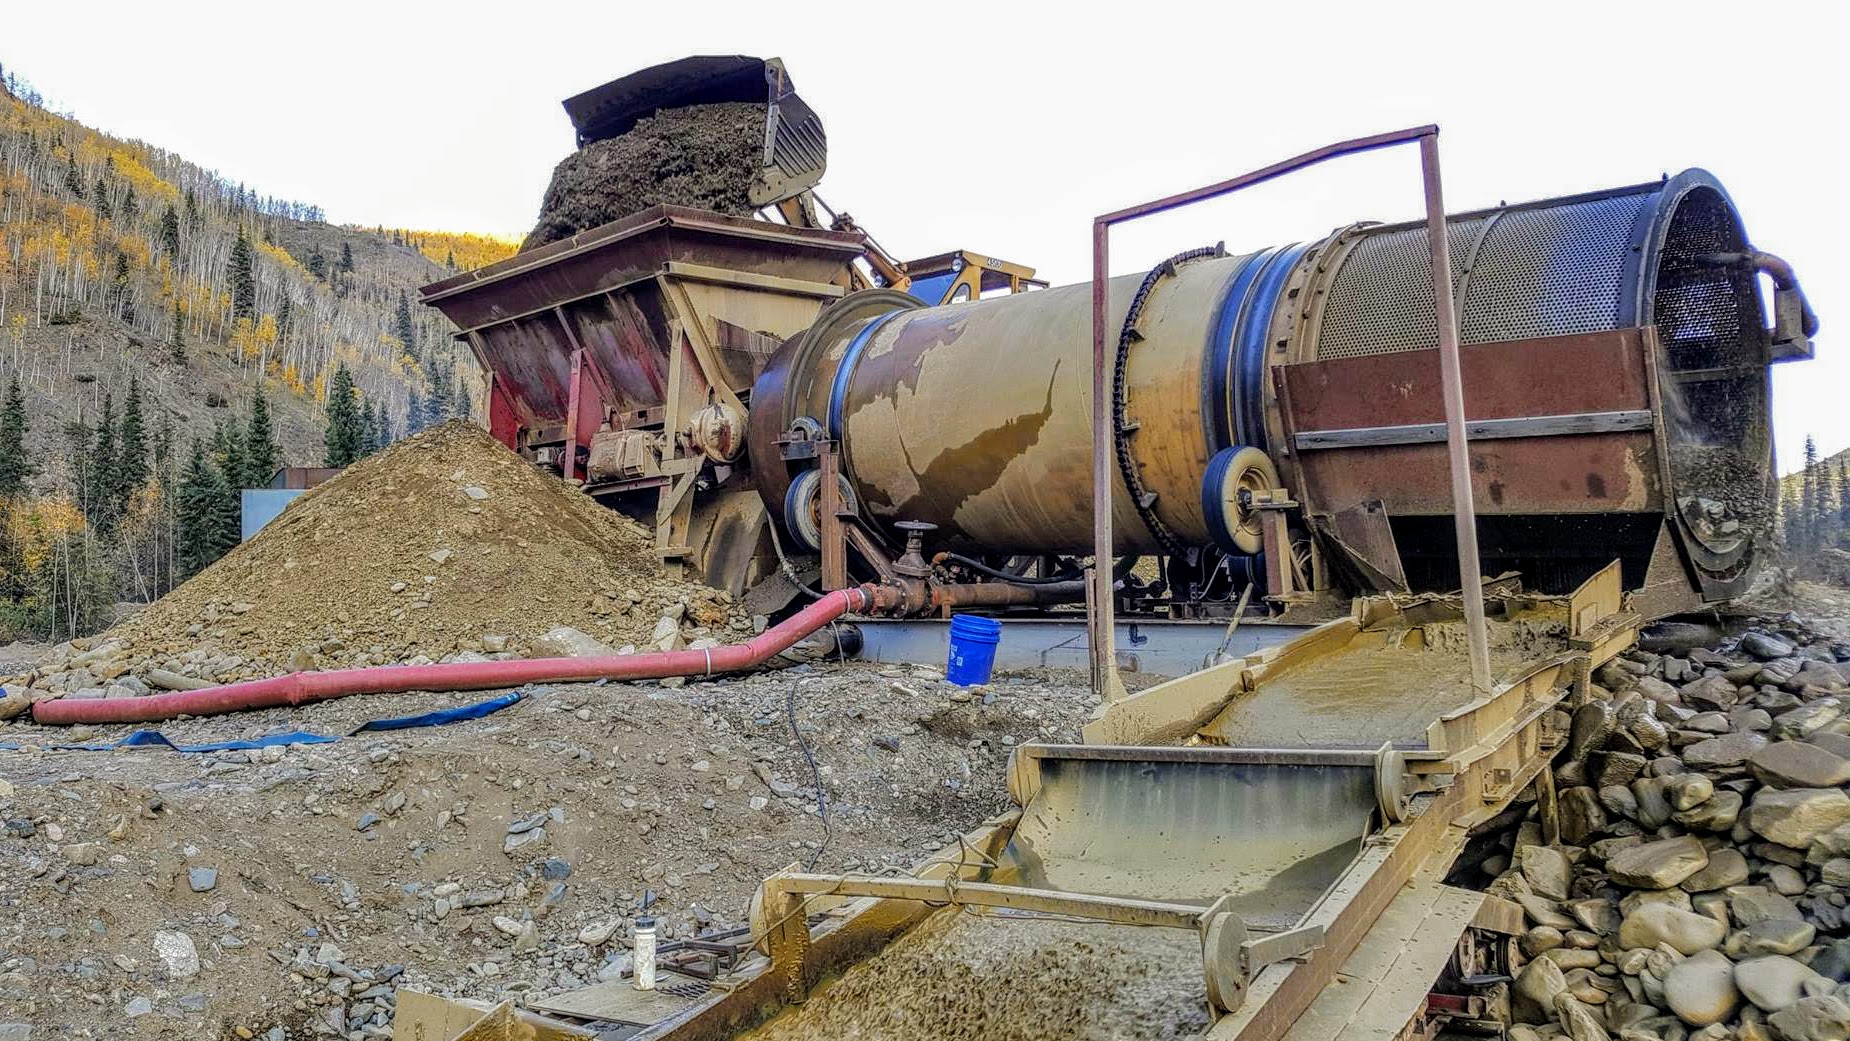
Trommels
Trommels use a rotating drum to agitate the material. Raw gravel is fed at one end and passes over openings in the drum. Rocks that are larger than the openings are disposed of as tailings. The drum is set at a slight angle to allow the tailing rocks to work their way off the end. Trommels do an excellent job of breaking up clay, mud, and compacted gravels.
A trommel is driven by an electric or gasoline-powered motor. The motor spins the drum by either using a long chain with cogs welded around the drum or by wheels that the drum sits on. Most trommels will have a spray bar running inside the drum that sprays high-pressure water on the gravel to aid in removing gold particles from the rocks. The trommel has a lot of moving parts which is one drawback. The more complex a system is, there more potential for failure.
In North America trommels are most often paired with a sluice box that is positioned at a right angle to the drum. A section of openings are positioned above the sluice box with metal screens to allow specific sizes of particles through. Each mine has different requirements for particle sizes depending on the size of gold that exists there. Miner’s typically have openings of 1/2″ or 3/4″, the size of the opening depends on the distribution of gold sizes in the pay gravels.
Trommels can be paired with any type of concentrator, it doesn’t have to be a sluice. Trommels can be any size. They vary from the Gold Cube trommel which is 5” in diameter and 16” long to plants that can run hundreds of yards per hour with diameters of 8 feet or more. Trommels are relatively easy to set up and can handle a wide range of materials. The big advantage that they have over other scrubbers is the ability to break up cemented or compacted material.
Pros
Cons
Can handle different kinds of material
Mechanically complex, requires maintenance
Can handle high volume
Large footprint
Relatively easy setup
Burn a lot of fuel
Breaks up clay and compacted gravel
Large trommels are difficult to move
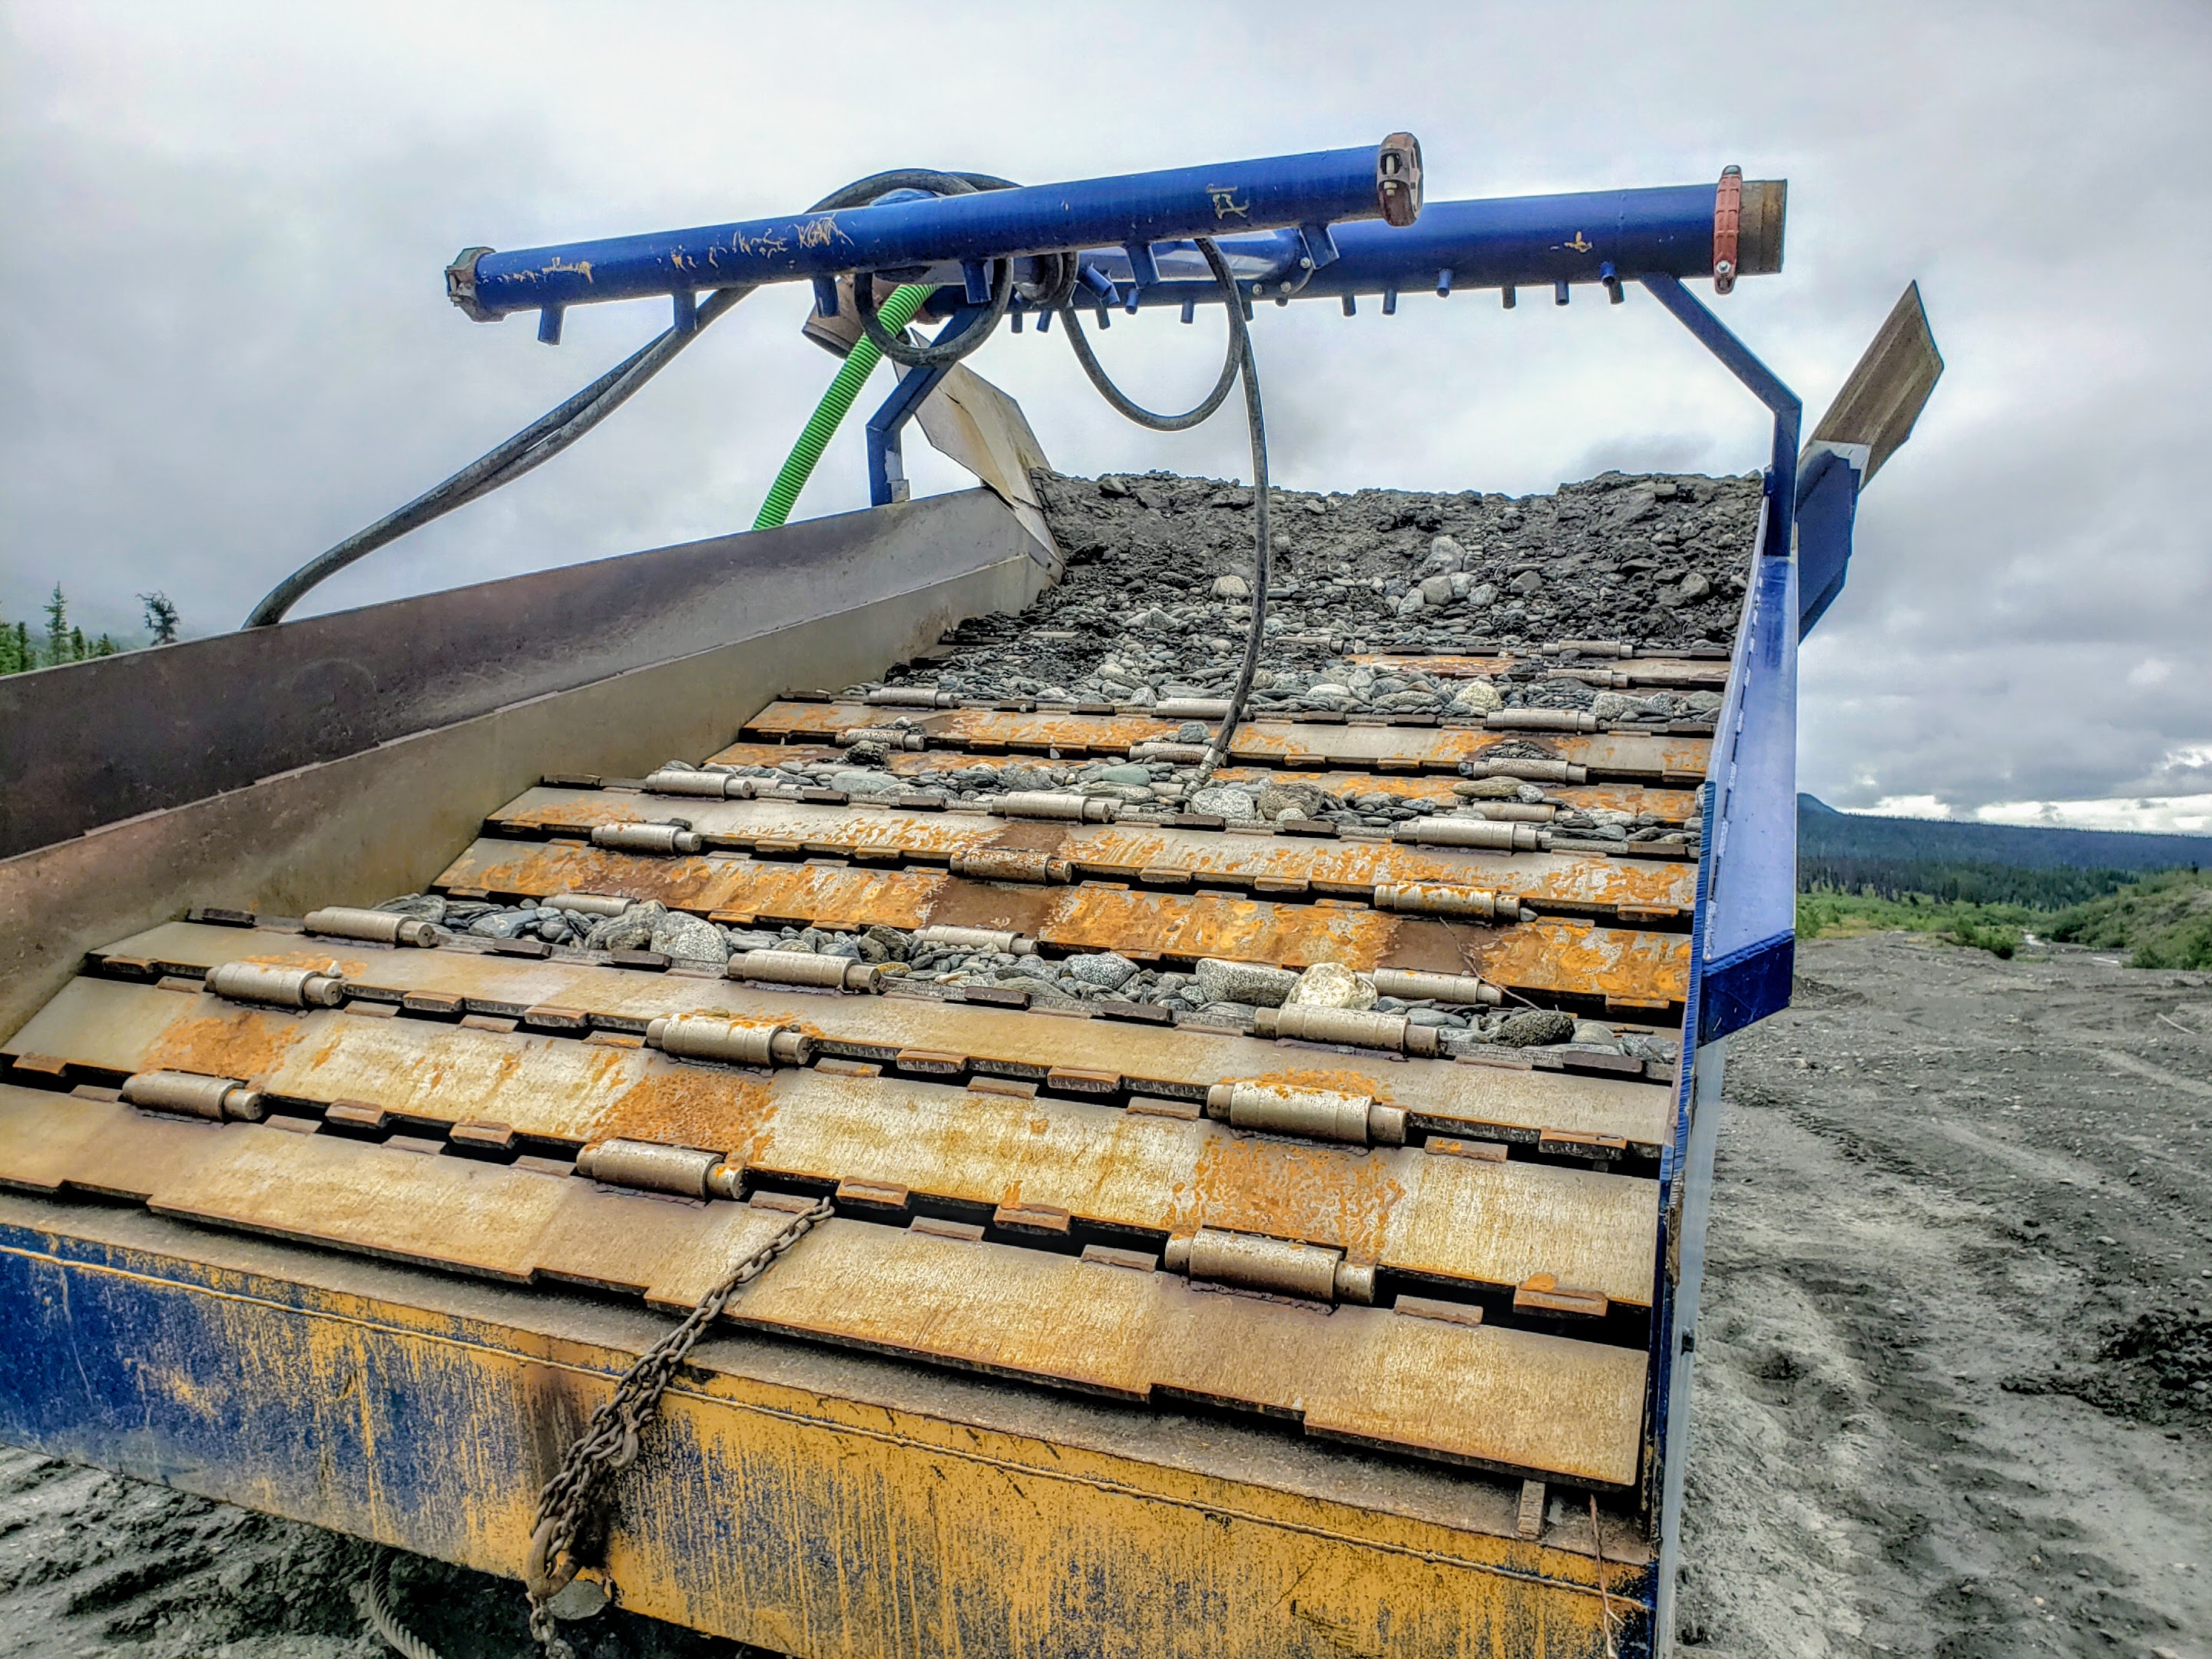
Screen Decks
Screen decks use a series of vibrating screens and water jets to wash gravel and separate large rocks. Each deck is mounted on an angle and suspended by springs and caused to vibrate by mechanical means. There can be multiple decks used or just one.
Like a trommel, screen decks are fed at one end and allow oversize material to fall off the other end. There are perforations in between which allow material to fall through to the lower section. The vibration is caused by the rotation of an unbalanced weight called an “exciter”. That is actually the same thing that causes your cell phone or an Xbox controller to vibrate just on a much larger scale. The exciter is driven by a gas or electric motor. Some smaller models such as the Goldfield Prospector drive the exciter by a pelton wheel using water power alone and no motor.
A series of high-pressure water jets are used to wash material as it vibrates. Screen decks allow for well-positioned water jets to be put in place for thorough washing of gravels and rocks. There are a variety of screen options varying from woven wire, to punch plates and rubber or plastic perforated material. Screen sizes vary depending on the gold distribution and material being processed, customization of screen sizes is easy to achieve.
Screen decks can accomplish very high production in the right materials. Some of the largest wash plants in the world are using screen decks for that reason. Unlike a trommel, screen decks do not handle clay or compacted material very well. It tends to bounce off the screens and roll off the end. Despite the violent nature of vibrating beds the screen deck is a relatively simple machine and does not require a lot of maintenance. The only part that is mechanically driven is the exciter and there aren’t a lot of moving parts compared to a trommel or a derocker.
Screen decks tend to be quite high off the ground (at least large scale wash plants). They generally require enough of an elevation difference at the site to be able to feed the hopper and allow room for a concentrator below. Some miners use a conveyor system to get around this problem but mobility is not the screen deck’s strong suit. They work best in a stationary position where they will be used for a long period of time.
Pros
Cons
High volume
Struggles with clay and compacted material
Mechanically simple
Large footprint
Fuel-efficient
Difficult to move
Separation of multiple sizes
Slow to set up
Reverse Trommels
There are a few variations of reverse trommels that work a little differently than a basic trommel. A reverse trommel allows heavy material (ie. gold) to exit one end while the large rocks and waste material exit the other. Reverse trommels often have a double tube design with an inner trommel that screens the material while the outer trommel has a screw-like helix that separates the gold.
The trommel is set at the appropriate angle to allow gold to exit one end while water flows over the outer tube. The helix acts in a similar way to a gold wheel, the material of higher density is allowed to work it’s way up the spiral and exit on one end, the less dense material falls out the other.
There are some models with only one opening that kind of resembles a cement mixer. The APT RG-30 for example. They work in a similar way with a helix and a carefully positioned angle and rate of water flow.
Reverse trommels are popular in the mid-sized range from 1 to 10 yard per hour units. There are quite a few on the market. One popular unit is the Mountain Goat Trommel which is a hobby-level clean-up machine. There are large-scale commercial versions and everything in between.
Reverse trommels are interesting machines and work well once they’re set up but they are much more complicated machines than a basic trommel and are finicky to set up. They also require a lot of maintenance. That’s one reason they are mostly on the small-scale side of the industry.
Pros
Cons
Can produce very clean concentrate
Require a lot of maintenance
Break up clay very well
Slow setup
Separation of multiple sizes
Complicated machinery, lots of moving parts
Some designs are very compact
Not very fuel-efficient
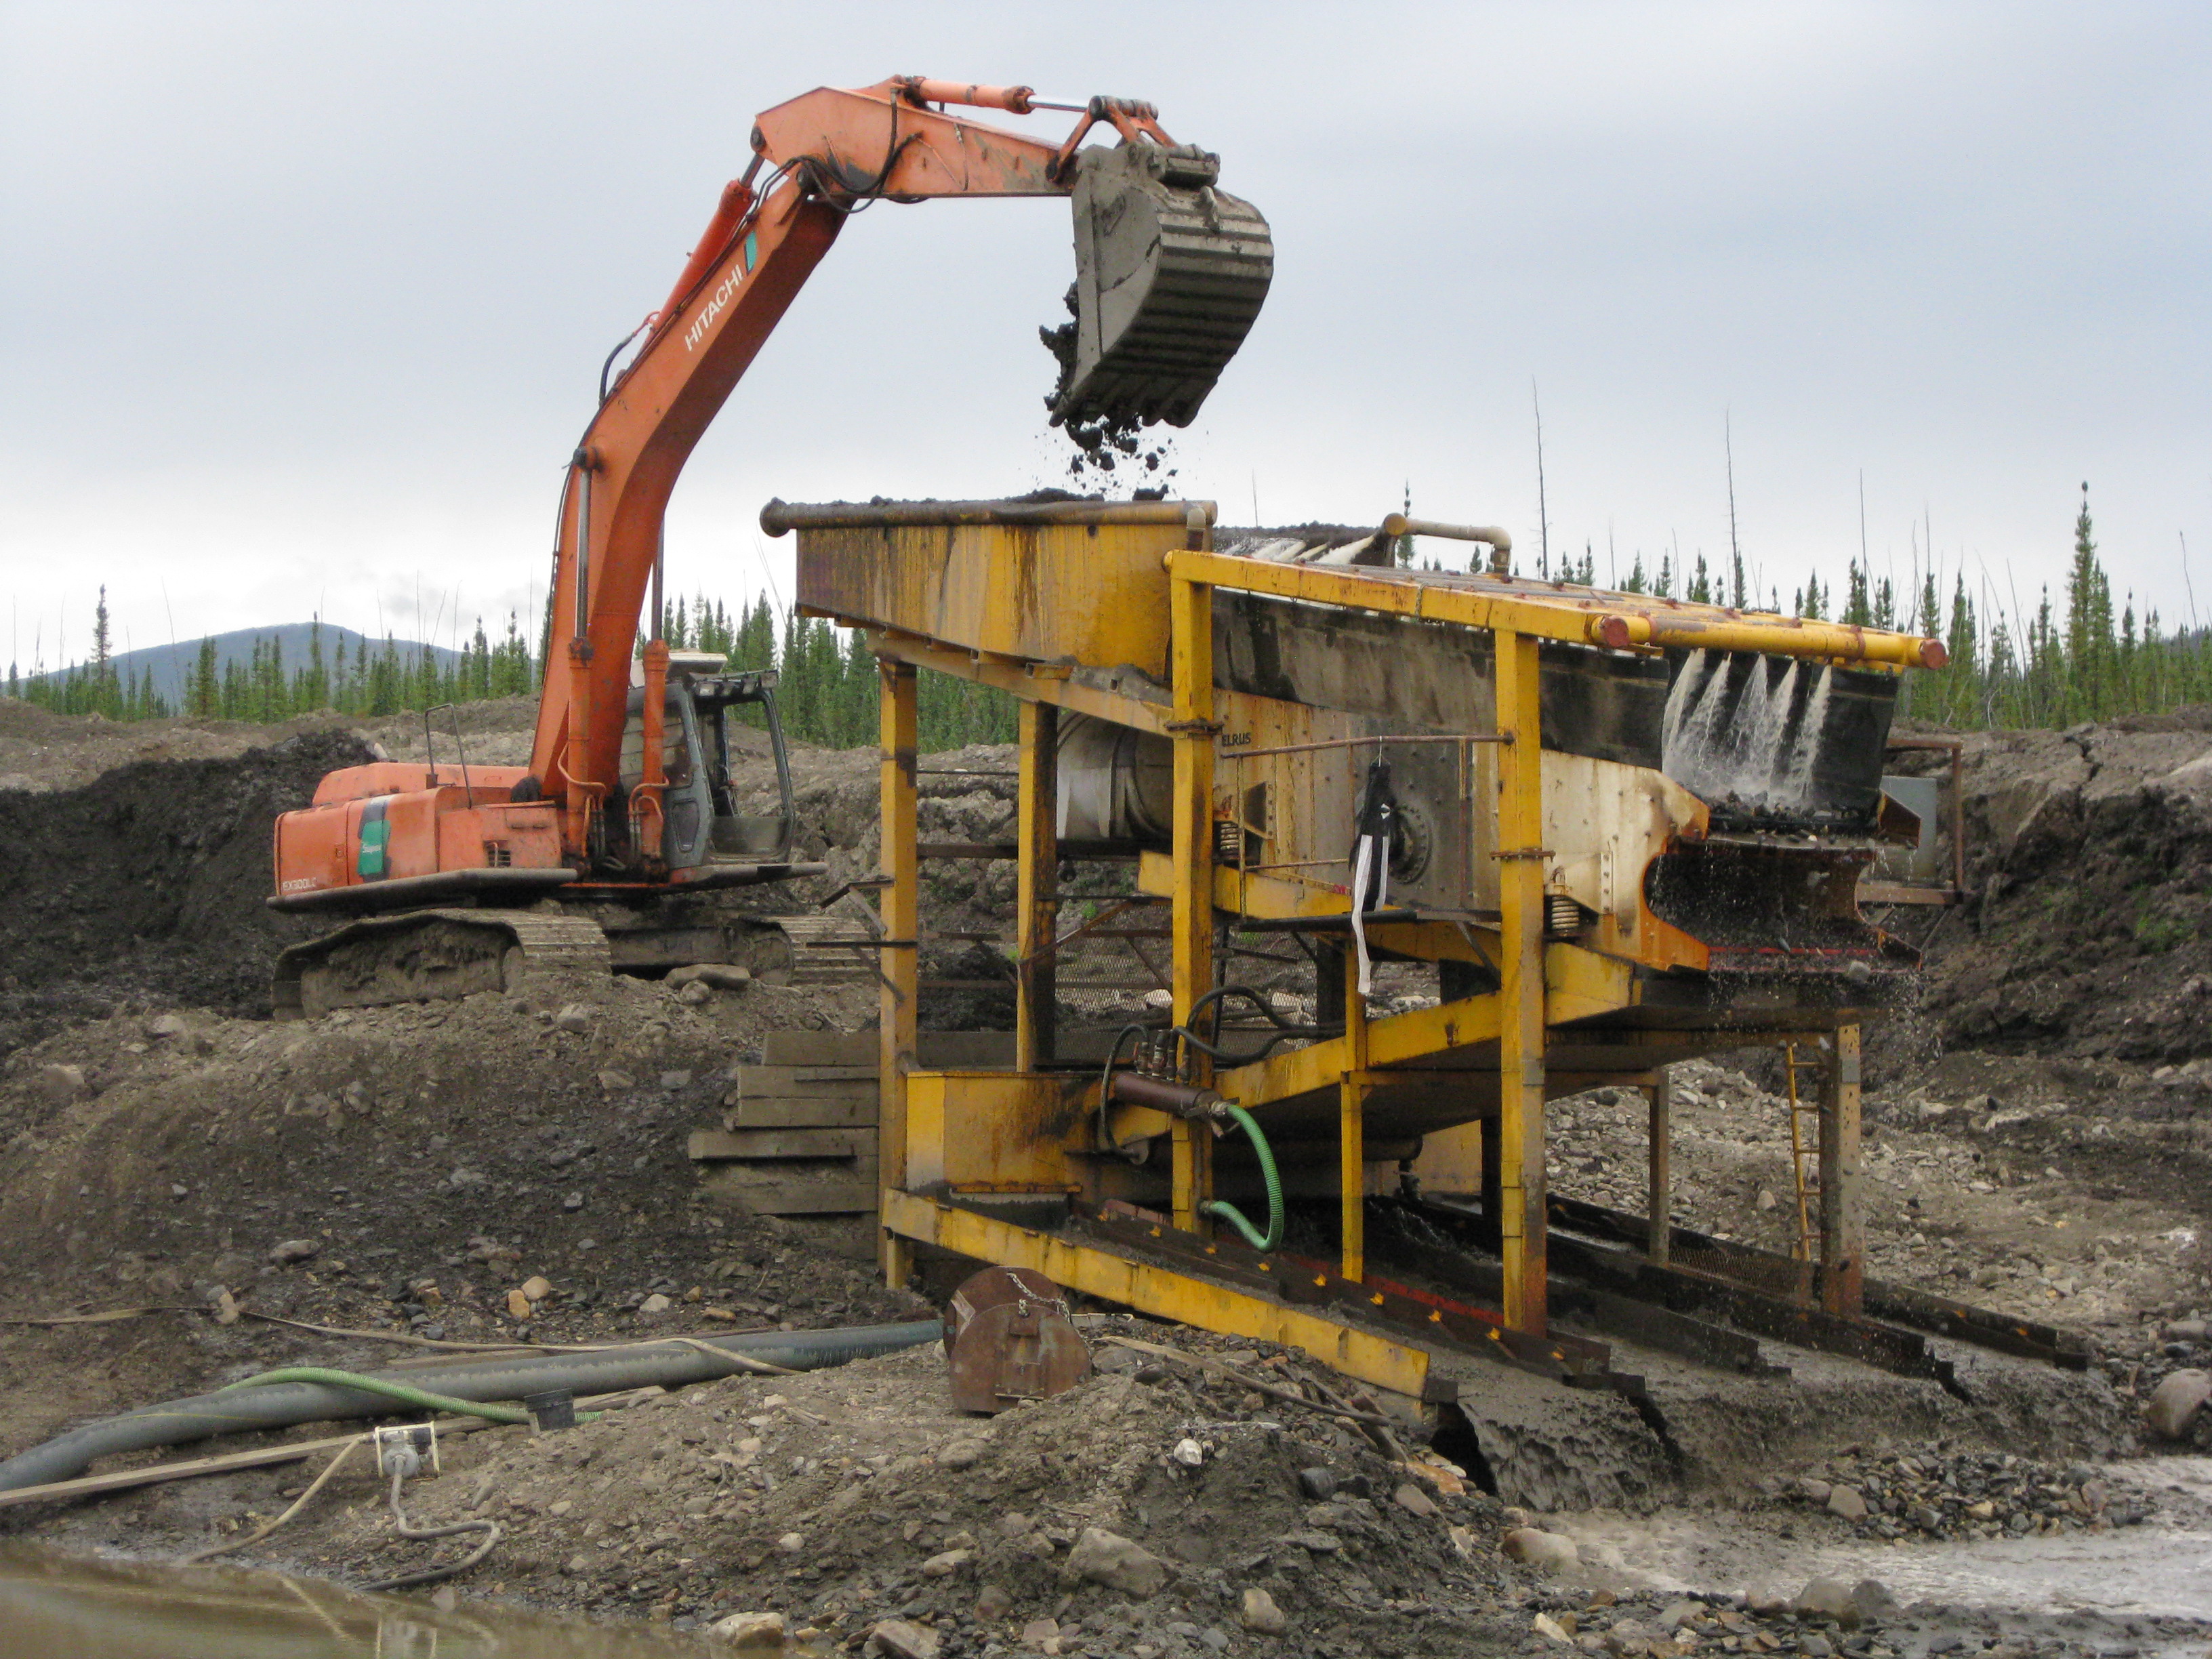
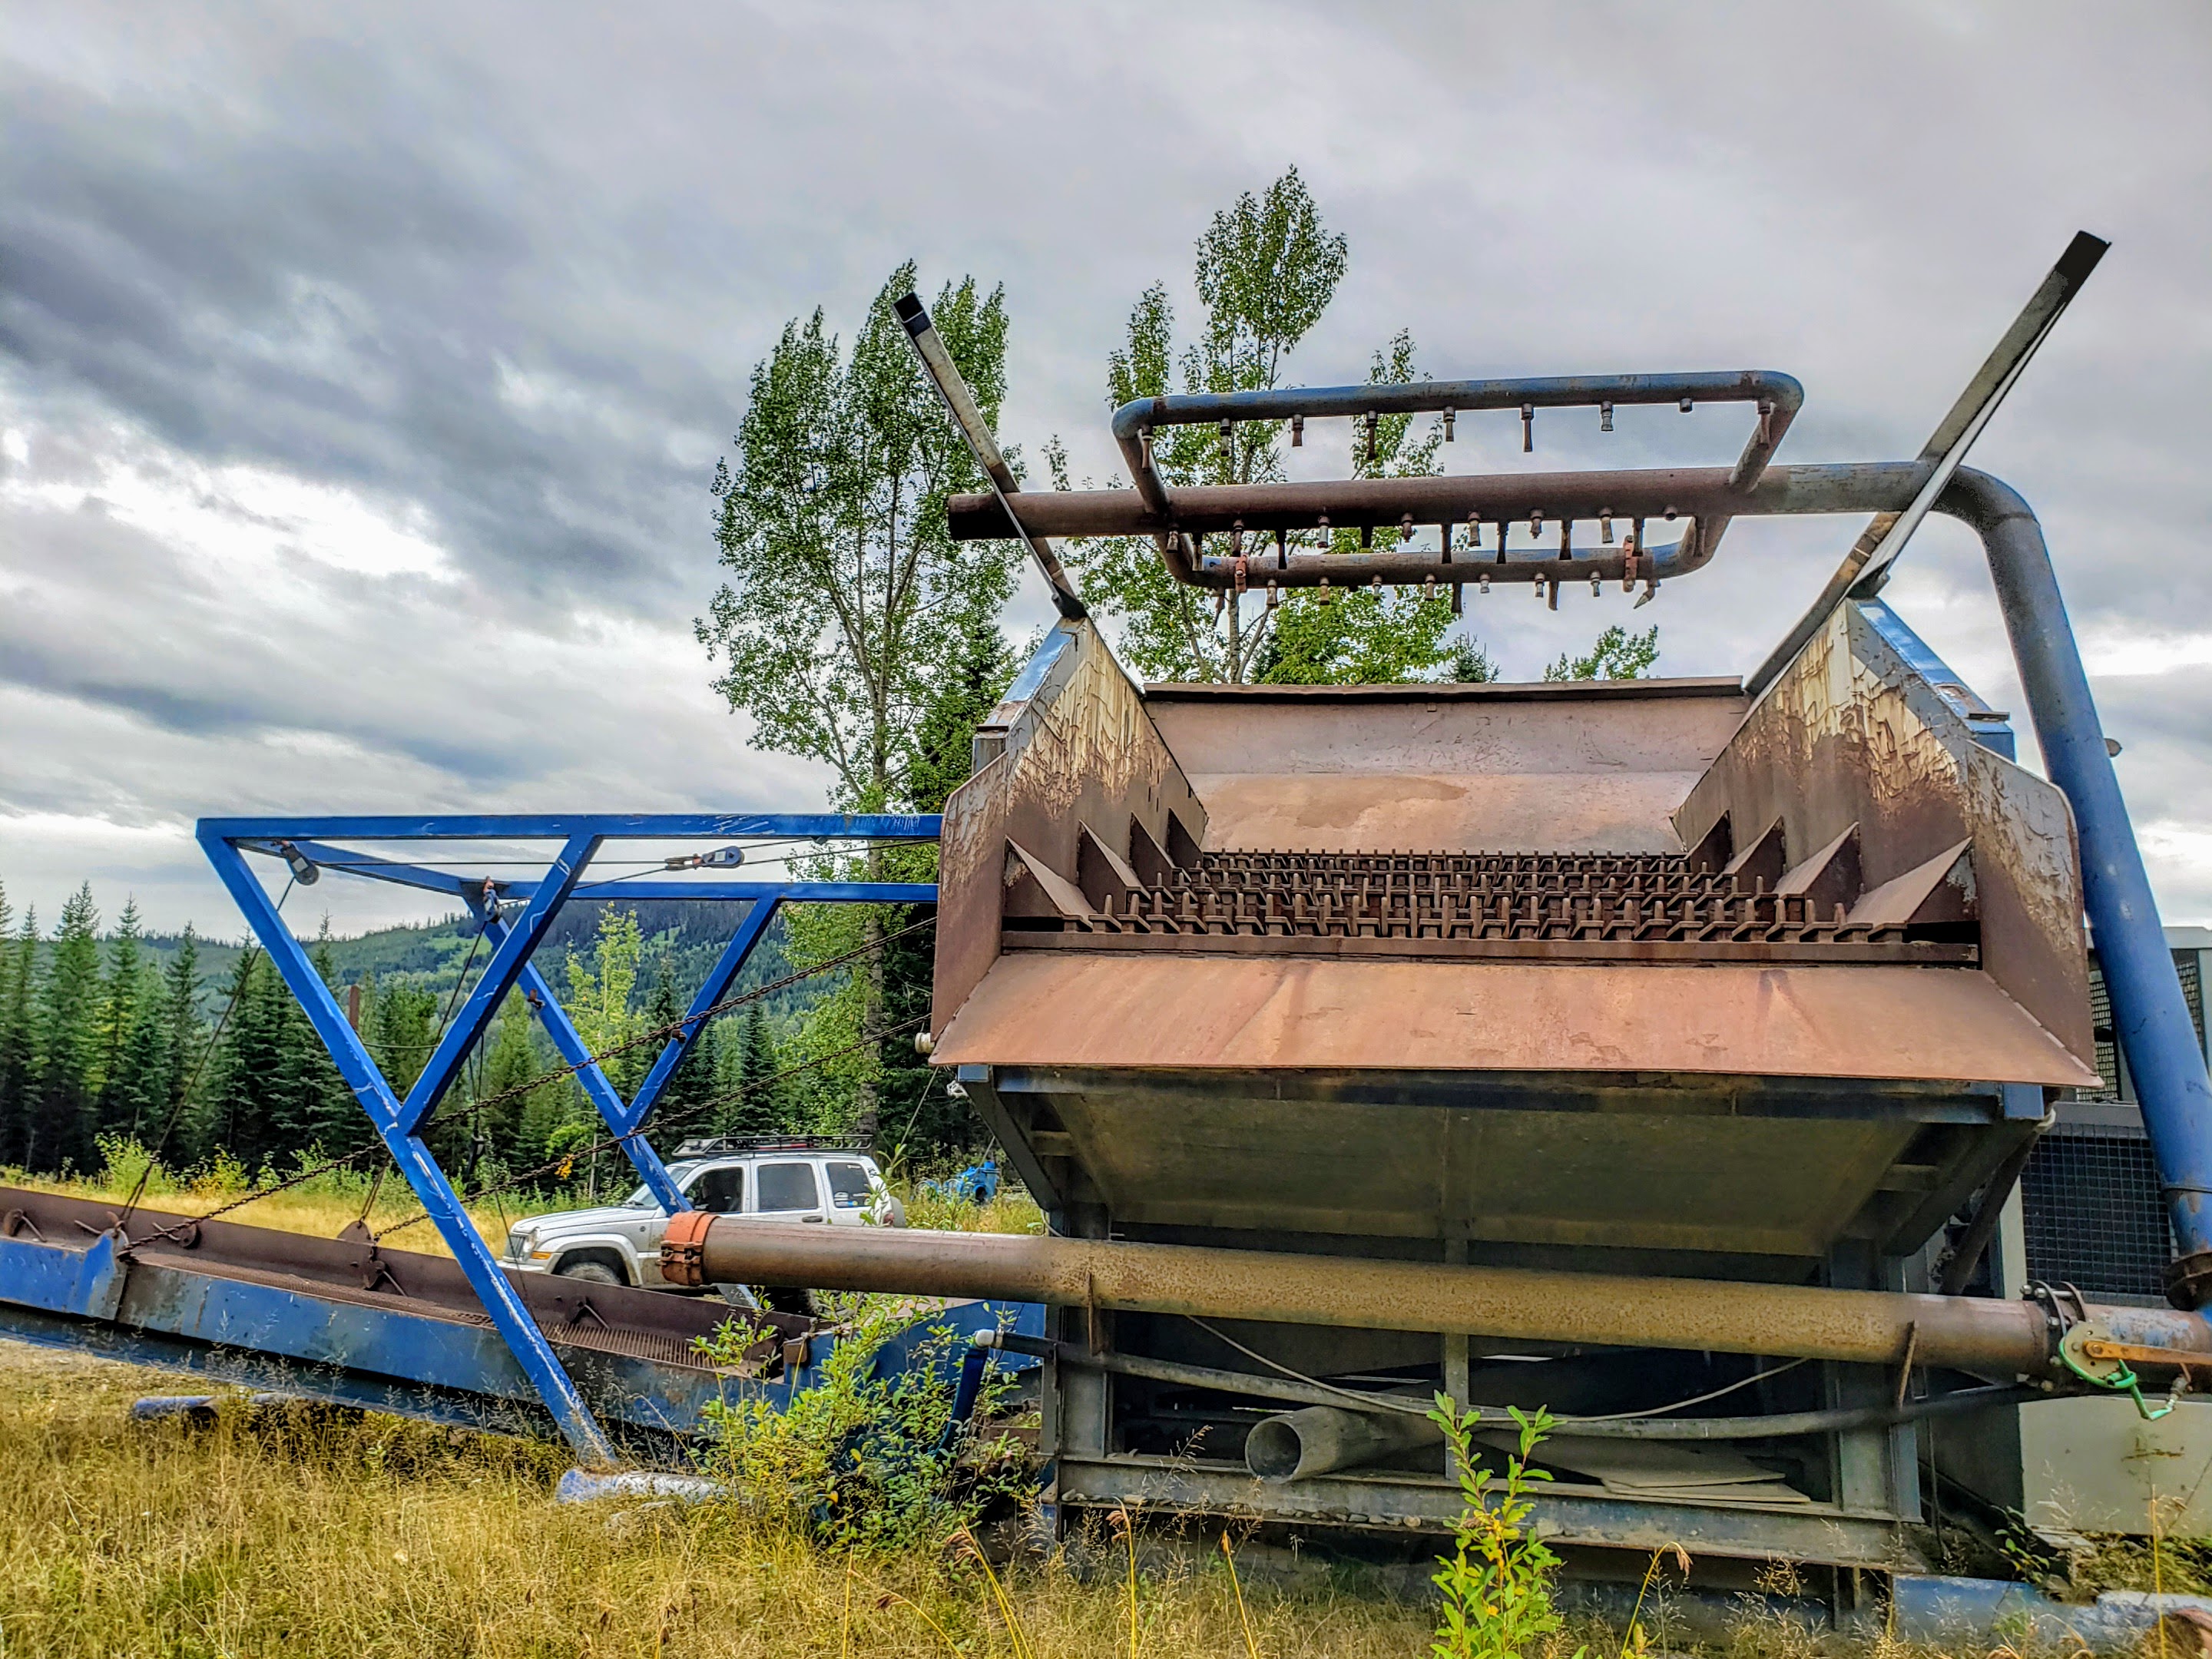
Derockers
Derockers are a neat machine. They use a flexible deck made of long flat slabs with spaces between them. Under the deck is a carriage frame with truck tires that moves back and forth. There is a high-pressure spray system overhead that washes all the material. As the undercarriage moves back and forth it rolls the rocks around on the deck. The water and rolling action work together to wash off the rocks and allow smaller-sized pebbles and material to fall through the openings in the deck slats (usually 2” minus).
Derockers work really well in areas where there are a lot of large rocks and slabs. They are called “de-rockers” after all. They can handle some clay, due to the rolling action they can break it up somewhat. The derocker was invented in the Yukon to deal with gravel deposits that are full of boulders. These machines can easily handle boulders or slabs up to 4 feet in diameter, which would break other types of separation equipment.
Compared to some of the other scrubbers such as screen decks and trommels, the derocker is a complex machine with a lot of moving parts. You have a carriage that takes a beating, the deck has a lot of links to maintain but the derocker frame itself is stationary.
Super Sluice Derocker in Cariboo, BC
There was a variation of the derocker in the 1980s called the Super Sluice, made by a company called Gold Machines Inc, that used metal fingers instead of the flexible deck. The Super Sluice was very popular for about 10 years in the Cariboo, Klondike and Atlin but over time the complexity of the machine led to frequent breakdowns and they are very few still in use today.
Pros
Cons
Handles large boulders and slabs
Require a lot of maintenance
Can break up clay and compacted material
Complicated machinery, lots of moving parts
Very high production with the right material
Require a lot of water and power to run
Quick setup, easy to feed
No adjustment for screening options
Grizzly
Some wash plants don’t have a mechanical separation system at all, some use a simple grizzly. A grizzly consists of vertical bars with spacing to allow the size of material you want to pass through. The grizzly is set on an angle such that the larger rocks will roll off and the stuff that fits through the bars will pass through.
Highbankers and small test plants use a grizzly. Production is slow and they often require manual intervention to clear the large material that collects below. Grizzlys are often incorporated into other separation equipment such as screen decks and trommels.
Pros
Cons
No moving parts, no breakdowns
Slow production
No motors needed
No ability to clear tailings
Easy to move, no setup required
Screened material is still coarse
Easy to change for different size of gravel
Concentrators
The concentrator is the heart of a washplant. It’s the part of the wash plant that catches the gold and other dense material.
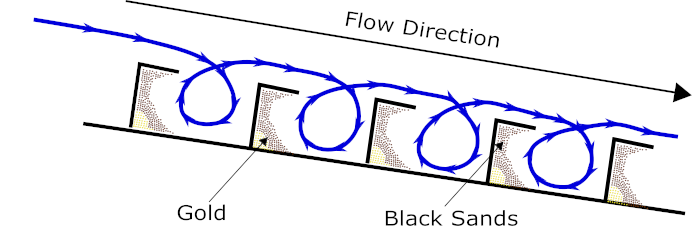
Placer concentrators all use gravity and inertia to separate material based on density. Gold is very dense, it has a density of 19,300 kg/m³. That means that one cubic meter of gold would weigh 19,300 kilograms (19.3 metric tons). In contrast, the typical gangue minerals such as quartz sand have a density of 2,700 kg/m³ and the black sands have a density of about 5,200 kg/m³.
All concentrating methods depend on this principle, except for the use of mercury but that’s not used in large-scale placer mining.
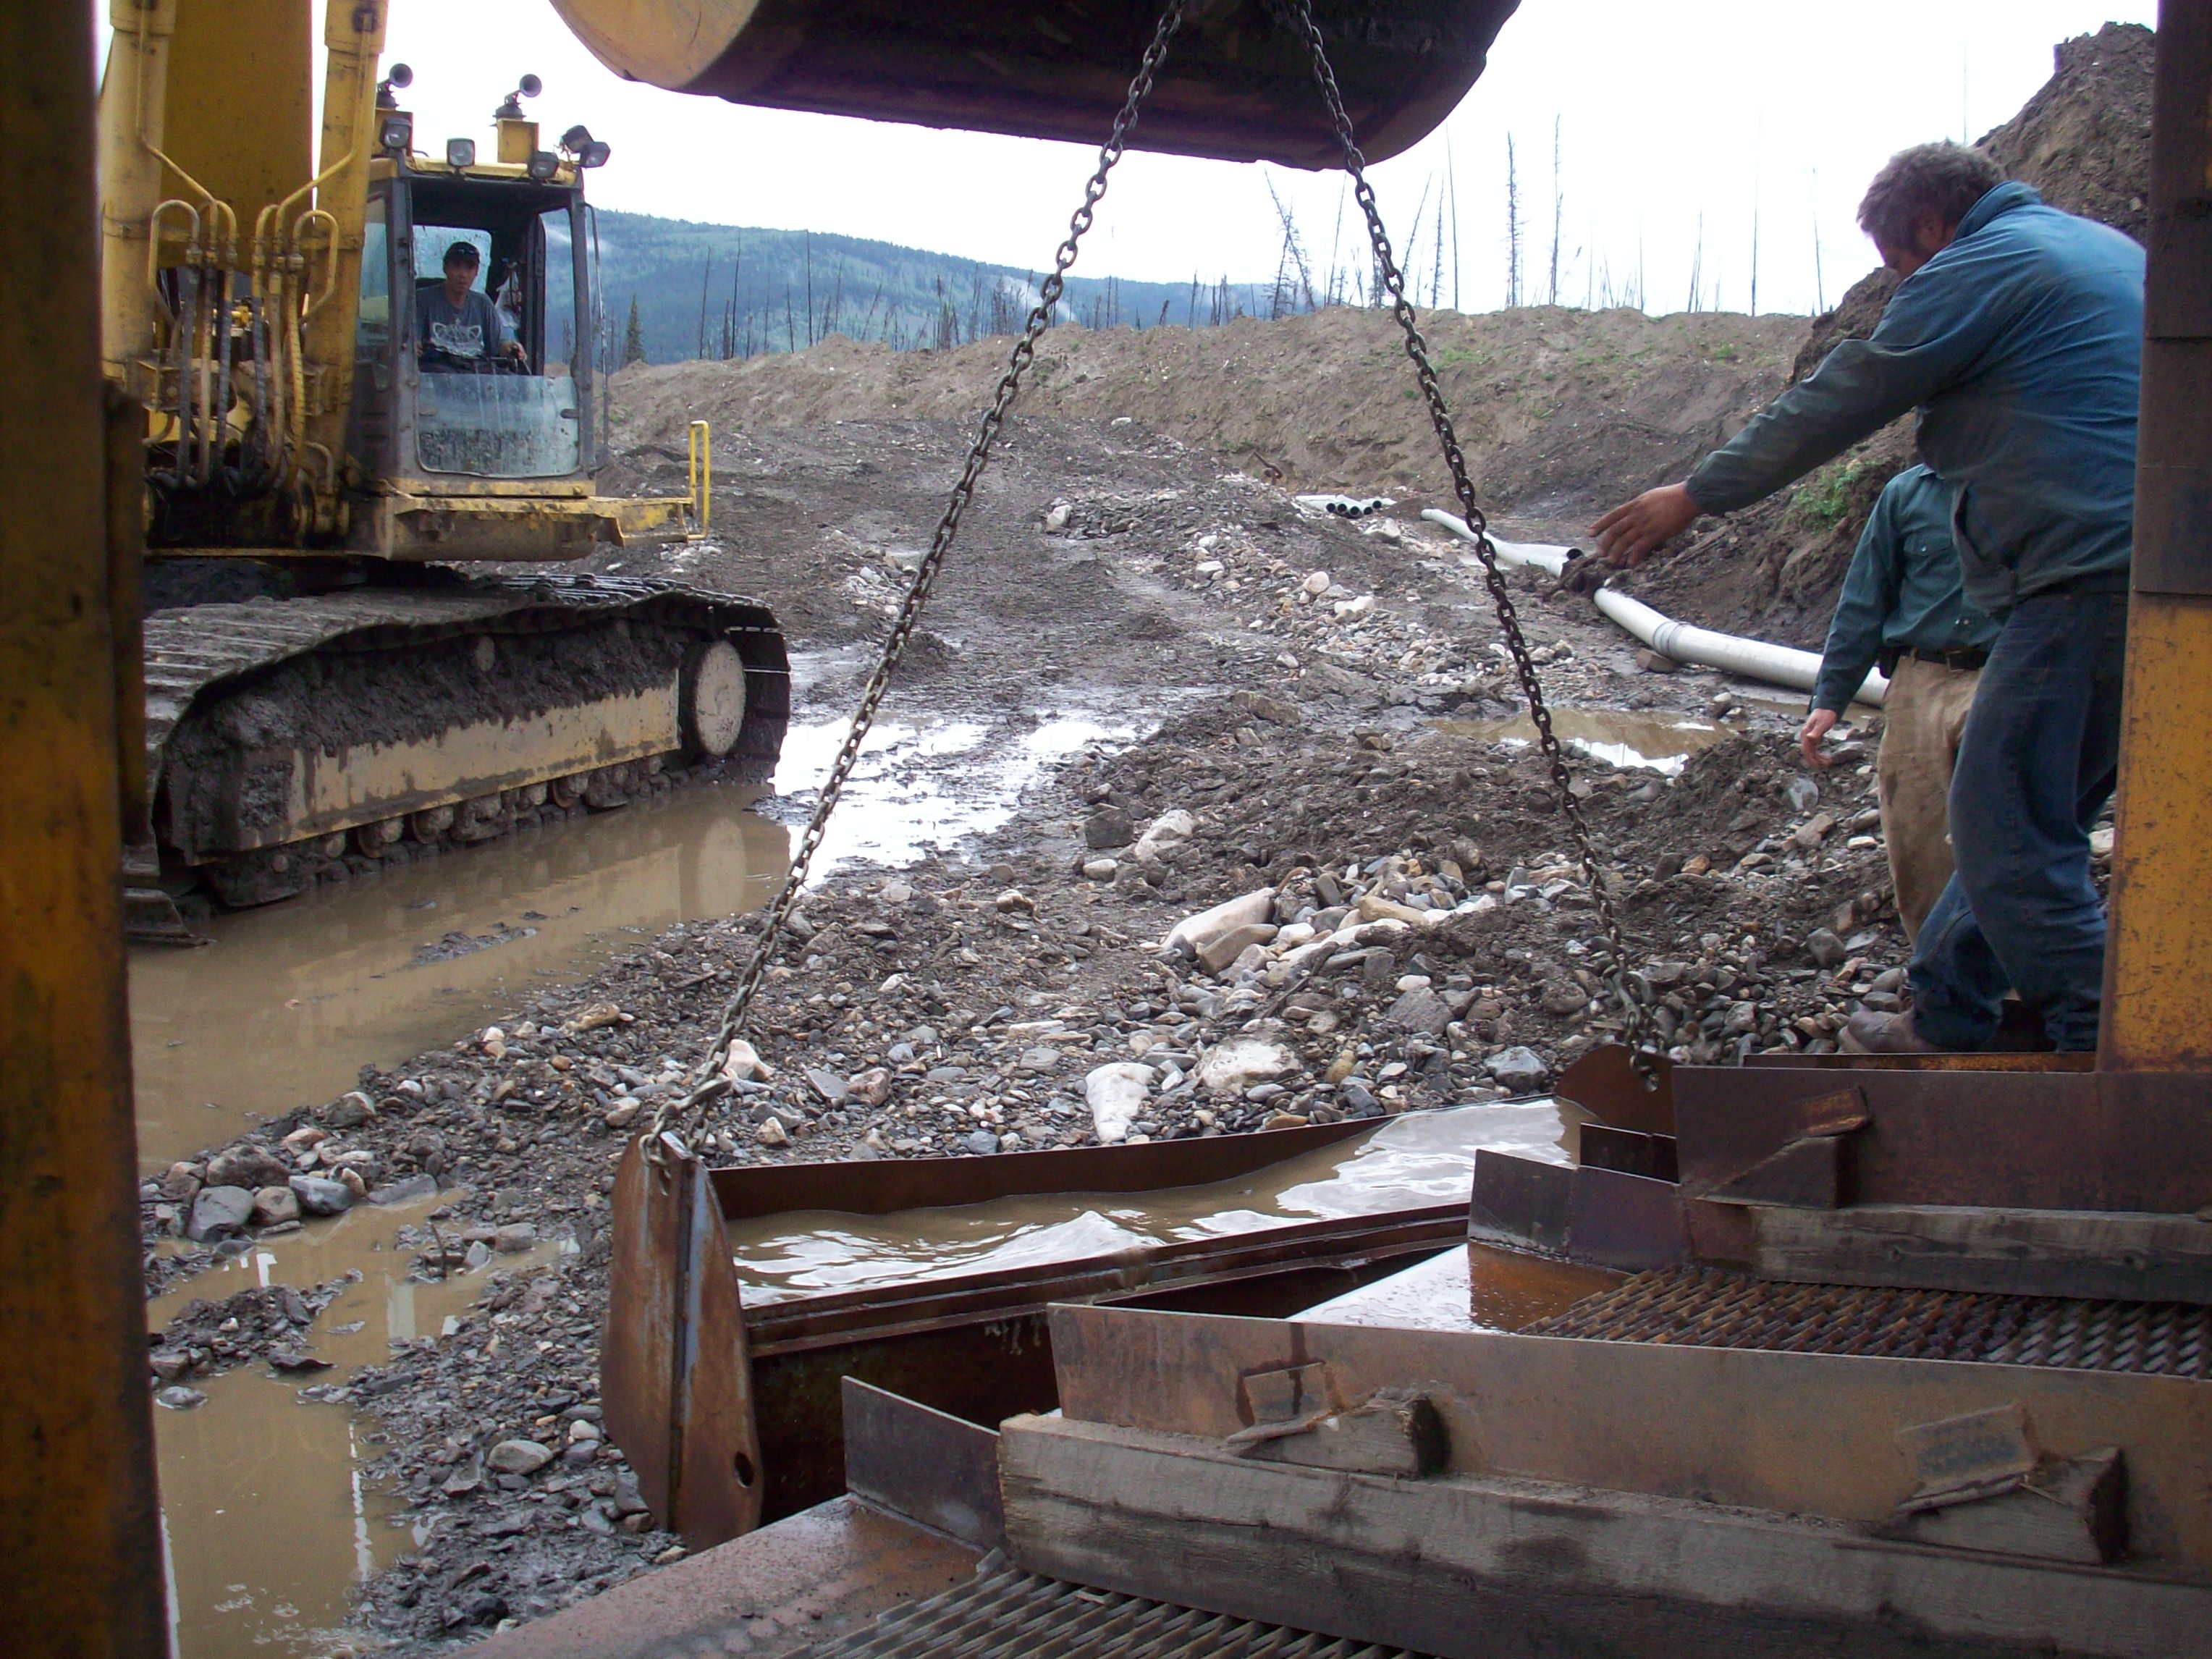
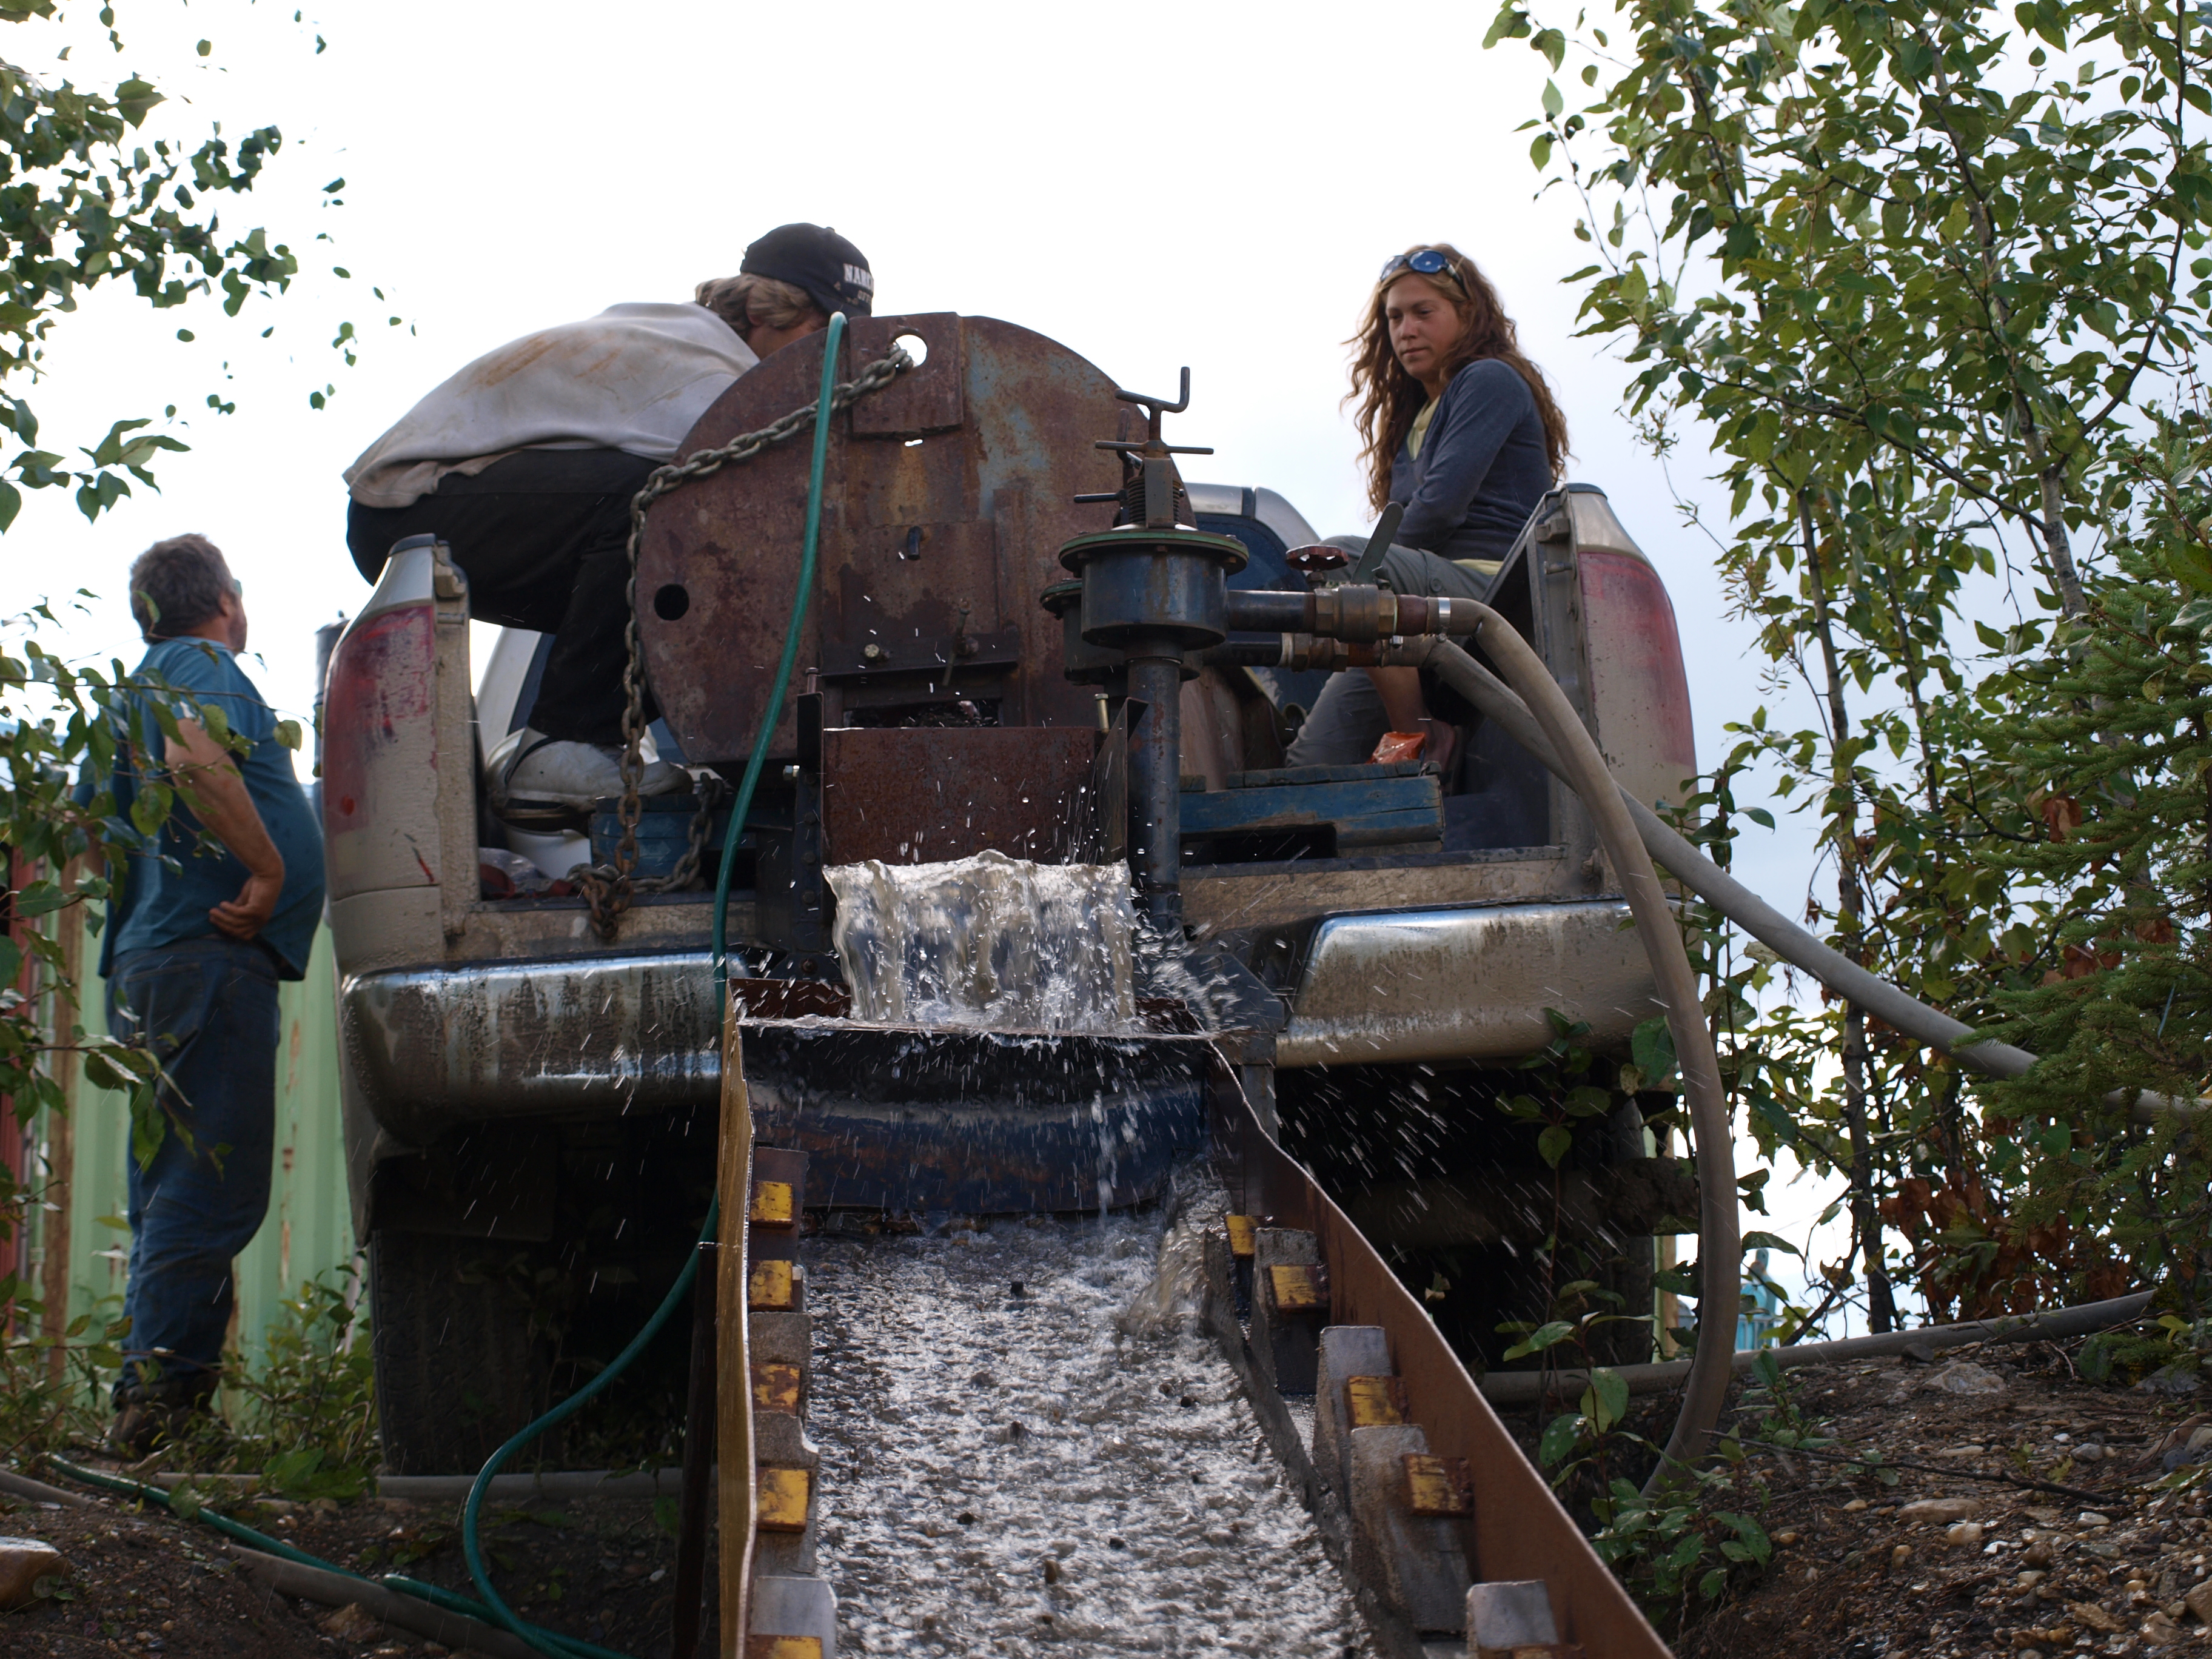
The Sluice Box
In North America, the sluice is the most common concentrator on commercial placer gold wash plants. The sluice box was developed during the California gold rush around in 1849. The first sluices were called Long Toms. Early sluice boxes consisted of long wooden boxes with wooden riffles and moss or burlap to line the bottom. The primitive long toms saved a ton of labour but miners at that time did not have a pre-scrubber and had to pick all the rocks out by hand and pan all the concentrates.
Modern sluices haven’t changed that much from the original design. We use metal now and have scientific studies to analyze the optimal riffle designs and matting but the concept is exactly the same.
Sluices work by creating a vortex behind the riffles. As the gravel/water slurry flows over the riffle it creates an eddy current as it rolls back on the riffle. The eddy causes the water to momentarily lose inertia and it can no longer carry the dense sediment. Dense material is held in the riffle as long as the water is flowing. Once the water stops, the suspended material is released from the riffles, that’s why it’s not good to stop and start a sluice box.
There are a variety of riffles in use today but they all work the same way. There have been some excellent studies on different riffle designs and matting.
A study of the fine gold recovery of selected sluice box configurations, Jamie Hamilton at UBC: download PDF
Placer Gold Recovery Research by Rany Clarkson of New Era Engineering: download PDF
Studies show which riffle designs work the best, what spacing between riffles is optimal and what angle to run at, typically 1.5 to 2.5 inches/foot of sluice run.
There are several different types of riffles in use today. The Hungarian riffle and expanded metal are most common in commercial sluicing operations. Miners in New Zealand developed the hydraulic riffle in the 90’s that allows water to inject under the riffle which keeps them from packing. It’s similar to the way that the Knelson concentrator uses a fluidized bed, more on that later in this article.
Some modern designs have abandoned riffles altogether and use a drop riffle or vortex such as the Devin Sluice or Dream Mat. These vortex systems catch gold in spirals carved into the matting or machined into aluminum sheets. Vortex riffles and matting have the advantage of quick clean-ups but they tend to work better on small-scale operations and clean-up sluices.
Devin Vortex Riffles
Different types of matting are used to catch fine gold. Miner’s moss is a typical matting that is made of a synthetic material with lots of loops to catch gold. Miner’s moss is kind of like a thick version of the soft side of velcro or thick carpet. Actual carpet is used in some cases as well. There are lots of high tech rubber designs on the market such as Gold Cube matting, Gold Hog, Dream Mat and many other designs. Some matting is easier to clean up than others but they all catch gold.
Other variations on the sluice include the live bottom and oscillating sluices. The live bottom box works really well. The live bottom box uses a thick rubber sheet on the bottom of the sluice box and has mechanized rollers that sort of massage the rubber moving it up and down. Similar to the rollers in a massage chair. That keeps the material from packing up and keeps the gold at the bottom.
Sluice boxes can handle huge scale production, they can be made very large and multiple sluices can be run together to handle even higher production. The largest wash plants in the world run multiple sluices. All sluices require careful setup and lots of tweaking to make sure they’re catching all the gold. Sluice riffles will eventually become packed with black sand and can no longer catch gold, for this reason, a sluice must be cleaned out regularly.
Despite the ubiquity of sluices and their simplicity an alarming number of commercial miners are losing fine gold off the end of their sluice. Quality control and testing is essential to make sure that your sluice is operating as it should be. A full-scale sluice can reliably capture gold down to 150 mesh with proper setup.
Sluices have the major disadvantage of slow cleanup times that require a full shutdown. They also lose gold when you start and stop the slurry feed. They are simple and easy to repair in the field though.
Pros
Cons
Can handle large volume
Proper setup is critical
Simple design, easy to fix in the field
Require shut down for cleanup
Modifications and adjustments are easy
Large footprint on commercial operations
Require frequent cleanups
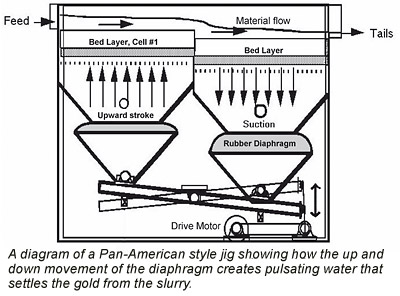
Hydrostatic Jigs
Hydrostatic Jigs, often just called “jigs” are very different than a sluice. They use a pulsating water action to separate gold from the lighter gangue materials. Jigs have serval components that work together to separate gold. Typically they have a screen in the upper section which holds a layer of steel balls called “ragging”, usually about 3” thick. Below the screen and ragging is a rubber diaphragm that is moved up and down rapidly by mechanical means producing a vertical pulsing action. The feed material flows over the screen is allowed to settle into the ragging.
The pulsing action in combination with the steel shot allows dense materials to settle to the bottom while lighter material is forced up and carried away by the flow. The action of the jig is based on Stokes Law which determines the rate at which particles fall while suspended in a fluid based on their density. Jigs are usually arranged in a series of cells, each with its own screen and diaphragm. Any number of cells can be used in combination to increase capacity.
The gold is stored in a container in the bottom called a “hutch”. One advantage to this system in commercial operations is that gold nuggets and pickers are not sitting in the open as they would be in a sluice box so it would be difficult for an employee to steal the gold.
Jigs first came into use in placer mining in 1914 in California. They were soon adopted to the large floating dredges that were in use at the time. Jigs had several advantages over sluice boxes. First, they take up much less space, which was important on a floating dredge. Secondly, they can be cleaned out without having to shut down the operation. You simply need to drain out the hutch and you’re back in business.
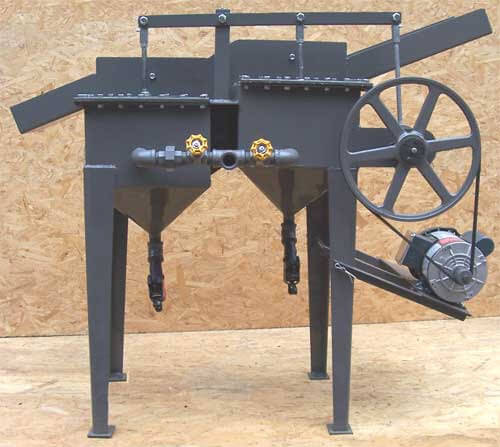
One of the first jigs used in placer mining was the Pan American Jig wich consisted of two cells. The Pan American model had two 42-inch square cells and could process 20 yards per hour. Multiple units were used in tandem to increase capacity.
Many modern jigs follow the exact same design as the Pan American. Many manufacturers around the world still produce an almost identical machine. There are many variations of jigs today but they allow work on the same principle. Smaller jigs are often used for cleaning concentrates but larger units are also used in full-scale commercial operations.
Pan American Jig
Pros
Cons
Clean up without shutting down
Initial setup requires lots of tweaking
Small Footprint
Rubber diaphragm wears out
Gold stored in safe container
Low capacity per cell
Dummy proof once set up
Specialised parts required
Centrifugal Concentrator
Centrifugal concentrators are the most efficient method for concentrating placer gold in terms of capturing fine gold and overall revocery. They rely on a rotating drum that resembles a washing machine. The drum spins at high RPM, usually at least 100 RPM, creating a centrifugal force that pushes heavy elements to the outer edge. If you’ve ever ridden the gravitron ride at an amusement park you’ll know firsthand how this works.
In a centrifugal concentrator, the lighter material is allowed to flow over the top of the bowl and is discharged as tailings, the dense material is held in riffles and retrieved during cleanup. The principle is similar to a hydrostatic jig except more G forces are applied. At high G forces centrifuges are less sensitive to particle size than other gravity methods (sluice, jig, etc) and as such can retrieve extremely small gold grains down to 400 mesh.
There are four types of centrifugal processors on the market today: the Knudsen Concentrator, Falcon Concentrator, Knelson Concentrator, and the Gold Kacha.
The Knudsen was the first centrifugal concentrator used in placer mining. It was invented by George Knudsen of California and patented in 1942. The Ainlay bowl was patented in 1928 and saw some experiments in placer mining but didn’t take off. The Knudsen bowl is a 12” to 36” diameter bowl mounted on a vertical drive shaft. The bowl is tapered to allow the slurry to rise up the side while the riffles catch the gold. The Knudsen bowl was used all over the world most notably in California, New Zealand and in Africa. The Neffco Bowl is a modern version and is still used today.
The Knelson Concentrator was developed in Burnaby, BC in 1980. The Knelson is a bit more complex than the Knudsen Bowl and runs at a higher RPM. The Knelson concentrator uses a perforated cone and uses pressurized water that forces in from the outside of the bowl. The cone experiences a force of 60G’s while the water pushes against it, the counteracting force acts to keep the heavy particles fluidized allowing a continual replacement of light grains by heavy ones and avoiding the compaction of riffles like you see in a sluice. The Knelson concentrator is very efficient but like all centrifugal concentrators it requires frequent cleanups.
Falcon concentrators are similar to the Knelson. The main difference is the angle of the walls. Both use the same water pressure system that pushes against the centrifugal force creating a fluidized bed. Falcon (now called Sepro Mineral Processing) is based in Langley, BC, and was founded in 1987. It’s interesting that both Knelson and Falcon were developed in Greater Vancouver. Both companies are world leaders in mineral processing technology.
The Gold Kacha (GK) is a really cool system. I was introduced to this device on a recent placer exploration trip to Sierra Leone, Africa. The Gold Kacha was developed in 2005 in South Africa by Appropriate Process Technologies (APT). It’s similar to the Knudson/Neffco bowl but has several advantages. The Gold Kacha can easily process gold down to 450 mesh (30 microns) and the riffles are designed to prevent gold compaction. The GK can run 3-4 cubic yards per hour.
It’s set up in a turnkey package that’s easy to use. The biggest advantage is that the Gold Kacha retails for $1,500 USD. All the other concentrators on this list are at least 4 times that cost but the GK was designed for use in third world Africa to help artisanal miners avoid using mercury.
All centrifugal gold processing machines work well for catching very fine gold, they catch coarse gold too but the fine gold is the challenging part. Centrifugal processors can catch extremely fine gold very well but they require frequent cleanups, usually every hour or so. Some wash plants use multiple centrifuges and are able to isolate them using valves so that while one centrifuge is being cleaned the others are still operational, I think we’ll see more of these systems in years to come.
Pros
Cons
Able to retrieve gold < 400 mesh
Frequent cleanups are required
Easy to use, no special knowledge required
Very expensive (except Gold Kacha)
Low water consumption
Low capacity per unit (compared to sluice)
Low power/fuel consumption
Requires thorough pre-screening and clean water
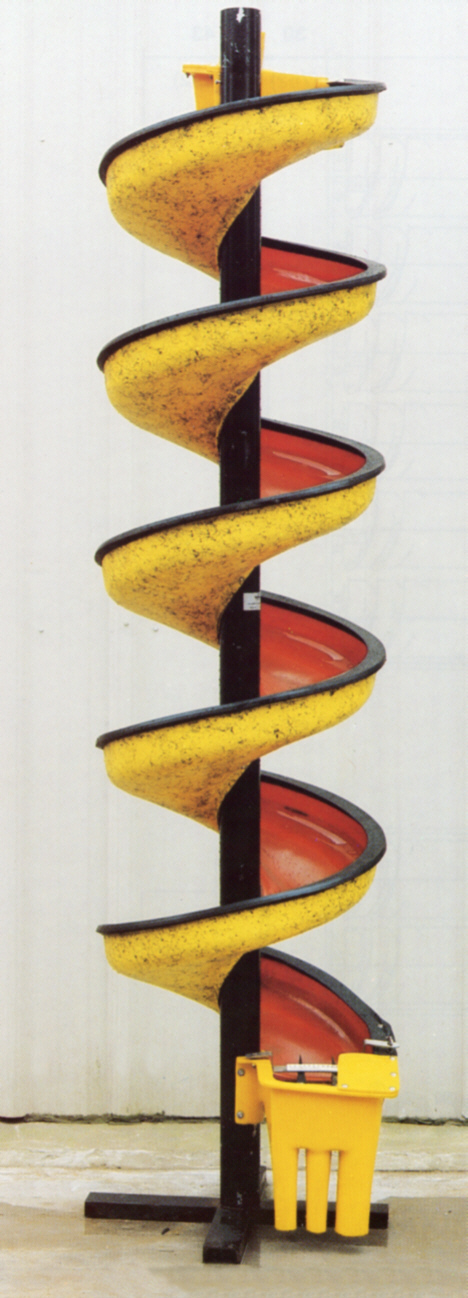
Spiral Concentrators
Spiral concentrators are not commonly seen at placer mines these days. They were popular in the 70s and 80s but have fallen out of fashion. They are very commonly used in the beneficiation of heavy mineral sands, chromite, tantalite, iron ores and fine coal.
Basically, spiral concentration involves a stack of spirals that are fed from the top using a low-pressure slurry pump. The slurry flows down the spirals like a water slide and separates based on density. At the bottom there are splitters that divert the slurry at different points along the radius of the spiral. The outside of the spiral will have the tailings, since they are less dense the spiral action forces them to the outside, the concentrated gold is on the inner radius and the “middlings” are in the middle. The principle is similar to the way that a shaker or wave table separates gold.
Spirals are often run several times so that the middlings can be run again to increase their level of concentration. There are several variations such as the pinched sluice and the Reichert Cone which uses a series of stacked cones instead of spirals. The spirals are usually made of fiberglass and are lightweight and fairly inexpensive. They are able to reliable capture gold from 6 to 200 mesh, some models can catch down to 300 mesh. Placer spiral systems can handle 4-10 yards per hour but can be scaled up with more units.
Pros
Cons
Able to retrieve gold < 300 mesh
Require consistent, laminar flow
Easy to use, no special knowledge required
Low capacity per unit (compared to sluice)
Low cost and cheap to operate
Requires thorough pre-screening
Low power/fuel consumption
Dry Washers
Gold is found in areas that don’t have water available, such as the desert regions of California, Nevada, Arizona, and Australia. Placer miners came up with a solution for dry washing.
The process works on the principle of winnowing, which uses wind or air to separate dense material from less dense material. The technique has been used for millennia to separate grains from their husks. Dry washers use a short, waterless sluice and pressurized air in combination with vibration. The sluice portion of a dryswasher has a porous bottom, either canvas or a very fine screen, that allows air to pass through. The whole thing is set on a steep angle so that the material can work its way over the riffles. Air blows up from the bottom and provides some buoyancy for lighter material.
Small scale dry washers resemble a highbanker with a screen/grizzly on the upper section and a sluice-like screen setup on the bottom. There are hand-operated units using bellows, and gas-powered blowers. Commercial-scale drywasers are somewhat rare but they are used in gold-rich areas of Australia and parts of the United States.
There are no manufacturers that make commercial-scale dry washers. All large scale units are custom made. Most of them are fed by a loader and distribute the material through a screen system into multiple cells of smaller dry washer sluices. Keene is developing a commercial drywasher but it’s not available at this time.
Material to be run in a drywasher must be completely dry, it must contain less than 3% water otherwise it won’t work. The material must also be disintegrated and not clumped together by clay or caliche. Studies show that under ideal conditions a dry washer will have about 15% less recovery than a wet system (ie. sluice).
Pros
Cons
Doesn’t require water
Lower recovery than wet systems
Can be moved rapidly
Makes a lot of dust
Fast cleanup (compared to wet sluice)
Frequent cleanups are required
Feed Systems
We’ve covered screening systems and concentrators. The next component of a wash plant is the feed system. Wash plants can be fed in different ways. Some have a hopper that is fed by an excavator or loader, others are fed by a slurry pump or dredge.
Hoppers
The most common feed system on a wash plant is the hopper. The hopper is a large container that is filled with raw gravel and allows it to be dispersed at an even rate. Many hoppers are gravity-fed, they operate in a similar way to an hourglass. They have an inverted pyramid shape and act as a funnel.
Other hoppers have a belt or track in the bottom that manages the feed rate. I’ve seen some cool designs in the Yukon that use a recycled excavator track in the bottom of the hopper to slowly feed a trommel.
The hopper won’t feed itself and must be refilled regularly by an operator. Most operations either use an excavator or a front end loader to keep the hopper full. Some miners use a conveyor belt system in combination with a hopper to maintain an even flow of material.
Pros
Cons
Maintain even flow (when not clogged)
Large rocks can get stuck
Simple design, not much to break down
Requires operator to refill regularly
Bucket Ladder
The bucket ladder is the most efficient system for feeding wash plant. This was the norm on the monster floating dredges that scoured the gold-bearing placers of western North America from the late 1800s till the 1950s. These monster dredges moved ridiculous amounts of gravel, each dredge could efficiently process up to nine tons of gravel per minute, with an average of 20,000 cubic yards per day!
The bucket ladder consists of a boom and a series of metal digging buckets. It’s sort of like a giant chainsaw. The buckets are specially designed with a digging edge and held together with a giant chain. The boom is raised up and down with a gantry winch system. The buckets continually dump material into the scrubber system (trommel, screen deck or any other system that we discussed above).
The depth of the bucket line is limited to the length of the boom. Typical industrial dredges could dig up to 60 feet deep. The buckets are able to dig up soft bedrock but if hard rock is encountered they cannot. The buckets can’t handle large boulders either. The dredge in the video below isn’t at a placer mine but it shows what a modern bucket ladder dredge can do.
Environmental restrictions have made it a lot more difficult to operate a floating plant with a bucket line but some are still in operation today in Europe, Africa, Russia, China, Asia, South America, Mexico and the Yukon. Modern bucket ladder dredges are common in non-placer applications
Pros
Cons
Constant supply of material
Can’t dig too deep
Huge capacity
Massive overhead cost
Excavation and delivery in one step
Not very mobile
Few breakdowns
Regulatory hurdles
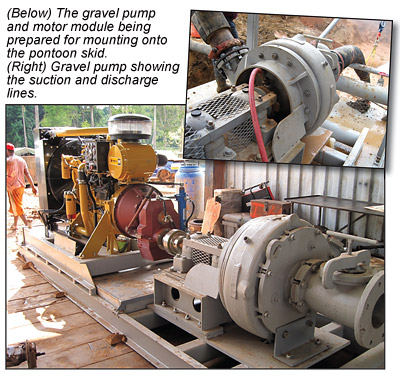
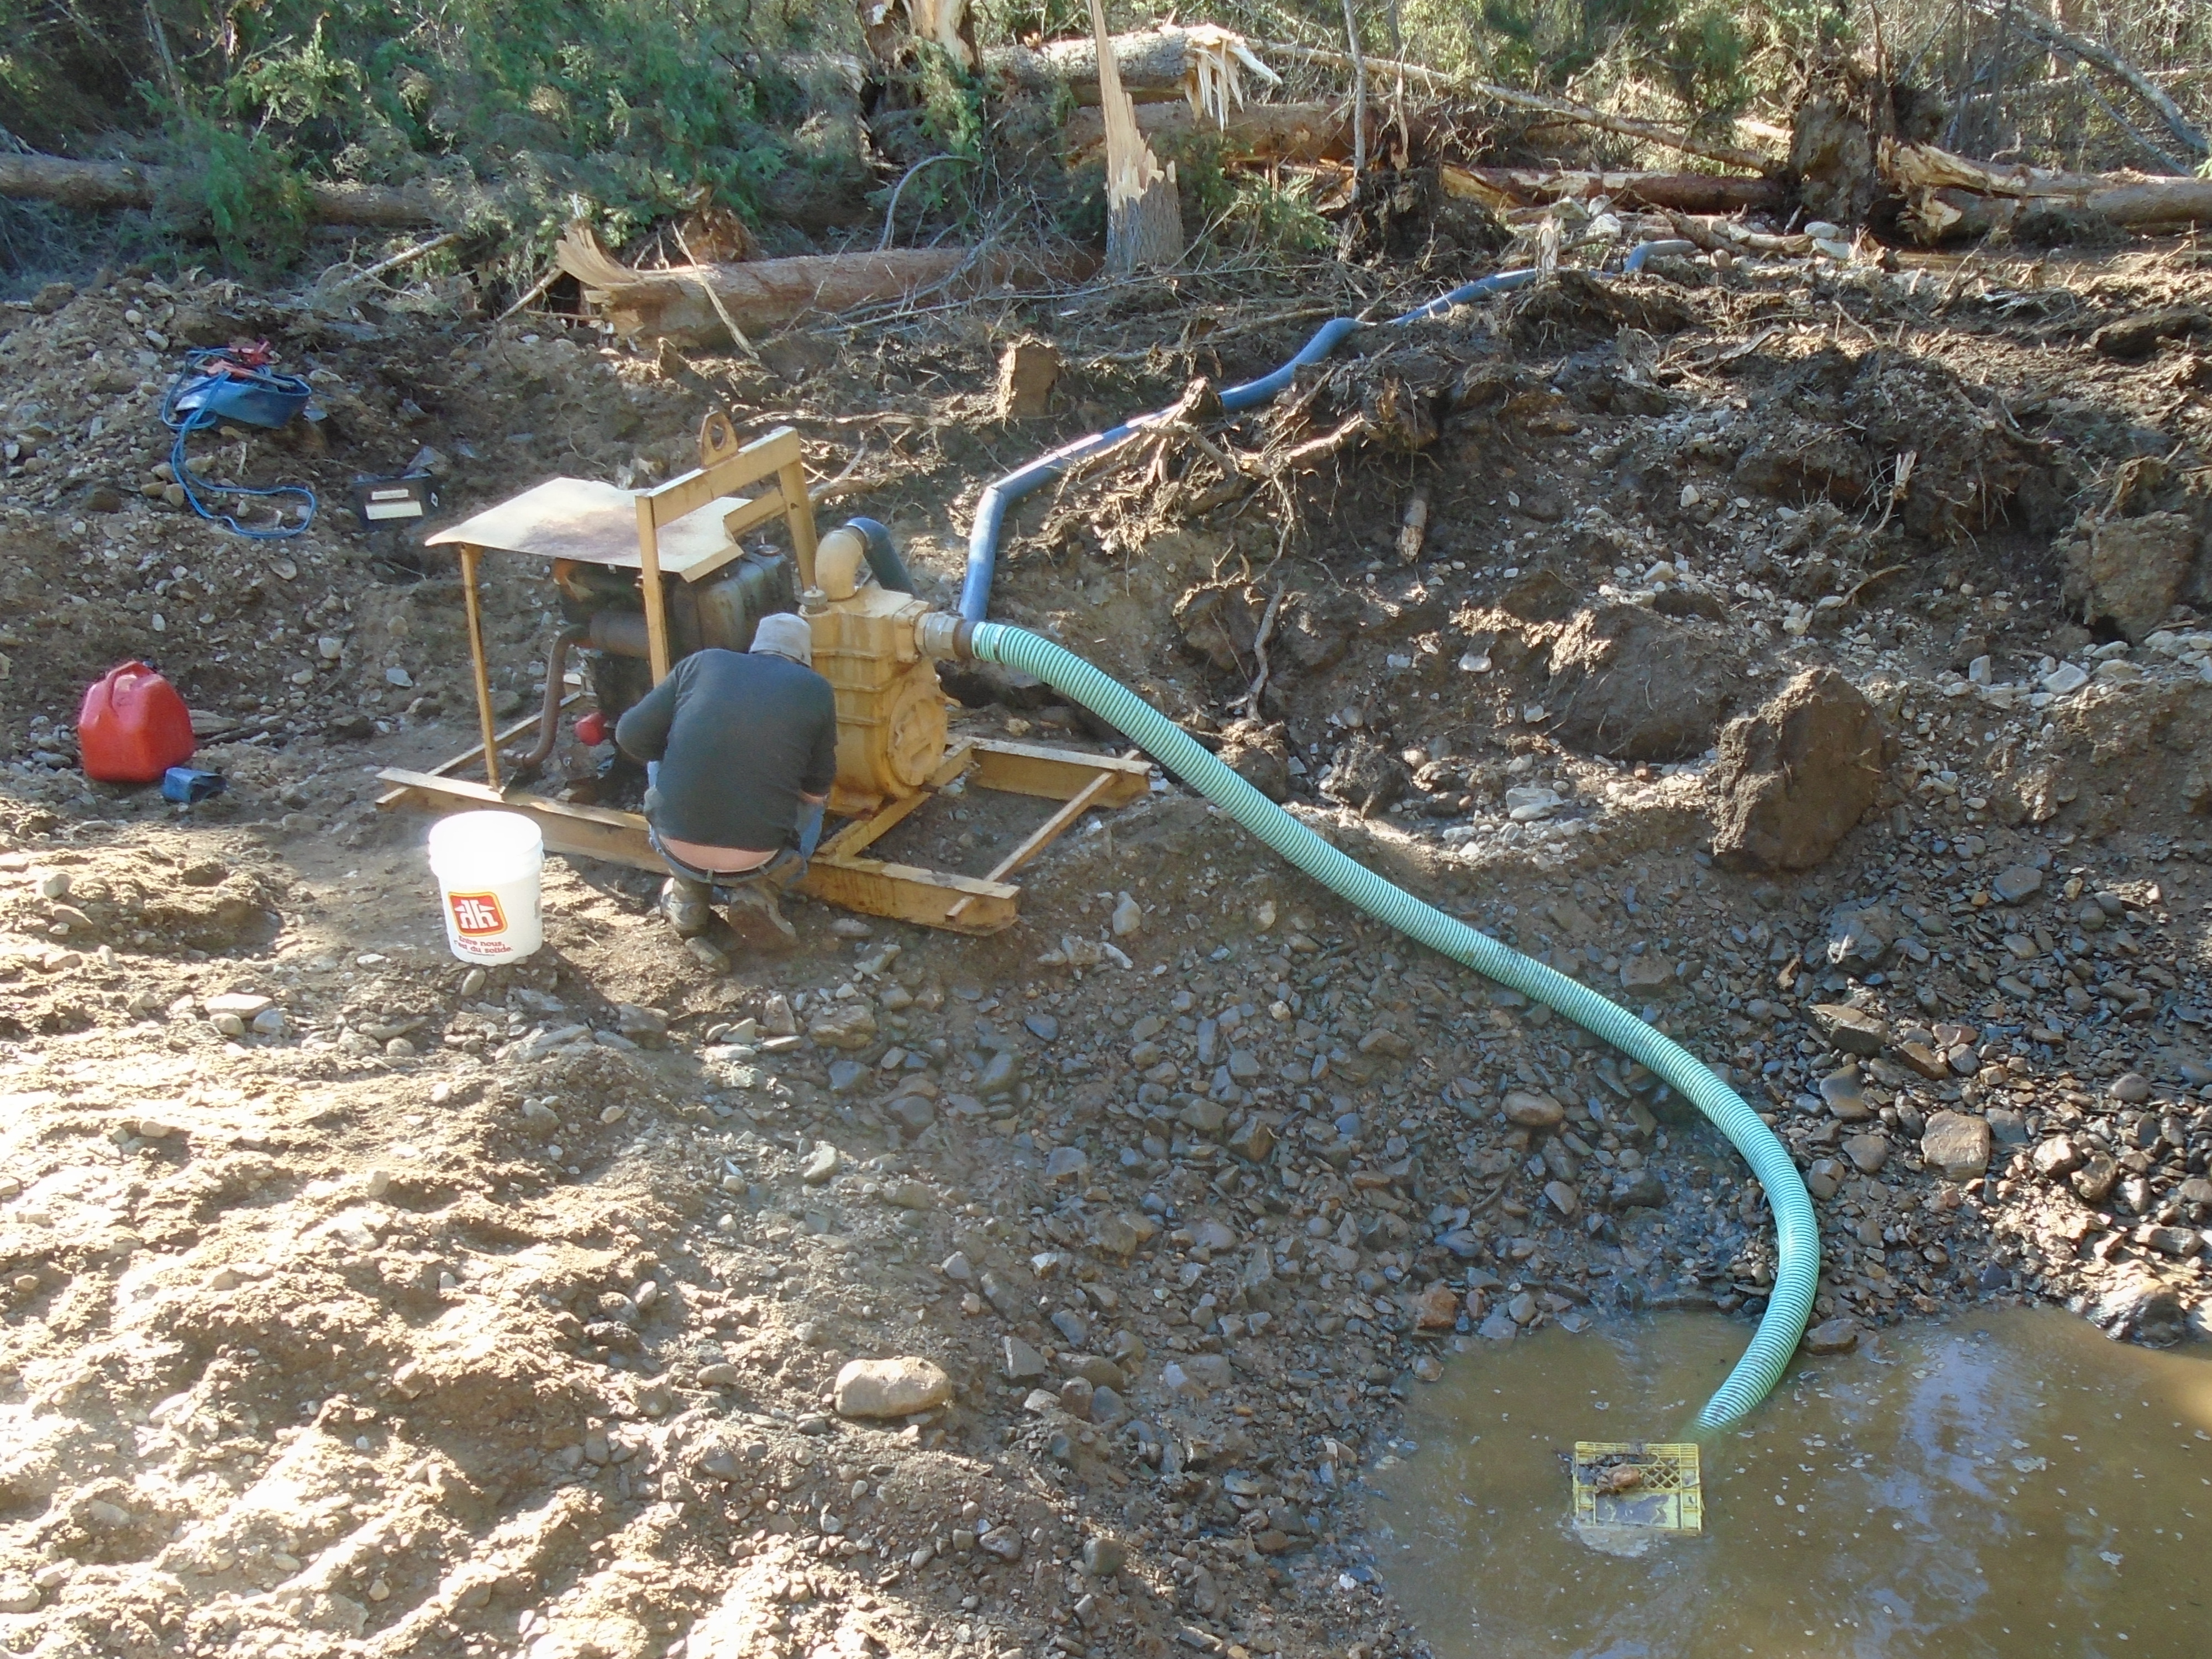
Gravel Pump
One of the most efficient ways to feed a wash plant is with a gavel or slurry pump. There are several large-scale placer mines in Alaska and other parts of the world that mine by hydraulic means using large water monitors. The material is washed into a pit and pumped up to the wash plant using large industrial slurry pumps.
Gravel pumps don’t work in every scenario but if your location is favorable this is a very efficient way to mine. The slurry pump can be unmanned, saving labour costs and allowing workers to focus on other areas of the mine. These pumps are very expensive initially but the savings in operating costs will pay off over time.
There are a lot of mines operating in wet ground in BC and the Yukon and a slurry pump would be an excellent solution. Instead of fighting the groundwater you can use it to your advantage.
Pros
Cons
Consistent feed of material
High initial cost
High capacity
Requires careful mine planning
Savings on labour
Doesn’t work in every location
Good solution for wet ground
Possible regulatory hurdles
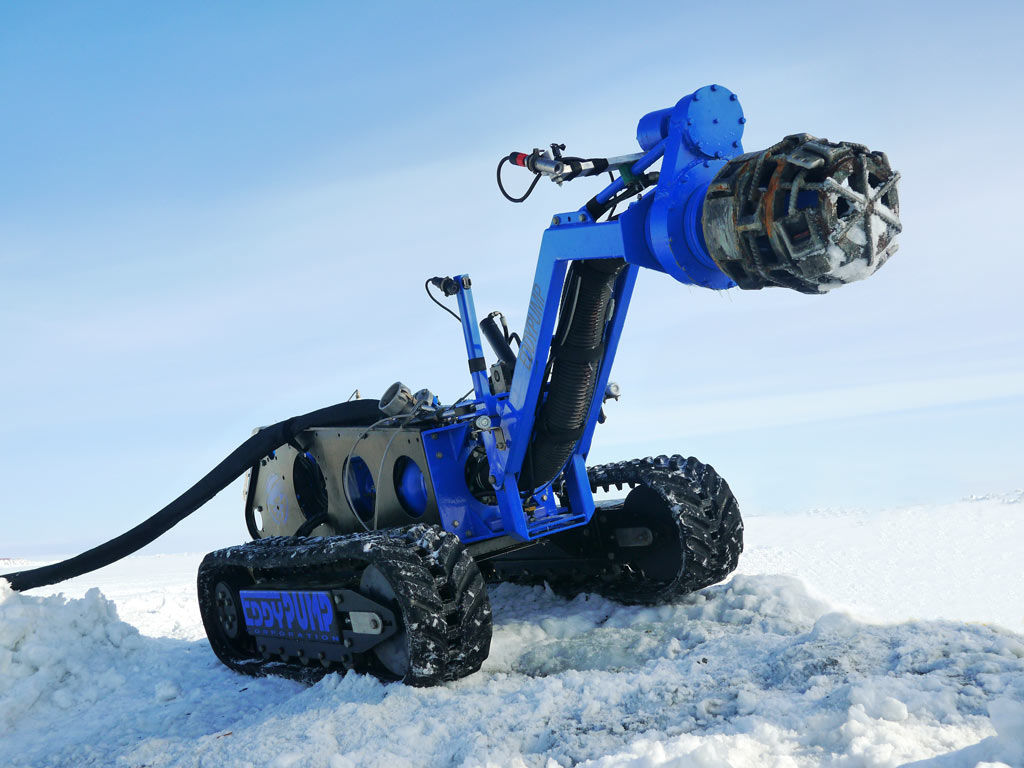
Suction Dredge
Suction dredges are similar to a slurry pump set up. A suction dredge uses a venturi to create a vacuum that sucks up gravel and water at the same time. Floating dredges are commonly used in small to mid-scale mining. Floating dredges are classified by the diameter of the suction hose which varies from 3 to 8 inches.
Modern suction dredges first became popular in the 1950s due to the availability of good, portable, centrifugal water pumps and modern diving equipment. Some jurisdictions such as British Columbia and parts of California have banned suction dredging but it is a very efficient method that is used around the world.
There are some very advanced dredge machines on the market today. Large scale operations are using 8-inch and larger suction lines. Some of the most interesting dredge innovations are being developed for use on the Bearing Sea in Alaska. The robot dredge in the picture below is a really cool new technology that uses a remotely operated robot with a cutting head attached to an 8-inch dredge.
Not all dredge systems use a floating platform and can be fitted to just about any wash plant. You can get excavator-mounted units up to 12” in diameter that can be used in a regular mining pit. These systems advertise up to 600 cubic yards per hour of production.
Some systems use slurry pumps instead of a venturi in combination with a cutting head. The advent of undersea mining has pushed the envelope on this technology and we’re going to see a lot of advancements in the coming years.
Pros
Cons
Consistent feed of material
Doesn’t work in every location
Excavation and feed at the same time
Possible regulatory hurdles
Can be unmanned
Wash Plant Carriers
This is the part of the washplant that supports the scrubber, concentrator, and feed system.
Stationary Skids
Many large wash plants are mounted on a steel frame welded to metal skids. This system isn’t very mobile. Skid-mounted plants are meant to stay in one place for a long time. When it’s time to move they are pulled by heavy equipment such as bulldozers or large excavators and dragged into position.
Skids are simple and stable but don’t provide a lot of mobility.
Trailer or Frame with Wheels
Small to mid-sized wash plants can be mounted on a trailer or frame with wheels. This provides an easy way to move it around. The trailer will often have a leveling apparatus to stabilize the plant while in use. Not much else to say, it’s a trailer we all know what that is.
Floater Plant
The floater plant, also known as a “Doodlebug” is a very efficient way to mine. The plant can be mounted on pontoons or a barge. Floater plants have the ability to move very rapidly in a pond of their own making. It takes planning to operate efficiently without boxing yourself in but when properly executed a floater setup can move a lot of material quickly.
Any type of scrubber, concentrator, and feed system can be fitted onto a floater.
The large bucket line dredges technically fall into this category but most floaters today use an excavator to dig and pull the barge. For a floater operation to work effectively the ground can’t be too deep. Floaters mine in one continuous direction mining in front of the plant while the tailings are deposited behind. It’s almost like an assembly line approach to placer mining.
Pros
Cons
Rapid movement
Don’t work in deep ground
Efficient mining and tailings management
Require a pond for the plant to float on
Floater Plant in Atlin, BC
A placer wash plant is the sum of its parts. It’s not a trommel, it’s not a sluice, it’s the whole package. There are just about as many combinations as there are miners. Placer miners are always coming up with new innovations to solve problems and mine more efficiently.
There is no one plant that is the best in every situation. They all have their strengths and their weaknesses. The type and size of your gold, the type of gravels you’re dealing with, ground conditions, regulatory environment, available capital, and other factors all work together to determine what type of wash plant is best for your mining operation.
What makes placer mining unique is that you have control over your own destiny. The barriers to entry are low and a small group of people can have the opportunity to develop a mine and produce gold on their own terms. You don’t need a corporation and millions of dollars to succeed in placer mining. That freedom is a double-edged sword though. The majority of placer miners bite off more than they can chew and fail miserably.
This article lists some sure-fire methods to lose your shirt in placer mining that apply to large-scale mines and small hand operations alike. By knowing the mistakes that others have made you can avoid making the same mistakes yourself.
Too much equipment, Too soon
There is a lot of equipment available to placer miners these days. A lot of rookie miners will buy way too much equipment before they even get started. That’s a great way to blow your budget without even finding any gold.
The fitness industry relies on this same principle. It doesn’t take much effort to go out and buy a brand new stationary bike but just owning that machine isn’t going to give you abs of steel. Getting in shape takes hard work and dedication. Placer gold exploration works the same way. Some miners seem to think that buying a bigger wash plant, a bigger excavator, or even the latest and greatest highbanker will somehow make gold appear. It’s easy to buy equipment, finding gold is hard.
If you want to blow your whole mining venture in the first season then buy too big of equipment before you’ve even explored your claim. You’ll be part of the illustrious club of would-be miners who failed before they even got started.
We were contacted recently by a miner who wanted to hire West Coast Placer to do some bedrock mapping. The miner had recently purchased a $250,000 wash plant. We asked them where they were mining and they responded, “We’re hoping that you can help us figure that out.” They didn’t even have a claim yet. That is not a recipe for success.
Other miners have spent their money on excavators, loaders, and high-end camp setups but then had nothing left to buy a drill. At different stages of placer exploration you’ll need different equipment. Having a solid plan will help you figure out what is required at each stage.
If you want to be successful explore the claim first and get the gear that you need to work in that specific situation. You don’t need a washplant until you’ve actually mapped out a mineable gold deposit and have a mining plan figured out. Start out with basic tools and expand as needed. During exploration the trick is to gather as much information as possible while spending the least amount of money.
Get hooked on a glory hole
We can all look at other miners who spent three years digging in the same spot totally convinced that it’s going to make them rich. We shake our heads and think of how stupid they are. However, a lot of miners fall into this trap.
What is it about glory holes that suck in the imagination of placer miners? It’s sort of like gold fever. Miner’s get hooked on the belief that one specific spot holds all the gold and that if they can just dig it up they’ll be rich.
This sickness can affect rookies and even some experienced miners. Sometimes it’s driven by a story from the past, or a misinterpretation of a geological feature. Getting hooked on a glory hole is similar to being in a romantic relationship that is totally toxic. All your friends know but you don’t realize it yourself until after the breakup.
This situation can be easily avoided by proper sampling and testing. A whole season’s worth of excavating in the wrong spot ( or multiple seasons for some people) can be avoided with one drill hole. If you are convinced that there is a whole bunch of gold in one spot, and you haven’t tested to confirm, then you have fallen victim to the glory hole trap.
Drink your own Kool-aid
Every placer miner has their reasons for digging and exploring in the spots that they do. Sometimes that’s based on good test results but often it’s based on nothing more than imagination.
Many miners have developed a form of fairy tale in explaining the gold deposits on their claim. The geological, fluvial, and glacial environments that create placer pay streaks are extremely complex. There are entire fields of science that dedicate themselves to understanding these processes. Even an expert geomorphologist can’t walk up to a placer claim and tell you what material has been deposited over the last 4 glacial periods, where the ancient channels are located and what ancient streams used to flow over the mountain range. If you think you know those answers then you are heading down a dangerous path.
I’ve heard a lot of stories from placer miners who seem to know the exact play-by-play movements of glaciers during the last ice age and therefore know exactly where their gold has been accumulated. Obviously, they don’t have reliable knowledge of the geological history of their claim but they have convinced themselves that they do.
Others are convinced that there is a gold source up the mountain and it has puked out placer gold in a specific location that they’re about to mine. All without sampling and mapping out deposits.
It takes massive amounts of time and money to reliably recreate glacial movements. They are extremely complex and hard to trace. There are well-funded research projects that study these kinds of things with teams of experts and even they are not 100% certain.
If you think that you have those answers and haven’t hired expert geomorphologists, drilling companies, and performed large-scale studies to find out, then you’re just fooling yourself.
Truthfully in placer mining, you don’t need to know how the gold got there. All you have to do is test and sample the ground to find out where the gold is right now. Finding mineable placer deposits is hard and there are no shortcuts. There are techniques that work really well but believing in your own fairy tales isn’t going to make the gold appear. It’s much better to assume that you know nothing and explore in a systematic way.
Put too much emphasis on stories from the past
Every creek has a success story from the past about an old-timer who pulled out some rich gold from an ambiguous location nearby. They usually go something like this:
“In the 1920’s Johnny Miner pulled out a 30-ounce nugget from somewhere up on that hill over there.”
Other stories involve drifts built by Chinese miners in the 1890s or a rich mine that was wiped out by a wildfire never to be found again. They have a lot in common with urban legends with the right mix of potential gain and just enough details to keep you interested.
There are lots of stories like this and a lot of them are true. Being a placer miner in the 21st century involves being a little bit of a historian as well as an explorer. After all, there are pretty much zero creeks in the world that haven’t had a pan dipped in them at least once before.
There are several issues with historical information that sometimes slip through our radar. We all know that clickbait stories on the internet are probably exaggerated to capture our attention. That phenomenon is not a new invention. Speculation and hype have always been part of mining. It was probably even worse during the gold rush periods of the late 1800s. Testing techniques are not standardized either. Even if a story is meant to be factual the miner might not have had a reliable technique to test his grades. You could fall victim to second-hand confirmation bias from 100 years ago and not even know it.
Whether these stories are true or not you still need to do your own testing. Reliable historical information can be an excellent starting point but it must be taken with a grain of salt. If you have truly uncovered some historical information that provides evidence for a forgotten placer deposit then start testing that area. Remain objective and if the test results don’t show what you’re expecting then move on.
Far too many miners have spent their time and budget blindly searching for a rich paystreak that was mentioned decades ago. I personally know miners who have spent hundreds of thousands of dollars searching based on three sentences of historical information.
Keep an open mind and let the evidence guide you. It’s important to know when enough is enough.
Insufficient sampling
We’ve all heard the old adage that in real estate that the three most important things are location, location, location. In the world of placer mining, the three most important words are sampling, sampling, sampling.
This is the single most important aspect of placer mining and exploration. Miners of all sizes have lost money and often their entire budget due to poor sampling. There are lots of reasons why miners forgo proper sampling. It costs money, it takes time away from mining, maybe they don’t know how to sample properly in the first place.
Sampling will make or break your placer operation. It must be done over a broad area and in a way that won’t fool the person doing it. The quality of sampling is just as important as the quantity.
For example, it is critically important to measure the volume of each sample accurately otherwise the grade calculations will be totally wrong. Say you sampled half an excavator bucket and found 3 grams of gold. Is that 3 grams per yard? Or half of that? It makes a big difference. Let’s say you’re using 5-gallon pails. Were they all full when you ran the sample? Half-full? Three quarters? Your grade calculations will change dramatically based on the volume.
Bigger samples are always better but there is a trade-off between lots of small samples and only a handful of big ones. Each situation and budget will call for variations in the sampling plan. You want to have enough locations tested to be confident that you understand the size and distribution of your pay streak while getting reliable results in each sample.
It’s important to test areas outside of the location where you think the best gold is. That means testing every depth interval from surface to bedrock as well as testing ground whether you think it’s a location that you can mine or not. Many miners have missed out on unbelievable pay because they only tested areas that they thought were favorable for mining. Here’s a tip, every spot is favorable for mining if the gold grades are high enough.
Placer exploration is a little bit like the board game Battleship, where you have to shoot missiles on a blind grid to sink your opponent’s ships. You start out knowing nothing but over time you gain evidence of where things are located, in this case gold instead of toy battleships. The same systematic approach will lead you to win Battleship as it will to mine a profitable placer deposit.
If you think you’ve done enough sampling, you haven’t. If you start washing gravels before you have sampled a broad area with verifiable tests you are guaranteed to lose your shirt.
Before you start mining make sure that you know the depth, location, and the grades of your pay gravels. There are a lot of opinions on what the proper way to sample is. The important thing is to be thorough and be consistent.
Get a Partner
Many great placer mining operations have met their demise due to disagreements between partners. It always sounds like a good idea at the time but partnerships fail for a variety of reasons. Most often financial disagreements.
Howard from the great mining classic, The Treasure of the Sierra Madre said it best,
“Ah, as long as there’s no find, the noble brotherhood will last but when the piles of gold begin to grow… that’s when the trouble starts.”
Gold does funny things to some people. Even people that you wouldn’t expect. There’s something about the yellow metal that affects us deep inside. It’s not just the financial value either. Silver, copper, uranium, platinum, and numerous other metals are mined in similar ways but people don’t get as emotionally attached to any of those things. The only other mineral that affects people in a similar way is diamonds.
Gold fever has existed as long as people have been mining. The primary reason that the Spanish explorers stumbled upon North America was the search for gold. Christopher Columbus wasn’t looking for America, his sole purpose was to find Cipangu, the island of “endless gold.” The Spanish explorers famously ravished and betrayed civilizations in the Americas to steal their gold. The betrayal met its climax in 1532 when Francisco Pizarro famously betrayed the Inca ruler Atahualpa.
Partnerships fail for many reasons but greed is often the primary factor. Sometimes personal finances fall apart, a partner gets divorced, falls behind on truck payments, anything can happen. A lot of placer mines that have done everything right and developed great gold deposits have fallen apart due to disagreements between partners.
Gold mining partnerships always start out with the best intentions but humans are complex and things can change. If you’re considering a partnership make sure the person or people that you’re going to join forces with are going to stick it out for the long haul. Make sure you have a solid contract in place that has been verified by a lawyer or notary.
They say a business partnership is like a marriage. You want to be careful who you’re going to bed with.
Set Unrealistic Deadlines
One thing that has ruined the dreams of many would be gold miners is rushing the exploration process. Exploration, planning and logistics take time. Everyone is eager to start mining but it takes preparation to get to that point. A lot of the points in this article are often the result of setting unrealitic deadlines.
A lot of miners start buying wash plants or heavy equipment before they are ready to use that equipment. As a result they get trigger happy and skip important steps in the exploration process. I know a miner who recently told me that they have to start mining next season no matter what. This person quit his job and has started to buy mining equipment. At the time that we were discussing this he had not found a viable gold deposit yet. If he followed through with that plan he’d have definitely lost his shirt.
A lot of miners raise money by having people invest in their operations and those investors inevitably want a quick return on their money. Many placer operations have failed due to pressure from investors to fast track the mining process. This is one reason why partners or investors can kill your placer operation. If everyone onboard has realistic expectations about the time frames required for exploration in advance the project has a lot higher chance of succeeding. It’s important to be honest about how much time it’s going to take to explore for and find a gold deposit.
At West Coast Placer we provide exploration services to placer miners of all sizes. We’ve seen a lot of successful operations and have helped miners develop their properties into profitable mines. We’ve also seen a lot of ventures fail miserably. There are some practices that are guaranteed to lead to failure and yet rookie and experienced miners alike make these mistakes over and over again. Hopefully these tips will help you stay successful in placer mining and keep you from losing your shirt.
Finding an ancient river channel is the holy grail of placer gold exploration. If you’re in a gold-bearing area, old river channels can hold the kind of unlocked treasures that dreams are made of. Prior to the gold rushes of the mid-1800s, you could have walked up to a virgin stream with untouched gold nuggets sitting in the bottom. That is an extremely rare discovery today. Ancient river channels are hard to find but that’s why many channels are still undisturbed waiting for a smart prospector to discover them.
There are undiscovered paleochannels hidden to the naked eye all over the goldfields of North America, and other gold placer districts all over the globe. Advances in technology have aided in the discovery of these ancient channels, some of the tried and true methods still hold true today. How can you find something that you can’t see? This article will explain what paleochannels are and how we find them.
Paleochannels have many names. Such as:
Tertiary Channels
Periglacier Channels
Quaternary Channels
Ancient Channels
Paleo-gulches
Ancestral Rivers
Paleo-valleys
Buried channels
Stranded Channels
Inverted Paleochannels
Abandoned Channels
Ancient Rivers of Gold
Some of those terms refer to specific ages or other characteristics of the channels but they all basically refer to the same thing, river beds that have run dry and have been buried by sediment. There are lots of reasons why a river might change its course but the end result is more or less the same.
The definition of a paleochannel is:
a remnant of an inactive river or stream channel that has been filled or buried by younger sediment
Paleochannels can form in many ways. Either slowly over time or abruptly from things like tectonic activity, glacial dams, mudslides, volcanic eruptions, or by human intervention.
When reading about ancient channels there are terms that often come up such as preglacial, periglacial, tertiary, quaternary, and many others. Those are just adding a time period to the formation of these channels, they’re really all the same thing. “Tertiary channels” are often written about in western North America, but that just means they are ancient channels that were formed during the tertiary period. The tertiary period ranged from the time of the extinction of the dinosaurs (the K-T extinction) about 66 million years ago to the beginning of the ice age period about 2.6 million years ago.
The quaternary period is more recent ranging from 2.6 million years ago to today and has experienced several periods of glaciation. The Pleistocene and Holocene are also part of the Quaternary Period.
Preglacial and Periglacial refer to the timing of a channel in relation to a glacial period. Approximately a dozen major glaciations have occurred over the past 1 million years, the largest of which peaked 650,000 years ago and lasted for 50,000 years. The most recent glaciation period, often known simply as the “Ice Age,” reached peak conditions some 18,000 years ago before giving way to the interglacial Holocene epoch 11,700 years ago.
People sometimes get hung up on some of the terminology but whether a channel formed in a specific time period doesn’t make a huge difference to a placer miner. To be honest, when it comes to placer exploration, every ancient channel in a gold-bearing area is worth exploring, regardless of the age. A channel that only formed 100 years ago has the same likelihood of containing placer gold as one that formed 3 million years ago during the tertiary period. What really matters is whether the creek that formed the channel carried gold or not.
A familiar feature that resembles a paleochannel is an oxbow lake. These formations occur when a meander in a river gets cut off. You can observe oxbow lakes in many places, eventually, the lake will run dry and you’ll end up with a buried paleochannel. Oxbows can be gold-bearing even though they are not considered a “paleochannel”. Streams meander and change course frequently, in some places you can watch oxbows forming in near real-time.
Rivers and streams form all kinds of channels, for different reasons but they all have some things in common. A paleochannel is really the same thing as the rivers and streams that you see today, it was just rerouted and buried by sediment. When prospecting a paleochannel the same rules apply, the old river had inside bends, exposed bedrock, boulders, etc.
The character of a Paleochannel
There are several characteristics that make up a paleochannel. They can tell you a lot about its setting and the depositional environment, which in turn can give you a good idea if placer gold will be present or not.
Those characteristics are width, sinuosity, thalweg, slope, and age.
Channel width is an important metric for characterizing streamflow and depositional environment. The width is measured perpendicular to the centerline from bank to bank. The width can tell you a lot about a channel, especially when combined with other factors.
Sinuosity is the measure of how much a channel meanders. The sinuosity is measured by dividing the channel length by the straight line distance down the valley axis. You can infer the slope, transport capacity, and other factors from the sinuosity alone. More sinuous channels, those that meander a lot, occur on gentle slopes, the straighter the channel, the steeper the slope.
Thalweg is a funny word that comes from German meaning “valley way”. Don’t ask me why we use a German word but we do. The thalweg is simply the deepest part of the channel which is colloquially referred to as the “gutter”.
The slope, along with the width and sinuosity is used to calculate the ability of a channel to transport sediment. The slope is the average angle of the valley in which a stream lies. From a placer standpoint, we know that if our sluice box is too steep the gold won’t catch in the matting, if it’s too shallow the sediment won’t clear. A creek is no different.
The famous California goldfield geologist, Waldemar Lindgren studied channel slopes in relation to placer deposits in BC, California, and the Yukon in 1933. Lindgren determined that the optimal slope for placer formation is a 30-foot drop to the mile or 6 meters per kilometer which calculates out to a ratio of 0.06 or 0.34°. The Klondike’s Bonanza Creek averages 50 feet to the mile (0.01). Dominion Creek, in the Klondike, averages .02; there are slope breaks to 0.01 and that is where most of the gold was trapped. Almost all placer-bearing channels in BC range from a slope of 0.02 to 0.10.
Types of Paleochannels
Bench Channels occur on high benches or terraces above a current river. The flat benches represent the ancient valley floor. As river valley systems evolve the river cuts deeper and deeper into the bedrock leaving old channels high and dry. If you retrace the history the old river would have sat at a higher elevation than it does today.
Bench channels typically have a single channel and aren’t braided. The slope, sinuosity, and width tend to be similar to the current stream. These paleochannels typically run parallel to the existing steam but not always.
High benches can be observed in many river systems in western North America and many rich paleochannels have been discovered and mined within them.
Buried Paleochannels within modern valleys can be adjacent to or underneath an existing alluvial stream within the same valley. The extent of these channels is difficult to determine due to the complexity of their setting. These channels can be very deep and sometimes buried under several different glacial or fluvial events. The sinuosity, width, slope and direction often mirrors that of the existing stream but not always.
These channels are difficult to mine due to the continual flow of water from the existing stream. A bedrock drain or lots of pumping is often required.
A great example of this type of paleochannel is the Wingdam Mine on Lightning Creek in the Cariboo. Omineca Mining and Metals has found a unique solution to mining their deposit, check out the video below.
Paleogulches are another type of ancient channel. They are gulches that dried up and were buried by sediment. Paleogulches have steep sides and a relatively steep gradient. They have low sinuosity and a relatively straight path. The channel often runs on or near bedrock due to the steep slope of the thalweg and high flow rate.
Gold in these deposits is usually coarse and hasn’t traveled far from the source. Paleogulch placers, like other buried-channel deposits, are typically covered by thick deposits of till, glaciofluvial deposits, and glaciolacustrine sediments.
Paleotrunk-valleys are similar to the paleogulches above. They are trunk valleys that were abandoned and filled with sediment. These deposits are often hundreds of meters wide and quite deep. Paleotrunk-valleys typically no longer have a stream running in them and tend to be totally filled with sediment leaving little to no surface expression.
The Bullion hydraulic mine near Likely, BC is an example of this type of paleochannel. The Bullion Pit produced over 120,000 ounces of gold over the lifespan of the mine. The famous Mary Creek deposit is another example of this type.
Inverted Paleochannels form in a totally different way. They sit high above the surroundings but not on a bench, and not in an existing valley, at least not usually. This type of paleochannel forms when a river valley is filled with lava from a volcanic eruption. The resulting lava cools into basalt and forms a protective cap that is much stronger than the surrounding rock. The result is that over time the surrounding rock is eroded but the basalt is much more resistant and protects the sedimentary rock below it, leaving a high ridge where the river used to be.
Inverted channels are more common in the southwestern United States in places like Utah, Idaho, and eastern Washington. I’m not aware of any gold deposits from inverted channels but it is possible.
An important note about paleochannels: not every channel contains gold. There are paleochannels all over the earth, only ones in gold-bearing areas are significant for gold prospecting. After all, the ancient channel won’t contain gold unless the creek that created it carried gold in its sediment load.
Most parts of North America have been exposed to glaciation at some time or another. The more northern parts have seen extreme transformations of the landscape due to glaciers scouring the surface of the earth. This makes finding ancient channels a lot harder.
It’s rare to find an entire river system entombed in sediment in BC, for example. What you usually find are fragments of ancient rivers. Some can be only a few hundred meters long while others can stretch for 10s of kilometers. There are often pieces missing due to glacial or other types of erosion.
The job of the prospector when exploring an ancient channel isn’t too different from a crime scene investigator on CSI. You’re dealing with fragments of channels and what you want to do is add up the clues to reconstruct the crime scene. Modern prospectors use a variety of tools to put those clues together.
How to find a paleochannel
Now we know the types of channels and a little bit about them. How do we find a paleochannel that we can mine?
One of the tell-tale signs of a paleochannel is finding compacted river gravels in an exposed bank. If you’re in the right place and you’re lucky enough to come across river gravels in an exposed bank you could have discovered an ancient channel. Old river beds have certain characteristics that differ from other materials that you’d often see in an exposed bank.
An old river bed will have the following features:
Rounded river rocks
Densely packed
Sorted by size
River beds look different than glacial till, for example. Till will generally have different sized rocks randomly jumbled together, not sorted. Till can have rounded rocks but they are usually accompanied by angular rock of different sizes. A river bed should have bigger rocks at the bottom and finer, rounded gravels on top. River beds are packed together similar to the way that a brick wall is put together, everything fits together tightly with sand and gravel filling in the gaps. It’s not always totally obvious but if you see these signs it’s worth exploring further.
Spotty pay is another potential sign of a paleochannel. If there are sections of a creek that pay well and contain really good gold while other sections are barren that can be due to a rich paleochannel. Sometimes rivers don’t carry any gold of their own but redeposit gold from an ancient channel. It’s also possible that gold is washing down from a hardrock deposit, either way it can pay off big time to investigate spotty pay areas. The same is true when there are several creeks close together and they only have placer gold in a certain region on each creek. If the hot spots on several creeks line up there is probably a reason and it could be that the creeks all cut through a hidden paleochannel.
The old-time miners often discovered ancient channels by digging shafts by hand. Many channels have been discovered in this way. It’s not very effective by today’s standards but some people still use this technique. The presence of compacted river gravels underneath layers of sediment are a good sign that a paleochannel is present.
The old-timers would often dig numerous shafts looking for a channel and would dig a horizontal shaft known as a drift once a channel is located. That involves a lot of backbreaking physical work with a low chance of success but during the 1800s and early 1900s, there weren’t as many options available as there are today.
Here’s a great 5-minute YouTube video that describes what compacted river gravels look like, as well as some of the geology at play:
The modern prospector can benefit from advances in technology, especially computer mapping and GIS. Modern mapping tools such as Google Terrain maps can help to find the habitat where paleochannels are likely to be present. LiDAR and drone-based high-resolution terrain mapping can give highly detailed terrain maps which aid in locating favorable conditions for paleochannel exploration.
For example, river benches as described above can often be seen on topo maps. It’s unlikely to see a channel outright since they rarely have a clear surface expression, if at all, but you can narrow down the search area by looking at terrain that is favorable for channels to occur.
Once the search area has been narrowed down to a specific area more advanced techniques can be used to map the exact location and depth of a paleochannel.
There are several geophysical techniques that can map underground structures without having to excavate down to the channel level. Geophysics uses a variety of techniques to map the subsurface of the earth. Some work better than others for mapping paleochannels.
Magnetometer surveys have been used on many occasions to attempt to map ancient channels. A magnetometer is an instrument that measures changes in earth’s magnetic field. They are commonly used in hard rock exploration due to their rapid speed and relatively low cost. Magnetic survey results are usually presented in a map that looks like a thermal image except that instead of temperature you’re looking at variation in the magnetic field, measured in nano-tesla (nT). When exploring for a paleochannel the concept relies on trying to pick up the magnetic signature of concentrations of black sand. The survey usually involves recording measurements along lines perpendicular to the channel and looking in the processed data for anomalous magnetic highs where black sand concentrations are present.
Magnetic surveys have been used a lot in the past but have a very low success rate for mapping paleochannels. This is largely due to false positives from surrounding rock and weak concentrations of mineral sands. I haven’t seen any of these surveys that have actually been successful in locating a paleochannel on their own.
Ground penetrating radar (GPR) is another popular technique. GPR uses a system with two components, a radar source and a receiver. The GPR source emits radio energy of a specific frequency and the receiver records reflections of subsurface rock and soil layers. The survey is laid out in a similar way, with lines perpendicular to the channel.
GPR has also been used in many exploration programs with limited success. Some channels have been discovered in this way but GPR has a few drawbacks. The signal is attenuated by groundwater, clay layers, and permafrost. Under perfect conditions, GPR can map a channel but the data is often ambiguous and of poor quality.
Electromagnetic techniques such as resistivity have a much higher success rate but they have similar issues to GPR when it comes to groundwater. Geoelectrical resistivity tomography (GRT) surveys have a much higher success rate than GPR or magnetometer surveys. The way they image the channels is a bit vague but many channels have been found with this technique. GRT has a few drawbacks as well, conductive bedrock, groundwater, and other factors can lead to unpredictable results.
Sample Cross Section
Seismic surveys have the highest success rate for mapping paleochannels. Seismic works in a similar way to GPR but instead of radio waves it uses vibrational energy. There are two types of seismic used today. Refraction and passive seismic. Refraction surveys have been around for a long time and have been used to find many paleochannels with a very high rate of success. A refraction survey uses an energy source such as dynamite or a specialized shotgun to introduce energy into the ground. An array of sensors called geophones are laid out in a survey line to record the reflected waves that bounce back off the subsurface layers. The timing and velocity of seismic returns give information about the density of layers and their depth from the surface.
Seismic energy passes through groundwater, clay, permafrost with ease and if done correctly will accurately map the subsurface layers. The drawback to refraction seismic is the cost. It takes an experienced crew and expensive equipment to perform this survey correctly.
Passive seismic surveys are a new technique that has only started to be used in the last decade. The passive technique does not require an energy source and can be done with a much smaller crew at a fraction of the cost. Passive seismic is the new kid on the block but it has proven to be very effective at mapping hidden paleochannels. Passive surveys also remove the need to cut lines which lowers costs even more. More info on this technique here, bedrock mapping.
Once a channel is identified and the location is known, further testing is required. The above techniques are able to show the location, shape and character of a paleochannel but won’t give you any information about the gold content. For that you need to take actual samples.
Depending on the depth of the channel there are several options. If it’s shallow enough you can test with an excavator but that is rarely the most economical option. In most cases you need to drill.
There are several drilling techniques used in placer exploration and there are pros and cons to each.
Auger drills are popular among placer miners due to the relatively low cost and perceived sample size but they have serious drawbacks. Augers struggle with large rocks and boulders, and can’t usually penetrate bedrock. They also tend to ovalize the hole leading to sample contamination and material loss down the hole.
Sonic drills are the most effective option. A sonic drill uses a high frequency vibration to bore through soil and rock. These drills take undisturbed samples and can drill through gravel, boulders, and bedrock. You can’t beat the sample quality and efficiency of a sonic drill but the costs of this type of drilling can be quite high.
RC Drill in Action
Reverse circulation (RC) drills also work really well. These drills use a downhole hammer that pulverizes the rock and gravel into chips which are pushed to a collection cyclone at the surface using pressurized air. RC drills also work really well for placer exploration. RC drilling has been used to successfully map many hidden paleochannels in BC and the Yukon.
Rotary diamond drills can also be used with specialized drill mud. These are less common than RC or sonic but have been successful in some situations.
Once you have identified the places where paleochannels are likely to occur from topographic maps, conducted geophysical surveys to map the channel and taken drill samples to confirm the channel depth and gold grades you’ll have the information necessary to develop a mining plan. If the gold grades are high enough to profitably mine then you’re ready to start production.
Many of the richest placer mines in the world exist on paleochannel deposits. They are notoriously difficult to locate and prospect but the results can be extraordinary. Advances in modern technology give today’s prospector an advantage that wasn’t available to miners in the past. There are hidden paleochannels in every mining district and even in places that have been mined for over a century. Discoveries are being made in places that nobody thought to look at in years past. Keep your eyes open for indications of an ancient river channel, there just might be a bonanza sitting right under your feet.
Throughout mining history, there are stories of scoundrels, cheats, bandits, and liars. The gold rush towns had their share of bad actors but above everything else, there is one title that nobody wanted to have, “the claimjumper”.
In the world of mining, claimjumpers are the lowest of the low. During the gold rushes of North America miners traveled into areas where laws didn’t exist yet. In the California Gold Rush of 1849, the territory had no government, police or administration of any kind. Despite the lawlessness and disorder of the early gold rushes one thing was held sacred above everything else, the right of the miner to locate a mining claim and to hold it against all comers.
What does claimjumping mean? There are two forms of claimjumping but they both amount to the same thing:
Producing minerals from a claim that belongs to someone else
Attempting to seize the land on which another party has already made claim
Historically, stealing or mining ore from someone else’s mine was referred to as highgrading. While claim jumping referred to the actual seizure or taking over of someone else’s claim. Today the two terms are intertwined.
Claimjumping is illegal today just as it was in the mid-1800s and even before that. You can’t shoot a claimjumper anymore but the modern laws are quite powerful nonetheless. In British Columbia and throughout Canada you can face huge fines, jail time and being banned from the right to hold claims. As well as having to forfeit any ill-gotten minerals or profit. If, in the process of claimjumping, you break any environmental regulations or mining laws you will be on the hook for those penalties too. On top of that your equipment and even your vehicle can be forfeited if proven to be involved in the crime.
There are honest and dishonest forms of claimjumping in which the law does make a slight distinction. Honest being that you were unaware that you were engaging in claimjumping. The difference only applies in terms of repayment for the ore that was extracted, the fines and other penalties still apply whether you are knowingly claimjumping or not.
It’s difficult to find the information on Canadian claimjumping laws. Part of that comes from the fact that there isn’t an accepted term for the crime. In legal terminology claimjumping has been referred to by many titles including:
Mineral Trespass
Wrongful Abstraction of Ore by Trespass Workings
Wrongful Working of Minerals
Highgrading
Wrongful Interference with Personal Property
Wrongful Conversion
Trespass and Conversion
Willful Trespass
My favorite is “Wrongful Abstraction of Ore by Trespass Workings”, it has a certain ring to it. There are slight differences to some of those terms but they all point towards the same thing. Trespass and benefiting from something that doesn’t belong to you. Trespass is actually a complicated part of the legal system. There are different kinds of trespass. We are all familiar with what it means to trespass on private property but a mining claim isn’t necessarily private property. Perhaps we should clarify what a mining claim really is.
Trespass and Conversion
In Canada, and specifically in BC, mineral rights are held by the crown. The actual “Crown” in Canada is a story in itself but basically means that the mineral rights are owned by the people of British Columbia. When you are the holder of a mineral or placer claim, you lease the rights to those minerals for the duration of your tenure. From the issue date to the “good to date” of your claim the minerals in that plot of land belong to you and nobody else. Surface rights are a totally different story. Check out our post on Free Miners for more info on that.
Trespassing is defined as “the wrongful interference with one’s possessory rights in real property.” When it comes to claimjumping you are definitely interfering with the claimholder’s rights when you are extracting ore that belongs to them. The trespass itself is not listed as a crime under the Canadian criminal code, but it does allow the claimholder to sue the claimjumper for damages.
In Canadian law there are two ways to deal with the proceeds of trespass and conversion. The mild rule, and severe rule.
Under the mild rule, the guilty party has to pay the claim owner for the value of ore that was extracted. The costs of mining the ore, bringing it to market, etc are not included. This rule applies when the trespass (claimjumping) was not intentional.
The severe rule forces the guilty party to pay the realized value of stolen ore including the cost of mining.
Either way you have to pay back the claim owner for whatever gold you mined on his claim, the severe rule means that you have to pay the full value not accounting for the costs that you incurred in the process. The mild rule is quite lenient that way but you have to prove beyond a reasonable doubt that you commited the crime unintentionally.
There are plenty of examples of supreme court rulings where the trespasser had to pay back the claim owner for their ill-gotten gains. Here is an example from 1907 in the Yukon in which one miner produced ore an another miner’s claim and mixed the ore with his own.
Here’s some info on a more recent case in the Yukon. I actually worked with one of the miners in this story in Klondike back in 2010, I won’t say which one though.
Claimjumping supreme court cases are common in Alberta although the claimjumping takes a slightly different form. These cases are regarding mineral rights for oil instead of precious metals but the concepts are the same. In Alberta, mineral rights are divided by different sedimentary layers that contain petroleum. So different companies can own the mineral rights in the same location but at different depths. Due to the complexities of this system, companies drill into other company’s leases all the time.
The consequences of mineral trespass vary, but the Alberta Energy Regulator introduced a penalty of $50,000 per occurrence. In addition to the penalty, compensation is owed for the value of any minerals obtained during trespass. Alberta mineral trespass is treated the same in a legal sense as gold claims in BC just with a much higher frequency of settlements.
Miner’s Meetings
During the gold rushes you couldn’t file a complaint to any governing body. Miners took justice into their own hands and had a form of democracy called Miner’s Meetings. The meetings were notorious for their swift justice but they were considered fair. In order to participate in a miner’s meeting you had to be the holder of an active claim.
A journalist named Baryard Taylor gave this account of the situation in the California Gold Fields in 1849:
In the absence of all law or available protection, the people met and adopted rules for their mutual security rules adapted to their situation, where they neither had guards nor prisons, and where the slightest license given to crime or trespass of any kind must inevitably have led to terrible disorders. Small thefts were punished by banishment from the placers, while for those of large amount or for more serious crimes, there was the single alternative of hanging.
As gold rushes progressed further North the miners took their knowledge and customs with them. During the Fraser River gold rush, the miners brought with them knowledge of mining placer gold with long toms, rocker boxes and hydraulic mining as well as their own customary law that had spontaneously developed in the California Goldfields.
During the Fraser River gold rush each bar had it’s own set of rules which were democratically chosen by the miners.
The Daily Alta California published the laws passed by a miners’ meeting held on May 12th, 1858 on Hill’s Bar, Fraser River, which included:
Claim sizes were defined as twenty-five feet along the river bank’s high water line for each person.
Miners were restricted to to one claim by preemption and one by purchase.
Claims were “not considered workable” between May 20th and August 20th.
During the non-workable period the work requirement was removed.
During the workable times claims must be “represented”, or worked, within three days or they were otherwise free to be jumped.
There was a regulation declaring that any thieves or claimjumpers would be expelled from Hills Bar and lose their claims.
And anybody “interfering with or molesting any Indian” would be punished as “the community shall see fit.”
Just up the river at Yale, the rules were slightly different:
There was a rule concerned with equality, limiting miners from holding more than one claim.
A one-day work requirement every five-days was established.
The office of recorder was created to keep track of claim registration.
Proven claimjumpers were to be banished from the placers and have their claims and gold forfeited.
All along the Fraser, mining communities drew on norms established in California to regulate society on the lower Fraser. This community didn’t legitimate itself based on an external authority. Instead, the miners assumed their own legitimacy and authority.
Miner’s meetings progressed into miner’s boards which were legislated under the Goldfields Act in 1859. The miner’s boards stayed in place until 1888.
More remote areas still used the principles of the miner’s meeting since police presence and regulations were often slow to follow the prospectors. Here’s an account of the legal landscape in the notorious Circle City which is situated just over the Alaska border from the Klondike by Arthur Walden in 1896, two years before the brunt of the Klondike Gold Rush:
Here was a town . . . which had no taxes, courthouse, or jail; no post-office, church, schools, hotels or dog pound; no rules, regulations, or written law; no sheriff, dentist, doctor, lawyer, or priest. Here there was no murder, stealing, or dishonesty, and right was right and wrong was wrong as each individual understood it. Here life, property, and honor were safe, justice was swift and sure, and punishments were made to fit the case.
Eventually communities grew, the North West Mounted Police set up outposts and federal and provincial laws began to take over. The days of frontier justice faded into the background but many of the principles that the miner’s meetings established made their way into legislation.
Current Laws
In the United States many individual states have clear laws regarding claimjumping, or as it is now referred to “mineral trespass”. They vary from state to state but almost all have similar rules on the proceeds of mineral trespass.
For example when a willful trespass occurs in Colorado, the trespasser is not entitled to set off the mining costs. In addition Colorado allows punitive damages for “Willful and Wanton” trespass claims. Punitive damages are a fancy word for additional fines to punish the defendant for outrageous conduct. That is uncommon in Canada.
US penal codes clearly list claimjumping as a crime which isn’t quite as easy to find in Canada. For example in Washington state Mineral Trespass (RCW 78.44.330) is considered a class C felony which carries a punishment of up to 5 years in prison and up to $10,000 in fines
In British Columbia, claimjumping falls under our Mineral Tenure Act. There are two sections of the law that deal with claimjuping:
9(2)A person must not hand pan on a valid mineral title unless the person receives permission from the recorded holder of the mineral title.
As well as
28(1)Subject to this Act, the recorded holder of a claim is entitled to those minerals or placer minerals, as the case may be, that are held by the government and that are situated vertically downward from and inside the boundaries of the claim.
(2)The interest of a recorded holder of a claim is a chattel interest.
Punishments are listed under section 63 of the Act, which states:
63 (1) A person commits an offence who does any of the following:
(a)wilfully and without lawful excuse pulls down, defaces, alters or removes a staking or legal post, a legal corner post or other survey monument; (b)explores for, develops or produces minerals contrary to this Act or the regulations;
(c)knowingly makes a false statement or provides false information under this Act, or in a registration;
(d)offers for sale, or sells, a mineral title for a non-mining usage.
(3) A person who is convicted of an offence is liable to a fine of not more than $25,000 or to imprisonment for not more than 6 months, or to both.
The following activities are in violation of the Mineral Tenure Act and will result in criminal charges:
Panning on a mineral claim or placer claim without permission
Producing minerals or placer minerals from an active claim by any means, pan, sluice, shovel, dredge, or even your bare hands.
Removing rocks or minerals from a claim, either rockhounding or for any other purpose.
In addition to a potential fine of $25,000 or 6 months in prison, anyone who is proven to be claimjumping will lose their FMC and any claims for a period determined by the Gold Commissioner. That means that you can lose your free miner rights for life and no longer be able to own claims.
A person guilty of removing minerals from a claim is guilty of theft under the Criminal Code of Canada. Section 334 of the criminal code states that theft under $5000 carries a prison term not exceeding two years. For theft over $10,000, a prison term not exceeding ten years.
The Criminal Code of Canada has provisions for selling unrefined ore and specific laws regarding fraud of unrefined ore. If you are engaged in claimjumping it will be difficult and illegal to sell your ill-gotten gold. Precious metal assayers and buyers know these laws and will not accept placer gold unless you can prove the source.
394(1) (b) of the Criminal Code, makes it an offence for anyone to sell or purchase any rock, mineral or other substance that contains precious metals “unless he establishes that he is the owner or agent of the owner or is acting under lawful authority”.
The punishment for violation of that part of the Criminal Code states:
A person who contravenes subsection (1), (2) or (3) is guilty of an indictable offence and liable to imprisonment for a term of not more than five years
In addition to the fines and penalties for those caught in the act of claim jumping you can also be on the hook for any illegal mining or environmental practices that you conduct. The mining and environmental laws are extensive but I’ll list a couple common ones here.
There are a lot more environmental inspectors than there are mining inspectors. They are likely the ones to catch you.
The most common fine is under Environmental Management Act Section 6(3) which states:
a person must not introduce or cause or allow to be introduced into the environment, waste produced by a prescribed activity or operation.
The standard fine for a small highbanker or river sluice is $575. You can see a list of some of the most recent fines here.
In his book Poachers, Polluters and Politics: A Fishery Officer’s Career, former fisheries officer Randy Nelson recounts on an incident where he caught some claimjumpers operating an illegal dredge in the Cariboo:
It was two days before Christmas, I had just caught up with a pile of paperwork and I decided to go for an afternoon patrol North of Quesnel. I crossed the Cottonwood River on Highway 97 North and climbed the big hill from the river valley. I glanced down a side road and saw a parked pickup truck with fresh footprints leading away from it down the snow-covered road.
It could have been any number of activities but I decided to check it out. I walked through the deep snow for over a mile, climbing along the upper banks of the Cottonwood River. The tracks finally turned off and headed downhill toward the river where I could hear a small motor running. Surely no one would be dredging for gold in this salmon stream in the winter?
They were so surprised I’m not sure their wet suits remained dry. They said, “Don’t you ever take time off? We never dreamt you’d be working this time of year or walk into this spot” I took it as a compliment and made sure to to pass that information on to the judge.
There wasn’t much the two of them could say. They were caught and one had a previous conviction. I seized everything at the site, including their dredge, gold dry suits, diving gear and tools. I loaded whatever I could carry and walked out with them out to their vehicle. I told them I would give them a ride home because I was seizing their truck too. Merry Christmas!
It would have taken several days to dismantle and pack the dredge out from the river and it was two days before Christmas so I hired a helicopter to sling the gear out from the river. The two miners were convicted in court and received fines of $3,000 each plus forfeiture of $4,000 worth of gear.
That was a bad day for those two claimjumpers. In situations where you are running bigger equipment that requires a Notice of Work permit (NOW) you can get into a whole bunch of fines and penalties. In a recent Mines Act decision a mine in the Cariboo was fined $28,000 for operating without a proper permit.
How can you avoid claimjumping?
Just like any other law in Canada your ignorance of the law does not exempt you from it. That means that if you are gold panning, mining, rockhounding, or producing mineral of any kind it’s up to you to understand the laws and claims in that area.
Before you go out gold panning make sure that you’re not on someone else’s claim. The best place to check is the BC MTO website (mtonline.gov.bc.ca). That is the website run but the Mineral Titles Branch of BC’s Ministry of Energy, Mines & Petroleum Resources. The MTO maps are a bit daunting to a newcomer but all the information is there.
Local mining laws can take a bit to understand at first but you can always email or phone the MTO with any questions.
Claims are rarely marked in the field since BC now has an online staking system. If you are out gold prospecting a GPS is just as important as your gold pan these days. Make sure your maps are up to date and you know how to use your GPS.
The best place to prospect is a panning reserve, your own claim, or a claim where you have permission from the owner. If you aren’t certain that you’re operating legally then don’t start digging.
In summary, these are the penalties for claimjumping in BC:
Repayment for full value of the ore that was stolen
$25,000 fine or 6 months in prison; Mineral Tenure Act
2 to 10 years in prison for theft, plus summary conviction; Criminal Code of Canada
Loss of FMC, potentially for life; Mineral Tenure Act
Up to 5 years in prison for selling ore without proving the source; Criminal Code of Canada
Fines for violation of mining and environmental laws
Possible confiscation of mining gear and your vehicle
Modern-day prospectors and miners work hard to explore their claims. It takes time and money to locate a claim, stake it and begin exploration work. There are hurdles to operate a mine legally. Most miners put a lot of effort into setting everything up properly so that they can mine and reap the benefits of their hard work. Claimjumpers try to cut corners and steal resources from the people that have done the hard work. There’s a reason that nobody wants the earn the title of “claimjumper”.
You can’t be banished from the land or hung you like they did during the gold rushes but you will have to repay all the gold you steal and face penalties for your crimes.
In the spring 2016 I was hired to help on a large scale placer exploration program in the Yukon. The property is located in a part of the Yukon where very little placer activity has taken place. We had a small team of three guys and a lot of equipment.
The Yukon, like BC and Alaska, was explored and settled by prospectors in the late 1800s. The Klondike gold rush of 1896-1899 was the largest and most storied gold rush in history. It is estimated that over 100,000 gold seekers migrated to the Arctic territory from places like San Fransico and Seattle. The Yukon’s economy is still driven by mining and the local culture is completely saturated with gold rush era influences. A great example is Yukon Gold, the flagship beer of the Yukon Brewing Company, has part the the famous poem “The Cremation of Sam Mcgee” on the label.
The Robert Service poem is part of Canadian heritage and is part of the school curriculum across the country. After several trips prospecting in the Yukon it takes on different meaning than a quirky poem that you have to read out loud in grade three.
There are strange things done in the midnight sun
By the men who moil for gold;
The Arctic trails have their secret tales
That would make your blood run cold;
The Northern Lights have seen queer sights,
But the queerest they ever did see
Was that night on the marge of Lake Lebarge
I cremated Sam McGee.
On a Monday night in early April at 9PM I received a phone call. “Your flight leaves Vancouver in the morning for Whitehorse. We’ll fill you in on the way.” Typical for this kind of job. I had been expecting the call for a few weeks but it still caught me a little off guard.
Approximate location of the camp
On arrival to Whitehorse I had been advised that one of our crew would meet me there. I had never met this guy before but I knew he was an old placer miner. The Whitehorse airport is small and we were the only flight. There were several people waiting for passengers so I had to guess. I noticed a guy wearing rubber boots and looked like a placer miner to me. I introduced myself and luckily he was the right guy.
Aerial shot of the placer claims
We spent a couple hours rounding up additional gear before catching the charter to the camp. I was crammed in a Cessna 206 with the pilot and a bunch of gear. We had all the 5 gallon pails we could buy at the Whitehorse Home Hardware, drill bits, my gear, a 45 gallon drum of diesel, and a bunch of other stuff.
Soon after leaving Whitehorse we flew over Lake Lebarge which is the location where Sam Magee was famously cremated.
Lake Lebarge
The pilot warned me that the runway was a little rough. We took a couple passes and lined up to land. It was rough all right, made of gravel and ice, we bounced so hard that we almost took off again. My two crew members were waiting to greet me at the plane. They were excited to meet me, especially since I brought a 24 pack of Kokanee. The beer didn’t last the night.
The two guys that I was working with had already been there for several weeks. It’s a rustic camp and there was no water available for showers or anything. I thought my team mates smelled pretty bad when I arrived but after a few days we all smelled the same. A few weeks later temperatures were high enough to rig up a pump system and a shower. This is not the first rustic camp that I’ve been to where we have satellite internet and no showers. These are interesting times to be an explorer.
The camp consists of three canvas tents, a seacan and an outhouse. The tents have “hippy killer” stoves that burn wood. They work well most of the time but you have to chop wood every time you want heat. Wood floors had been constructed which is certainly a luxury over dirt floors. Our kitchen is in the same tent as the office. There’s a propane stove/oven and plenty of food. We used paper plates so we wouldn’t have to wash them, they worked great for starting the stoves when we were done with them.
The main goal of this program was to carry out a sampling over the property. The drilling and sampling will allow us to find and evaluate economic placer deposits. Our primary tool was a Nodwell mounted drill with a 12″ auger. Some areas were sampled by excavator where the ground was not suitable to drill. Material was collected with the drill and excavator and processed on site with a small wash plant. In addition to gold values we developed an understanding of bedrock depth, characteristics and the distribution of placer gold.
Our Auger Drill
Most of the gear was brought in on the winter trail. The trail is about 100km from the closest dirt road and requires the ground to be frozen and snow covered. Our two Nodwells, Toyota track truck, quads, fuel and everything was brought in over the trail. With a light load it can be travelled by snowmobile in about 4 hours each way. With the heavy equipment it takes 3-4 days. There are impromptu camps along the way but nothing with heat and very little shelter. The guys were prepared of course.
On the trail
Nodwells are pretty cool machines. They were invented in the 1950s to service the oilfields of Northern Alberta and the Arctic. These beastly machines have super wide tracks to spread their weight on soft terrain. They have a unique drive system that uses rubber tires on the track. Operating one is similar to driving a tank. You pull levers to brake the track on either side. We had two of them, a big Nodwell for the drill and a smaller one for a support vehicle. The Nodwells have a lot of character, check out the yellow plywood interior and gun rack. The small one is named “Picasso”. The photos will expand when clicked.
We located and mapped several trenches that were used for ground sluicing dating back to the 1898 Yukon gold rush. The old timers diverted the creek to flow through hand cut trenches. The water was then controlled via a series of gates to strip away overburden. Sort of like hydraulicking. There’s not much left of the old workings today but it gives us an idea of where the pay streaks are.
Old Timer’s Trenches
Sampling is key to any placer operation. Sloppy or inadequate sampling spells the death of many mining operations. After all you wouldn’t get married without going on a date first. We collected samples with a rugged 12″ auger drill. Each sample had a set depth interval and a measured volume. With accurate measurements we can extrapolate the sample data to evaluate the deposit over large areas. For example if we sample 500mg (1/2 gram) from 10 pails of material, that equates to just over 3 grams per cubic yard. We did have some just like that, and better.
Fresh Drill Samples
After collection by the drill our samples were run through a mini wash plant. We were using a cool machine called “The Prospector” by Goldfield Engineering. The Prospector uses a water driven pelton wheel to create a vibration. That’s awesome because all it needs is a 2″ pump to run. The wheel rotates an eccentric weight similar to the way the a cell phone vibrates but on a larger scale. Using this machine I processed over 15 cubic yards of samples over 7 weeks.
The Prospector really eats through material. The shaker screen breaks it up almost as fast as you can feed it. It struggles when there is a lot of clay though. After each sample interval is run a cleanup is necessary. With this machine it’s a quick procedure. The concentrates from each sample are panned out with a gold pan. The gold is then dried out and weighed to be used in grade estimates.
As the summer solstice approaches the days get longer in the Yukon. In the summer the sun does not set in the Arctic it is after all the land of the midnight sun. The lack of darkness takes a little getting used to. In early May we had a couple of Northern lights shows that were pretty good. At that time there was about 2 hours of darkness where the Northern lights were visible. A week later it would no longer be dark enough.
We encountered few animals on the trip. This is described as a “hungry” part of the Yukon. One bear tried to enter our camp. It was a very large black bear, the electric fence slowed him down but it took a few bear bangers to scare him off. A huge mangey wolf casually pranced right in front of us one night. All the animals are big in the Yukon. Even the mosquitoes. They are so big that they often get up and fly away after you swat them. Unless you are willing to really smack yourself in the face, they are not going to die.
For some samples we had to use the excavator. The auger drill does not work well in areas where the permafrost has melted. We tried a few spots and the mixture of water and loose gravel would not stay on the auger flights. The excavator does not have that problem since it scoops up a bucket full of material, water and all. We used a huge 4″ pump to drain the holes first then sampled the bedrock and regolith with the hoe. The samples were of course put into pails and we measured the volume before processing.
We had a few other machines to help out as well. A couple of bulldozers, some quads, a side by side and a ’96 Toyota pickup with tracks instead of wheels. We took the tracks off once the snow was all gone using the hoe to lift the truck. Why bother with jacks when you have those Tonka toys kicking around.
The winter trail conditions rapidly deteriorated as the weather warmed up. The ground here is like muskeg with lots of water and mud. Just about everything got stuck at some point, except for the Nodwells. We had to cross a few creeks, mud and sometimes straight trough the trees.
The pursuit of gold will make men do strange things. In our case it involved a ton of work travelling over unforgiving terrain to drill holes down to bedrock. Our persistence and determination paid off though and we discovered a pay channel that extends over much of the drilled area. It is going to take some more work to map out the full extent but we already have clear evidence of a great deposit.
After 50 straight days it was time to go home. Our ride out was a DHC-3 Turbo-Otter, an impressive aircraft designed by de Havilland, a Canadaian company, in the 1950s. The Otter took our whole crew and all our gear without any issues. The turbine engine gives it the STOL capabilities to takeoff and land in a rugged bush airstrip like the one in this camp. We stopped along the way to drop off one of our guys and pick up some much needed beer before landing in Whitehorse.
I had a wild night in Whitehorse to close off the trip before heading home to BC. It was a good time in the bush but it is nice to return to the comforts of modern civilization.
In the summer of 2010 I was hired to work with a team to find hard rock gold in the Klondike. We explored a group of claims on the Indian River.
My crew stayed at a camp operated by a character called Big Al. That name might sound familiar because he has been featured on the popular TV show Yukon Gold on the History Channel. Of course at that time we had no idea he was going to be a celebrity. During the trip we heard a rumour that Hoffmans working a few claims over were filming for a TV show, it turned out to be the hit series Gold Rush on Discovery. We were surrounded by gold mining TV stars but didn’t know it yet.
Klondike Tailings Piles
The Klondike is a place that has a very storied history and was the site of the greatest gold rush of them all. California, Oregon, and British Columbia had their gold rushes and stories but the Klondike was like no other. Between 1896 and 1899 over 100,000 adventurers made the journey from all over the world to the largely uninhabited Yukon territory in search of gold. What made this rush different is the long journeys and overall inexperience of the Argonauts. At the time of discovery El Dorado and Bonanza creek were the richest creeks in the world. Some claims on El Dorado were getting $27 to the pan once they hit the pay streak. That is equivalent to about $750 per pan in today’s money.
My team met up in Whitehorse the capitol city of the Yukon Territory in early August 2010. We then rounded up some remaining gear and drove in a rented truck up to Dawson City. As you arive in Dawson City you can see the remains of over 100 years of placer gold mining. Before you reach the town you can see large tailings piles lining the sides of the highway. When looked at from above they look like something that was produced by a giant insect. The tailings piles were put there by humongous dredges that scoured the Klondike drainages until 1966. It is estimated that each of the dredges were producing as much as 800 ounces of gold per day!
Aerial View of Klondike Tailings
Dawson City is a cool town. The residents have maintained the look and feel of Dawson’s heyday during the Klondike gold rush. The streets are dirt with wood plank sidewalks. Most of the buildings are original in the downtown area and many commercial buildings have the false front that was the norm during the gold rush era. There is even a law that all signs have to be hand painted.
There are no corporate stores or businesses in Dawson. Everything is locally owned and operated. Some of the original establishments from the 1890s are still in operation today. Diamond Tooth Gerties is one such establishment which offers games of chance and nightly can can dancers 7 days a week. Anouther is Bombay Peggy’s which operated as a brothel during the gold rush. It has turned into a classy bed and breakfast now.
My Crew posing with the Can-Can girls
Dawson has several historic bars as well. One such bar is the Downtown Hotel. We stopped in there one night after visiting several other bars and took part in a local tradition. It is called the Sourtoe Cocktail. Only one of my crew was willing to take the shot with me. The Sourtoe Cocktail is a shot of Yukon Jack whiskey taken with an amputated human toe in the glass. They keep the toe in a jar of salt above the bar. Apparently the tradition started with a bootlegger losing his toe due to frostbite. I was informed that this was their 6th toe which makes you wonder where they new ones came from.
The Bonanza Creek Road is the main access to Indian Creek. Along this historic route there are plenty of relics of past mining adventures. Most notably the historic Dredge No. 4 which mined Bonanza Creek until 1959. There are other dredges as well and plenty of old heavy equipment that was abandoned by miners of the past. There are abandoned bulldozers, excavators, trucks and other random big machines. There is such a surplus of iron that many bridges use large dozer shovels as retaining walls.
Dredge No. 4
We were tasked with finding the source of the placer gold in the Indian River. We stayed at Big Al’s camp and were exploring mineral claims that overlapped his placer claims. His knowledge of gold bearing benches as well as historical research was very important in our search. Likewise our findings were beneficial to Al in exploring new placer areas. Most of our time was spent exploring old miner’s trails on quads and by foot. I’d be lying if I said it wasn’t a great time.
We came across several old mine shafts and evidence of placer mining was everywhere. My crew participated in some of Big Al’s cleanups too. It was exciting to see the amount of gold that he was pulling out. We participated in all the steps of his cleanup process from cleaning the sluice to the concentrator jig and so on. At each stage a fair amount of rum was consumed it seemed fitting when surrounded by hundreds of ounces of gold.
Yup, that’s exactly what it looks like.
In our hard rock exploration we employed several techniques utilizing traditional prospecting as well as soil sampling and statistical pebble counts. The soil sampling was conducted with helicopter support which made it a lot easier. We were bagging close to a hundred samples per day each which was more than we could carry in the bush. At the end of the day we’d chop out a helicopter landing area and radio the chopper. Then we’d pick up the samples that we cached during the day. Hard work but a lot of fun too.
We spent a total of six weeks prospecting the area. We took a lot of samples to be sent in for assay from all over the claims. Prospecting in the Yukon is similar to BC, there is not a lot of exposed rock around. Unlike the barren lands of the North West Territory and Nunavut there is plenty of forest and vegetation covering the rock. We spent a lot of time in the helicopter scoping out rock outcrops.
There seemed to be a correlation between the garnets that were showing up in the placer operation and high grade gold. When the placer miners hit the paystreak they got a lot of garnets with it. We started prospecting up a creek called “Ruby Creek” assuming it was named for the abundance of garnets. The hunch turned out be be right. We chased the garnets up to some large outcrops near the top of the mountain. The samples contained a lot of garnet but not a lot of gold.
From an old mineshaft that we found near a cabin we discovered that the miners hit a layer of pure quartz conglomerate. And it was loaded with gold. We then knew what to look for. The search for the source of the Klondike gold continued for several weeks. We encountered giant moose, grizzly bears, Northern Lights and some great people. On several occasions we thought we found the fabled mother lode but the samples returned disappointing assay results. Some of the more random samples showed the highest grades. They say gold is where you find it. We did not find the source of the klondike but we did manage to have a great time and got paid for it.